
To have a look at these previous scratchbuilding articles
you may go here for the in-progress post:
And here for the finished scratchbuilt model post:
As mention in those postings, during the construction of the
scratchbuilt model Jim Schubert from the Pugetian Irregular Dominions sent as a
gift the kit, for which I express again my deepest thanks.
Being the kit from circa 1970, I must repeat here what a
nice job it indeed is, how detailed and well-thought. The kit caters for the
Hisso and radial versions and has decals for both of them. Being
injection-molded, the small parts and the small diameter structure is rendered
well, but a wee bit on the coarse side. Nevertheless, there is a great deal of
detail and all parts are nice. Some bits have minor flash and a few parts are a tad rough, but the whole works very well for any real modeler.
Why endeavors like this, which produced kits of this quality
an appeal of relevant subjects of the best era of aviation ended up folding, is
a mystery to me, and a sad one. For its time and for today, this is a very nice
modelers’ kit. I compliment the maker who I understand was from the Washington
State area.
The many parts -with ingenuous wheels- are complemented by
nice instructions and the said extensive decals. I can still see the kit pop-up
around here and there in auction sites, and a few online builds. I only regret this company is
no more: civil subjects of the golden age properly researched and well executed
for a reasonable price are not many.
Thanks, again, to the maker, for giving us this treat.
I am quoting here Jim Schubert in his posting to the wing of
peace forum:
“The original manufacturer of
these kits in the early seventies was Vic Seeley, a Seattle area enthusiast and
model builder, who lived in the village of Greenbank on Whidby Island; thus the
name. The original kits were packaged in a very stout, plain, end-opening
cardboard box with a Xerox profile print glued on the top. The bagging came later and is the way Tom Young was last producing them
under his Model Aire International brand. Greenbank Castle’s second kit
was to have been a 1/72 Gee-Bee R-1/R-2 but it never got past the preliminary
mastering stage when Vic ran out money and enthusiasm for kit manufacturing.”
This newspaper article gives a nice view of the pursuits and vast aviation knowledge of Mr. Seeley, the kit designer:
http://www.southwhidbeyrecord.com/lifestyle/21643934.html
This newspaper article gives a nice view of the pursuits and vast aviation knowledge of Mr. Seeley, the kit designer:
http://www.southwhidbeyrecord.com/lifestyle/21643934.html
This is Jim’s own rendition of the kit:
I am not yet quite decided on which specific plane should I build, the Colorado Airways of the kit's decals or a Canadian M-2 that needs a few mods. We'll see.
I’ll be posting as usual the photographs with comments as I
go
The kit contents:


Even the tiny navigation lights are represented in the kit:
 As per instructions (and photos!) the doors were removed from one side to the other, engraving the new ones and sanding down the existing ones:
 The tail surfaces are a bit thick, although not overly so. Instead of replacing them (to preserve the character of the review) I just thinned a bit their leading and trailing edges:
 Again as per instructions for the Hisso version the nose sections were removed:

 Arguably the only sort of serious issue with the kit: the wing is molded as one part and there is some shrinkage visible under it in certain lighting conditions:
 My planned approach to this is sanding the wing's underneath flat vigorously, cut and engrave a thin new surface and cyano-glue it, reestablishing the locating holes, aileron lines, etc. Here another view showing the shrinkage to better effect:
 A generic view of the parts for the Hisso version:
 The instrument panel and structure with pedals is molded so the "flat" part of the tubes is facing the view:
 The back view shows that the other side of the structure is better showing the curved-section tubes:


 A new wing intrados was prepared:
 The sanding of the kit's wing intrados took a bit, at this stage still some areas are concave:
 Wing finally sanded flat and scratchbuilt surface ready
 At this stage I remembered a method that I used successfully on vacuformed parts: masking leaving the "ribs" space and then heavily prime to build-up relief:
 And it worked. The masks are removed:
 And then some details are enhanced and the leading edge is cleaned. A light sanding will later on soften the strips edges:
 The instrument panel and seat are ready to install. The stubs for the seat had to be supplemented as they are too short. Curiously enough, the kit's instrument faces even have some detail on them -not visible in the photo- and the seat has also surface detail:
 The control surfaces have the control horns molded in:
 but I removed them:
 separated the control surfaces:
 cut notches in the proper locations:
 and installed metal control horns:
 The parts are then re-glued at a more realistic angle. I did all this only to please my friend Alain Bourret Poirot, who suffers of a bit of obsessive-compulsive disorder, which he calls La Maladie du Modélistes. As you can see the fuselage halves have been glued enclosing the interior bits:
 The fuselage will need some minor filling and sanding at the seams, and so will the alternate nose provided in the kit:
 The nose piece as seen here shows squared top corners, instead of the rounded corners needed to match the fuselage, so they have to be sanded:
 A bulkhead is devised to separate the engine module from the cockpit:
 The nose is then glued, the fit is good but again those top corners will need to be rounded:
 The fit at the bottom and sides is good too:
 Little nicks on the parts can be easily patched with some scrap styrene and later sanded to proper contour:
 The skis are made according to actual photos of the machine intended, even if I am not sure at this point that this will be my choice:
 A niche is carved in the area of the stab that meets the fuselage, to "sink" it a bit further thus providing a more realistic seating of the part:
 Even if not sure about the final subject choice, I started to make the skis, just in case:
 As per instructions, for this version the foremost diagonal tube of the cabane structure is removed:
 The skis in progress, some puttying on the fuselage:
 Decals designed and printed:
 Work on the skis continues:
 The build so far:
 An airfoiled strip was sanded to half a teardrop shape at its end, then this cut to make the door handles:
 The landing gear is in place (all holes were more deeply drilled following the kit's marks). The parts are kind of fragile, be careful. I had to fiddle a little with the wheel axles that thread inside the legs, managed to brake an axle four times, but got it in position at the end:
 Painting begins:
 Decaling begins:
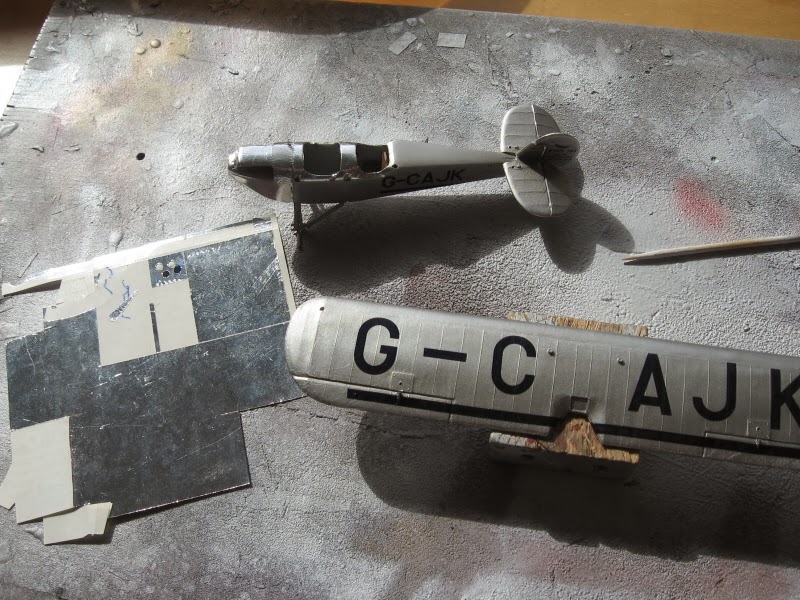
 Metal paneling is done with metal foil:
 Sections are measured, cut and applied. A kinda tricky product:
 Now the "swirl" pattern decals are applied, and later rows of Micromark "rivet' decals:
 Control cables being added, prop and spinner ready, nav lights being painted:
 Skis ready; cabane, radiator, oil cooler, stabilizer struts, engine parts, all in place. Missing in the image are the wing struts and nav lights:
 The wing is given its "metal" panels too:
 Then the aileron rods and the transparent inspection panel located in the wing cut out are added. The wing is glued on its supports:
 The wing struts were then glued, and they fitted perfectly, all of them. Notice that the struts have one end that goes in the wing socket with has a sort of spherical ending, while the other pin at the other end is normal. I never, ever, had in my modeling life a group of struts that fitted so well, without the minutest swipe with the sanding stick.
Once the skis were glued their ancillary strings and springs were added and then the nav lights and the prop, but for that you will have to go now to the finished model posting...


The kit's parts for the Hisso version are presented, their overall fit is good:


I cut the frame:

Then reversed it and re-glued to the panel:


Once the skis were glued their ancillary strings and springs were added and then the nav lights and the prop, but for that you will have to go now to the finished model posting...
Nice to see these oldies built. Armando Gil.
ReplyDelete