
Bush planes are the sort of renegades -James Dean-types if
you like- borderline cases of the aviation world. There is something romantic
about them and the environment they usually operate in.
The Bellanca CH-300 is another versatile 1/72 scale model of
the expanding range of Khee-Kha Art Products from Alaska.
It is a vacuformed kit with resin accessories of
extraordinary quality for which a pair of floats can be purchased as an
aftermarket part form the manufacturer (Edo K-4650 in this particular case, there
are others types produced by Khee-Kha).
This kit will allow you to build a number of options, since
it comes with two cowls, two pairs of wheels –small and big-, spats, two
different arrangements for the exhaust ring and “bowed legs” or “kinked” struts
to cater for all the possibilities. A clear vacuformed front canopy is also
provided.
The kit has comprehensive instruction sheet with building
tips, a 3 view and livery options.
The instructions are there to be read, since they will warn
you and guide you to avoid hiccups during construction.
You will have to get or print you own decals.
The plastic is nice to work with and its thickness makes it
easy to sand, handle and repair if necessary.
I started by marking the contours of ALL the parts on their
backing sheets with a fine point permanent marker. Then scoring with an Xacto and
snapping the parts off the sheet.
Careful sanding is mandatory to obtain both proper thickness
and neat contact areas. This is specially required for trailing edges and wing
struts.
I deviated from Khee-Kha’s master plan on a few issues. I
used brass “Strutz” for the characteristic wing airfoiled struts attachments
–see images-, used a print of the real instrument panel backed with styrene
instead of the kit’s part and did not use the wing spar as suggested in the
instructions but made my own arrangement.
I decided to build all parts provided with the kit, for the
sake of the review, so you will see in the photos parts that are not required
for the version I was modeling. The only parts that were a bit challenging were
the “bowed” legs, but came up nice with some care. I also used an almost
continuous thin styrene strip as support for floor and roof instead of the
segments suggested.
Further detailing included control horns made of aluminum
soda can sheet, Venturi, joystick, rudder pedals, control cables and rigging
with monofilament (you have to measure and drill their exit points preferably
before you paint), Pitot tube, stirrups, fuel caps –aluminum sheet punch-outs-,
navigation lights –from the CMR set-, curtain rolls and a couple of half-down
curtains in the cabin, seat belts, and the like. This particular plane had a
tail wheel, not the usual skid, so a white metal Aeroclub item was used.
A scale suitcase containing 1/72 winter underwear was made
and stored in the luggage compartment, never to be seen again (even if you open
the compartment :-)
“Strutz” airfoiled brass material was also used for some of
the landing gear parts combined with wire, same for the braces of the wing struts.
Since the exhausts had a particular end on the chosen plane styrene bits were
shaped and glued to the resin part –see images-.
As can be seen in the accompanying photos a clear CD lid
usually found at the top of the CD stacks was used to make the custom-fit
windows, since it matched the thickness of the styrene sheet. Both Model Master
Liquid Cement and Tenax 7R will glue this plastic without a hitch, but apply
sparingly.
I used pins wherever pertinent to attach parts pursuing
positive locking.
Construction was uneventful for most of the kit, but extra
care must be taken in the nose area. The constructed fuselage must match the
vacuformed windscreen and the resin nose; that requires attention, dry fitting,
and patience. Again, reading the instructions and looking at the photos on
Khee-Kha’s site are mandatory in order to avoid disappointment and unnecessary
fussing around. And when I say fussing around I mean screwing up. I had to
remove the forward fuselage side windows and trim them back, since I made them
longer than required (that can be seen in one of the photos before the
correction).
Check your parts against the 3 view provided for the length
of landing gear and strut items before final assembly, so you can trim them to
their correct size. In the case of the wing struts check them too against the
model before final trimming and remember that it is easier to snip off a piece
for final positioning than to try to add to the length of the part.
I finally decided to remove the fore window panes before
painting and add them later together with the windshield. The oval windows were
simulated with Testors’ window maker. Model Master acrylic was used for the red
and the same brand aluminum Metalizer for the pertinent areas.
Aluminum-painted decal strips were used for the window
frames.
Decals of course were home-made.
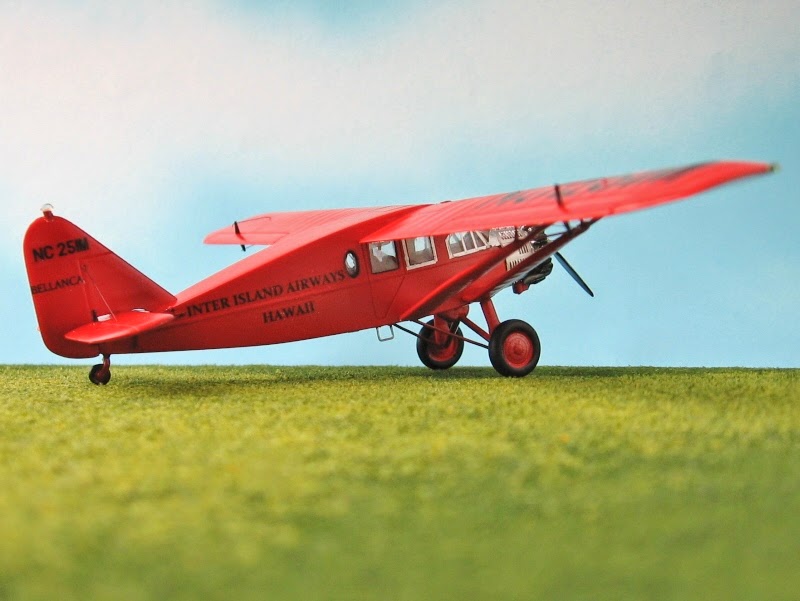
Inter Island Airways of Hawaii is one of the many attractive
liveries that can be used for this cute little kit. A CH-300 was recently
restored –although not perfectly faithfully- and flown in Hawaii with the
original Inter Islands livery.
Thanks to Lars Opland, owner of Khee-Kha, for his patience,
good advice, and historical data.


No comments:
Post a Comment