
(The completed model is here:
https://wingsofintent.blogspot.com/2025/12/mustang-thunderbird-racer-converted.html
Speedy Gonzales* is a Mexican immigrant that made Warner Bros earn millions. Like the vast majority of immigrants, he tirelessly worked for his US boss contributing to the economy and society (in this case with laughters). His “superpower” was… well… as his name indicates: speed, the very same racers need to win.
*See https://en.wikipedia.org/wiki/Speedy_Gonzales_(film)
As racers are very attractive subjects, I dedicated, along the years, many of my modeling efforts to them, scratchbuilding and building kits of dozens of them. Here are some samples:

.jpg)
.jpg)
.jpg)
.jpg)
.jpg)
.jpg)
.jpg)
.jpg)
-1.jpg)
.jpg)
.jpg)

.jpg)
.jpg)
.jpg)
.jpg)
.jpg)
.jpg)
.jpg)
.jpg)
.jpg)
.jpg)
.jpg)
.jpg)
.jpg)
.jpg)
.jpg)
.jpg)
.jpg)
.jpg)
.jpg)
.jpg)
.jpg)
.jpg)
.jpg)
.jpg)
.jpg)
.jpg)
.jpg)
.jpg)
.jpg)
.jpg)

.jpg)
.jpg)
%20(2).jpg)
-1.jpg)


.jpg)


.jpg)
.jpg)
.jpg)
.jpg)
.jpg)
.jpg)

.jpg)
.jpg)
.jpg)
.jpg)
.jpg)
.jpg)
All of the kits needed modifications (slighter or deeper) to more accurately represent their counterparts. I have used old kits and new kits in these endeavors.
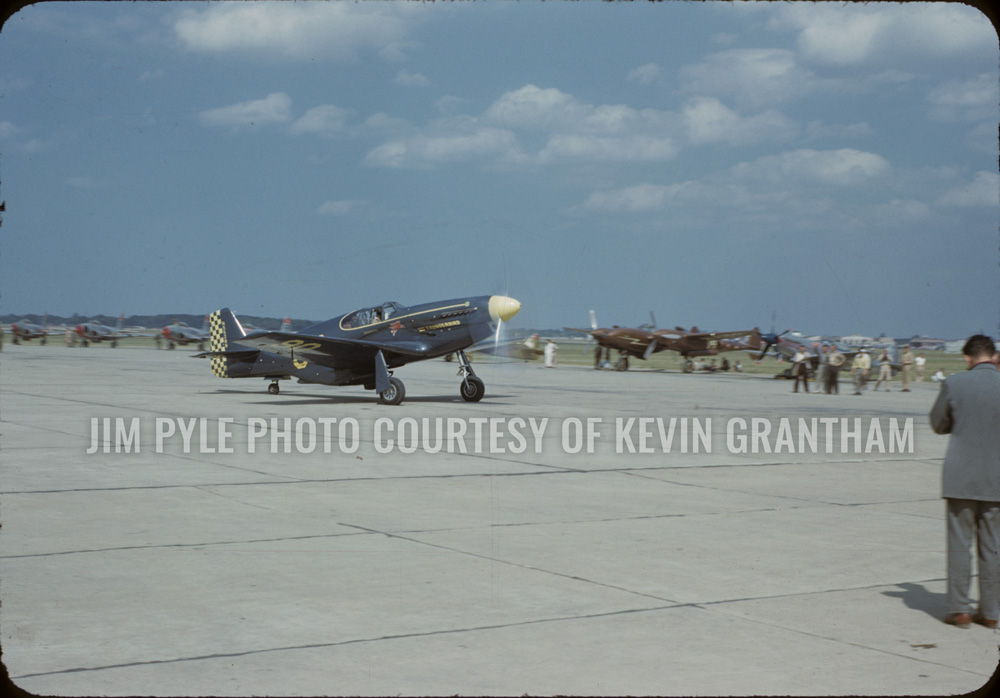
I have both the Academy and Arma kits of the P-51C to convert to N5528N, flown to a Bendix win by Joe de Bona and later flown by Jackie Cochran. I also have aftermarket decals, prop and photo-etched parts will be used. The Arma kit is far superior in every aspect, but the Academy kit is much easier to build, so most likely I will be using the latter for the sake of speed and spiritual peace.
Of all the conversions I made for racers this is perhaps one of the simplest, involving just the aftermarket decals, a new prop and easily-scratched minor details (like the ADF antenna). I also got masks and a P.E. set from which I will only use a few parts:

Academy solved the problem of the different versions separating the tail as a module. Mos parts are removed from the sprues, the military bits left aside:

Many surface details will need to be filled, as this racer had a very smooth skin. Features related to mil. equipment (chutes, gun openings, load hanging supports, etc.) have to be deleted. Exhausts will also need tweaking.
Chutes, ordinance supports, nav lights, formation lights, are all being deleted:


I must confess that I am not a fan of photo-etched parts. Most of them are small, fiddly to detach and clean up, very easy to lose, there are hardly ever spares for those small bits in the fret, and the folding of the parts requires more dexterity and patience than I can muster. In many cases they can't even be appreciated in the assembled model, especially in closed cockpits. I will be using as mentioned just a few, the simpler-to-deal-with ones. For some of these P.E. parts the existing fuselage relief (which by the way is not bad at all) needs removal:

The exhausts in the racer were shrouded. I tackled this detail with a quarter round styrene stick, tapered at the ends (dry-run):

Once the openings are filled, next is deleting the guns and light on the LE. But before a further thinning of the TE from inside with a cabinet scraper:

Now with the wing glued the turn of the guns and landing light:

Bear in mind that the restored plane you can see online differs in some minor ways from the original (it has nav lights and formation lights, for example), so do not take as a guide if you want to represent the historical machine.
Blog reader and master modeler Rabbit_vibes has sent a very nice contribution to the build in the form of more references and his own work on this very kit and scheme, vastly surpassing what I am doing here as a low-key build. My thanks to him for his help and for pointing out to even more details that need addressing.
Base colors are arbrushed:

The armor is removed from the seat's back and a simple bit of structure added:

The P.E. parts are added. Not easy for my failing sight. In any case some are a little bit of wishful thinking:


Seeing the absolute wonders other modelers are done with this or similar kits, I feel like a fat-fingered rookie.
The wing goes on with a good fit:

The wing regs on the decal sheet area longer than they should be, but the decal maker is printing new ones; now that's customer service and standing behind your product!.


Working on the aftermarket prop:

Starting to add the transparencies, a good fit. After masking, primer can be applied to see how the surface is doing:

I realized what I had was a partially-used mask set, so I had to "copy" a few items:

Ready for a first coat of primer:

Primed. Many things still to do were revealed:


With four simultaneous projects plus the season unavoidable busyness, I am feeling a teensy bit tired:

White base for the cobalt blue. The panel lines are still somewhat visible in spite of the putty and sanding. The seam at the fuselage front top was there in the original as a panel line:


The antenna housing present under the radiator intake on the belly is made by shaping the end of a Contrail strut. This should be painted black:

The blue color is airbrushed:

The black rudder is painted:

There is a little bit of controversy regarding that rudder. It's black in the restoration (I don't trust any restoration/replicas at all), AND in this contemporary color photo:
https://www.aircorpsaviation.com/wp-content/uploads/Debona-1949-Dice.jpg
But not really visible in B&W photos that seem to show in general the same hue of the fuselage on the rudder. We know that B&W photos can be tricky, so it is your choice.
You may think that after building a few of these Academy Mustangs I would remember their peculiarities. But I forgot (among other things) that the fit of the LG legs in their sockets is as loose as the mouth of president stupid:


The antenna is on (prop dry run):

Because I am a genius, I forgot to paint metal color the intake lip under the spinner. Shouldn't be that difficult. Tomorrow may be.
I used the regs from an Hasegawa model, as I don't have yet the correction for Draw Decals ones.
The lip was painted uneventfully, but a little snag happened. This plane most likely didn't have the number on the top of the left wing (the modern rebuild doesn't have it either), unlike what it's indicated on the instructions:


So what are references for -you rhetorically ask me- well, to look at them BEFORE you commit to basically anything. Unfortunately I focused on smaller details, and didn't realize the decals mistake until now. Still, the build can proceed now after the correction.
And now completed and waiting for a sunny day to upload the completed model post:

(The completed model is here:
https://wingsofintent.blogspot.com/2025/12/mustang-thunderbird-racer-converted.html