(The completed model is here:
https://wingsofintent.blogspot.com/2020/02/handley-page-o700-airliner-conversion.html
I have wanted for a long time to build the civil transports of the first airlines that derived from the H.P. 0/400 using the old, dated, Airfix kit.
I started as usual gathering references, and after a few years, once
satisfied with the material at hand, I bought (quite recently), a new release of
the kit, which needs quite a lot of work to make from it a credible model.
My first impressions:
1) A large number of parts were already loose in the bag they came in.
2) I have hardly ever seen so many ejector pin marks.
3) I surmised that two people were in charge of producing the masters
for the flying surfaces. One was restrained and created a normal rib
pattern. The other was a madman and thought the masters were for a
washboard. Or perhaps was trying to represent rib tapes, in which case
to say they are overstated is an understatement.
4) When I saw the three included figures I jumped thinking that they
were, like me, Shaolin Modeling Monks! One was even meditating seating
in the lotus position!
But no, they were stoic British crew members that at the first opportunity asked me when was tea time. The gall!
5) The "system" devised for the wing upper and lower halves is dismal.
Not sure if it was thought to facilitate rigging, but if it was, the
designer should be condemned to endlessly hear the deranged rants of
certain pumpkin-colored unpresident. If it wasn't, all the same. Hard to disguise those
seams will be.
6) I love it.
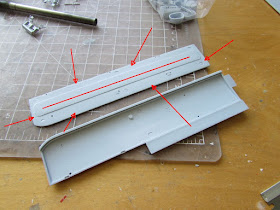
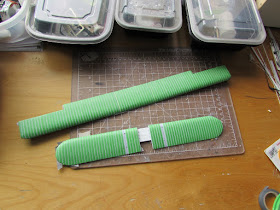
The washboards are included in the kit in the form of flying upper surfaces:
The wings are halved with an engineering solution not even a mother would call elegant:
Oh boy...
The three stooges:
The plastic will take no hint from normal sanding tools, so out it was with Igor, the orbital sander, terror of bad kits!
Arriving to this, which still needs some more sanding, took a long time, believe it ore not, and the grain on the sander wasn't fine.
My arm is still vibrating!:
I can see on the Net that many of the 0/400 releases are pestered with flash.
That wasn't the case with this recent re-issue, but every single part has some very little flash, and everything has mold parting lines.
Now, this is easily fixed, and actually this is a task I don't mind at all, as strange as this may sound. I abhor puttying and sanding and am always uncomfortable and anxious with painting, but this clean-up task is for me sedating.
Which is a good thing, since there are 3,684 parts to clean:
Easy peasy:
One by one they are all cared after. The fit seems good:
Finally all flying surfaces are ready to receive a nicer rib detail. Phew!:
In order for the wing insets to fit properly, ALL OF THEM have to be sanded.
Don't get carried away, and check often, until both surfaces are flush. If you don't do this, the inset will won't meet the other surface, and you will have a step.
I can only image modelers naively following the instructions, only to find out, at last minute, that the parts do not fit properly. Now that is what I would call "bloody paralyzing":
Finally a good fit:
All of them undergo the same treatment:
As we know, conversions some times require decisions early in the build.
At the beginning, modified 0/400 used the bomb bay to actually bomb newspapers, using parachutes. The Germans also used this technique in the Albatros L72 and other planes, much later:
Now, would you believe me if I tell you that those are chocolate and cookies tin boxes for the passengers? Nah, I didn't think so.
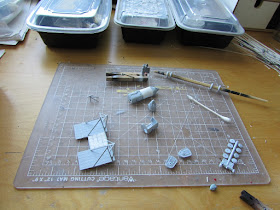
The tanks were left in the fuselage in earlier conversions, but were later moved to the nacelles, which then got longer. Since I am not decided yet in the specific plane I want to model, I assembled them.
The little trap door is a bit thick, sand it down or replaced for a sheet styrene item. The pillowing on the leather coaming, compared to photos, looks unrealistic and overstated:
The struts are of course affected, like many other parts, by ejector pin marks:
All parts are now cleaned up:
The coaming as it is in the kit (I call it "the large intestine"):
After some sanding:
Some sanding and filling is in order:
The most difficult part of the build is now over. I deem the construction process as 95% complete.
The ejector pin marks on the struts are now fixed! It was immensely difficult and only the bravest of modelers should attempt such feat.
I think I deserve a good rest.
I am always amazed at how much it can be learned from photos.
Even more surprised comparing photos with renditions (drawings, plans, profiles, etc.) and seen some interesting divergences.
Another source of amusement are the contradictions between publications or sources, and again, how can they differ from reality (photos).
The moral is: without research, the chances of producing a credible, accurate replica greatly diminish.
I would admit that is not at all easy to compile data from planes created and flown long ago, and many times the accounts, even by contemporaries, are misleading or blatantly incorrect.
I do appreciate any material I can get my hands on, but then I question it deeply.
I have amassed a large amount of info on this beast, and I am having a blast going through it, taking notes, realizing that corroboration is desirable regarding any little piece of knowledge you think you may have achieved.
I can see how certain planes were modified through time, generating confusion regarding the type they belong to. As it is frequently the case, even among the same types, the ancillaries changed, or the planes were repaired and therefore altered, and some were even made from pieces of the wreckage of others.
Still, this is a hobby, so let's not get too obsessive -or frankly annoying- regarding this or that nitpicking, but as long as it fun, let's get at it.
I just realized, among a myriad of other things, that in general it had double flying wires and single landing wires, which will make rigging so fun!
I had to force myself to cool down, because at this point I really have to make a decision about which specific plane I want, and for that I have to go through a lot of material, and duty is calling, so the model went for the moment to the box.
The main choice as explained above is either early types with the fuel tanks still in the fuselage, two small cabins fore and aft of them, which needs not great mods, or the later types, with the full cabin (with full height, thus the roof at the front must be changed) tanks on nacelles (they have to be extended and their securing bits altered) and some times two small cylindrical tanks hanging from the upper wing. The engines exhaust arrangement had some variations.
Location of door and windows varied too.
There were some conversions at the very beginning that were used in an official capacity, but I am not interested in those.
There were two planes that were sent to India. There are few images of them, enough perhaps to do the exterior, but nothing I can find on the interiors, so those are left for the moment aside.
There was even one that changed its Rolls-Royce engines for Jupiter radials.
The insets are glued in place. The fit as said is poor in all accounts, depth, length and width. This will of course necessitate puttying and the corresponding sanding, that will have to be negotiated with the rib detail in relief.
What a terribly poor idea this engineering was:
Being the engineering of this kit what it is, I couldn't be less and had to start to devise convoluted solutions for simple problems.
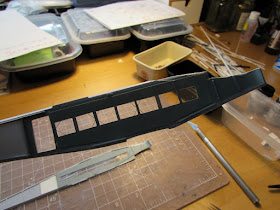
The center section is blanked off filling the squares one by one, 16 of them, with styrene tiles, and applying sheet on the inside, leaving space for the fuselage side. I decided to do this instead of the simple expedient of replacing the barbecue grill, to preserve alignment and rigidity and to make things as difficult as possible, thinking of the prospect that Airfix may hire me, and send me back in time to when they used to concoct these kits.
I would dream of working at Airfix in the 60's and have a laboratory like Dr. Frankenstein's, to create impossibly silly kits, so modelers will despair and migrate to Iceland like deranged lemmings:
Some detail on the fuselage sides and bottom is removed. Since I am not yet decided which version I will make, I left, just in case, the fuel tanks section untouched for the moment.
Care was put by the master maker into the detail on the insides, pity those ejector pin marks:
I will line the interior with styrene sheet, so I am not concerned on preserving the surface, just in removing the detail I don't need:
Once I pinpoint the version I want, new doors and windows will be cut, and the unnecessary detail filled or removed.
At the moment I am leaning towards two planes that had the full interior and extended nacelles. One flew in the United States, and the other linked England with Switzerland, landing at Lausanne, a place I visited and liked very much.
The only thing that really bothers me is the awful green color these planes had (save one of those which went to India that was reputedly pink with blue nacelles).
At least the one the flew in the United States had what looks like plain metal nacelles.
The white fields under the regs. -that are black- add a bit of variety. Still, like the Kangaroo, that awful green...
I ordered a masking tape that I hope will provide the right spacing for the re-instatement of the rib detail on the upper surfaces, 4mm width. Once the 56,234,367 lengths of tape are applied, I will be able to airbrush a thick layer of primer to build up relief back.
The detail on top of the nose is deleted, since it is not appropriate for the civil versions I want:
The seams were puttied, but there is more to do:
On the top wing center section, if you align the rib detail (which I did as far as I could, since it is not spot on) you end up with a displacement of 1/2 mm, that you will have to deal with later on:
Same for the lower wing center, 1/2 mm displacement:
Displacements of course result, if not corrected, in gaps when you join the outer panels (dry-run here.
Now, there is other issue here. In every photo I have the locations for the center inverted V struts that unite fuselage and wing are aligned with the other struts, but not in the kit, as you can see above.
They are about 4mm ahead of where they should be.
Not sure why this happens, and it is shown that way in the sketches of the instruction sheet.
If you reverse the inset, the center locations align with the ones on the outer panels, but the ones at the edges of the inset are then misaligned. So it is not a question of reversing the inset (as I thought when I saw the issue and panicked as I was gluing it).
The part on the fuselage top where these inverted V struts anchor is also displaced ahead, correspondingly.
Because in an organic structure one thing is related to other, we see that in the fuselage the anchoring point corresponds to the change of angle where the fuselage profile start to go downwards.
So that anchoring point can't be just moved back, because then it won't coincide with the vertex of that angle.
Therefore it must be concluded that something is definitely not right here, and the fuselage angle may need moving too (unless you build a O/700 which had a new cabin front roof).
Now to the nacelles, that need to be extended to accommodate the tanks removed from the fuselage:
Four bulkheads are made slightly smaller than the cross section of the nacelle, to allow for a styrene skin to be wrapped around later on:
And why not use the kit's tanks which I already assembled as spacers:
Since now I will go for the full cabin, instead of the earlier fore and aft the fuel tanks arrangement, the detail in the area is deleted to make way for the new furnishings:
A styrene stick section completes the structure:
The skin will begin and end at the bottom, where the stick is. When doing this type of structure that is enclosed, it is a wise measure to drill some venting holes, so the cement solvents can escape freely. Otherwise the skin may wrinkle and the assembly may take a while to properly dry:
The is how the parts play:
Meanwhile, the locations for the inverted "V" struts are blanked off and the new ones drilled.
Two things to consider:
a) The rigging holes on all surfaces have to be revised to accommodate the double flying wires.
b) The exhausts varied from plane to plane, even for this long nacelle conversions, and some times went along the length of the nacelle, and some times went "the other way", and the exit was a at the front of the nacelle, in that case the curves of the manifold went also the other way, instead of arching backwards.
The nacelle "skins" are rolled and held in place:
Holes that don't apply are plugged:
The skins are glued only to half the lower beam to start with:
The control horns locations, omitted in the kit and its instructions, are located and drilled:
The nacelle extensions are ready (detailing will follow later on).
The oil tanks (or extra gravity feed fuel tanks) -the cylindrical objects to the left- that hang from the upper wing are fabricated:
I realized that I had to clear one more bay for the cabin, so the detail is removed there too:
Consequently a new cabin floor is made. A plug is put in an opening on the fuselage bottom:
After a first reading of the reference material I have on hand, it seems that the one to follow is John Stroud's Wings of Peace article (Aeroplane Monthly Feb 1986).
There are a couple things still to digest and compare, but so far it rings true compared with the photos I have.
There are a few things that could be added (Stroud did not have the benefit of the material that now populates the Net) but it's quite enough as a guide for model building.
My Rolls Royce Eagle engines arrived.
In the background four Bristol Jupiter that I ordered just in case I build another HP42/45 or scratch a Short Scylla:
The opening on the kit fuselage sides are filled:
In order to partially show the aftermarket engine, I cut some panels from the cowling. The panels are marked on the parts, so I just followed them:
I chose the upper and external side of the left engine (nothing is being glued yet):
The front has to be rounded to allow the engine to go through:
These two protruding bits need removing:
Removed already:
Still some thinning to do, and the engine oil pan needs to be trimmed back substantially for it to fit inside the assembly. Some extra structural parts will need to be added later, but they are simple:
The gluing has commenced.
The landing gear parts are assembled and put in position (without gluing) to properly rig them. Other elements are also assembled:
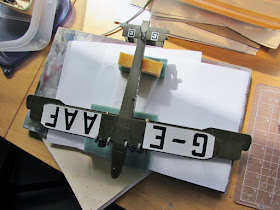
The plane I have chosen to represent, G-EAAF, started life as a converted O/400, but after a crash was rebuilt to O/700 standard. Photos show at least three different types of marks. A plain large Handley Page "calligraphy" logo on the fuselage sides, later a somewhat condensed registration partially superimposed on it, with complete separate registrations on both right and left side of the wings, and the final, common large registration on fuselage sides and one large reg on top of the upper wing and a separated reg (E-A ...AAF) for both lower wing halves, with a smaller HP logo on the nose sides and one HP winged logo on the very nose.
On this guise it flew in the US at the Curtiss Field.
The plane was sent to the US for commercial use, but was promptly confiscated by the US customs which followed the well known particular interpretation of the US "free" commerce: "We will impose our "free" commerce upon you, but will have none of it the other way when it suits us".
Eventually the plane was released but the commercial enterprise never... took off.
The US had built a large number number of wartime O/400s, known as the Langley, built by Standard. Strangely enough, I have never seen the Arfix kit built as such, nor an aftermarket decal sheet for it, even if there are plenty of images of it on the Net. Not that in any way I want to promote boom-bong-paff planes, of which I deem we have had ad nauseam.
The radiators do not fit well on the nacelles, so a grinder bit is used to provide the necessary clearance:
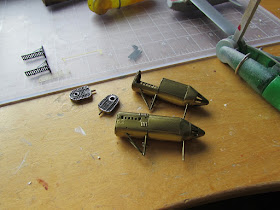
Whilst some O/700 had normal exhausts, only extended, on this one the "direction" was reversed, and the ends bent upwards and outwards:
Some parts are prepared for a painting session. I like to finish ancillaries beforehand when possible, so construction does not lag behind later on waiting to finish small parts:
Some small parts are assembled, and little rods are added to the otherwise simplified kit parts:
The whole window areas are excised, as well as the door, all later on to be replaced with clear stock that will eventually be masked for painting:
The masking tape arrived, so I can proceed now with the masking of the sanded upper flying surfaces to restore the "ribs" at a proper size. This will be of course a long and tedious task, but must be done to replace the absolutely awful kit rendition of the rib detail. Once all the 4,565,368 lengths of tape are in place, several coats of primer will be airbrushed:
The clear parts are measured and cut:
I will propose now a color theory.
We know that the second plane sent to India fro a local ruler, a O/700, had blue engine nacelles.
Looking at all photos I have of O/700, I can clearly see that the nacelles are either metal color, or a different color than the rest of the plane (which was supposedly NIVO, a sort of grey/green).
Contemporary planes from the same builder, like the W8, show colored nacelles, most likely blue, as were some details of their scheme (and most likely registrations).
Therefore I am inclining for painting the nacelles of my model of G-EAAF -which again clearly shows a different hue on the nacelles- blue. Several photos show what looks like black for the landing gear structure (including tailskid spider), whilst shock absorbers seem the same color of the plane in general. Below is a photo of a W8 to show what I am talking about.
But: I have mentioned than in some images the color is metal and in some others isn't, so may be (I stress the conditional) it could be the same color casting different reflections, the color of HP logo, gold. Metallic paint some times produces that effect.
Now, NIVO airframe, gold nacelles and black LG, that's a beauty.
The radiators, by the way, show another hue (brass?)
The small gravity tanks are metal.
Plenty to ponder about.
The famous Van Eyck painting of the Arnolfini couple reveals, in the mirror on the painting, the back of the couples and the painter itself.
(From Wikipedia):

Because history likes to repeat itself, another mirror in the photo of the interior of the converted Handley Page reveals in turn the photographer and his camera, plus some detail on the background:
(Link to Age Photostock image):
https://www.agefotostock.com/age/en/Stock-Images/Rights-Managed/MEV-10429085
With the help of interior photos I was able to determine all the elements of it. Here the fore and aft bulkheads with their doors. The front one opens to the cockpit (the pilot seat was on the right), and the aft ones opens to what I think is a restroom:
The supports are made, as well as an extension needed to close the gap present on the kit for the top position:
Despite the deceiving marketing of Handley Page at Selfridges, the chairs were not leather-covered sofas, but very simple wicker affairs.
I have done wicker chairs before for my models, printing a wicker pattern on stiff paper both sides, and then spraying a copious layer of art fixative. The pattern is like this:
Then you cut the pattern into the elements you need for the chair, adding legs.
After a lot of time spent on research, I have found interesting pieces of information on the plane that was sent to Argentina:
And also a very important, key description of the "Pink Elephant", the one sent for a ruler of India in replacement for the lost one he first acquired (central column, up):
Right column, second note:
A process commences to address Airfix's mistakes on the position of the two central A frames:
The modification of the nose roof begins:
Long ago I just wanted to build the darn thing, and blindly trusted (how naive!) the manufacturers, magazines and the like.
At the very beginning of this post I manifested my displeasure for building a model that had to painted in a military color, therefore went looking for the alternatives.
One were the known "Silver Star" very early conversions for the Versailles treaty, that I discarded for being still too military and not related to real airline service or pure civil use, the infamous Pink Elephant for which a lot of info was unavailable (until I disinterred it and just posted here for the benefit of a fellow modeler), and now... I just found this jewel, a civil machine sponsored by The Daily Telegraph that participated in an attempt to unite London with Cape Town:
The clear strips are glued with a very thin frame inside to improve solidity:
The tubular structure present in all conversions is added to the pre-bent cabin floor.
The cockpit area is being prepared:
Another part spoiled by ejector pin marks, better make another than dealing with it:
The area behind the door is lined to represent the restroom. Toilet and sink are added, a little progress id made on the nose area:
Pity the wonderful etched parts sold by the late Fred Hultberg are no longer available. They were truly affordable and excellent, and for most there are no replacements, and when there are, they are expensive:
I sorely miss, among many other bits, his oil coolers:
ANYONE PICKING THIS UP AMONG THE MANUFACTURERS?
Since the cabin height remained constant -instead of lowering at an angle at the front- on the O/700, pieces of styrene are added to the area:
The pip on top of the radiator is deleted and substituted by a short length of airfoiled stock to match photos. Small holes where the louvers pivoted are drilled on the sides:
More details discovered whilst studying photos:
-There were navigation lights on the lower wings, close to the last strut, that appear to have a lens pointing forward and another pointing sideways:
-The wind-driven generators/fuel pumps -whichever the case-, that were in the original plane on the fuselage sides, have been moved to a position between the "V" struts that hold the engine:
-The main landing gear structures and tailskid spider are definitely black.
Shock absorber covers are the same color of the engines, which is not the color of the structure or plain metal (another photo shows a metal patch or cover, much lighter, the same hue of the coaming of the nose position):
The construction of the wicker chairs begins, printing a double-sided pattern and preparing the parts.
More than necessary are always made, to discard the ones that aren't as good:
After a coupe hours a little progress is made:
After several days of relentless work I am half-way through the seat-making:
Some airbrushing goes on. These parts will be set aside as I proceed with other aspects of the build, but I like to have them ready in advance so they don't hinder progress later on:
The wicker chairs are completed and being installed:
Due to the windowed surface on the original plane, the interior will be quite visible once the model is completed (of course now the model is missing the structural bits in the middle of the window panes):
A liner is made for the interior to cover the rough surface of the fuselage sides, and to allow beneath it, eventually, all the rigging wire needed inside (and seen through the windows):
The other side is made:
Parts are masked and airbrushed:
After doing a section of the wing "ribbing" with the Tamiya masking tape I had at hand (4mm width more or less), I realized that the gap they left for the primer was too narrow, so I wanted to buy a 3.5mm width masking tape, which resulted to be more difficult than I thought.
I finally got on on the Net, but upon arrival it was obvious that the quality was despicable, and the edges, instead of being neat and sharp, were frayed and fuzzy, thus not adequate for obtaining a nice edge effect:
So the search for a good 3.5 mm masking tape continues.
Meanwhile, "wires" are set between the cabin lining and windows:
The aft section of the floor is glued and some parts are being prepared for airbrushing. The areas that were modified are clearly seen:
The usual accoutrements are prepared:
The bathroom is tiled (you wouldn't believe what the 1/72 charged):
More detail painting follows:
Since the top fuselage area needed modification, I decided to protect the cabin with a ceiling:
The restroom is being prepared. The open passenger cabin door will provide some little visual access to it:
A dry run with the interior. All seems in order:
I still have some curtains from the time I built the Potez 62 airliner:
The windows are being added. The three sections that compose the upper and lower wings are glued together. Their fit was quite so-so, and had to be adjusted:
Keeping those dihedrals equal:
A couple of you posted that you got "bent" fuselages when you built this kit.
I agree that the fit of the fuselage slabs isn't the better, and you have to keep an eye, but I also consider that I chopped and modified quite a bit:
Now the task to complete the new area on top:
The fit of the lower wing is bad, which is strange, since the width of both components is given by the kit parts. In any case, shaving of both, exterior side of fuselage sides and interior sides of root ribs was necessary to make the wing able to slide in.
We all know this is a very old Airfix kit, a sort of highlight for its time, and should not be judged by today's standards...unless Airfix keeps selling it, which it does, in spite that it's now completely déclassé. I completely love Airfix's new releases (of which I have bought and built many) but some of the old ones...
Restoration of the top fuselage continues adding styrene sheet and then puttying and blending-in.
The foremost section had a complex shape, and eventually a wood master will be carved to vacuum-form the needed part:
Part of the nose interior is put in place, before I produce the cover for the area:
Other sub-assemblies are completed:
The union of the wing panels left a too wide gap due to kit's imprecise fit, so it was filled, to be later given an engraved line:
I am normally a very fast builder, but the kind of projects I am working on at this time feels a bit like
The positions to anchor the gravity feed fuel tanks -that are visible on the photos- are drilled (dry run here):
The plug for the nose tip, and the section between nose and cockpit:
The lower tail is added and other fuselage openings and clear areas are taped, in preparation for the messy stage that will follow:
Some more puttying and preparing the forward cabin area for the part that will lend the particular shape to this version:
The three components that are need to re-shape the nose area are being readied, two of them of course are plugs to vacuum-form the definitive parts:
The parts are molded:
And here in the process of trimming them:
The first bit is glued on:
The largest bit is filled with epoxy (Milliput will do too) and glued on. This way, if you have sand a bit to conform the part to the fuselage and cut trough the thin vac, you still have epoxy behind:
The part is on. The mid part, which has the instrument panel, is being prepared:
Et Voilà:
Since the galactic quest for a good 3.5mm masking tape found zip, the job must be done twice, overlapping two strips per bay. Tedious, but ultimately...extremely tedious:
And after a few revolutions of our galaxy arm around its massive central black hole:
Now the lower wing is waiting.
One Kalpa after, the lower wing is done:
Successive layers of primer are sprayed:
Once reasonably dry, the tape is removed. Due to the bad quality of the tape I got, there was a little seepage here and there, but fortunately things are mainly ok, just waiting for a light sanding to soften the edges. You can see that other areas of the fuselage have been taped and puttied where needed too:
The ribs as they appear after removing the tape:
After some light sanding. The paint will later soften them a bit more:
Once the prosthetics are blended-in, the masks are removed. I am waiting now for the arrival of the window masks to apply them and have a first coat of primer to reveal blemishes:
There were three short sections where the primer "did not take", easily solved by placing short pieces of masking tape and smearing a dab of putty, and then sand a bit when dry. Any blemishes can be restored like this:
The decals, window frames and masks arrived! They are splendid!
That means I will be able to mask the windows and proceed with the fuselage priming and eventually painting, as well as with general assembly after that:
The masks for the windows are applied:
Ready for a primer coat:
Primer goes on, giving the replacement rib detail a unifying treatment and preparing the fuselage:
Lower wing and fuselage are glued together:
The addition of the protective leather coaming in the two exposed locations on the nose is coming now before painting.
Instead of adapting the kit's, which is coarse and overscale, I will install a Milliput chord and use a tool to give the impression of the sofa upholstery look it has.
The Milliput coils are in place:
The "accordion" areas of the trailing edge that allow the wing folding are masked, and since I did all the ribbing detail with primer, a mere cotton bud soaked in acetone erases all the detail leaving the are clean:
The kit's ribs underneath are removed too:
Kitchen alu foil is measured engraved and cut:
And applied top and bottom:
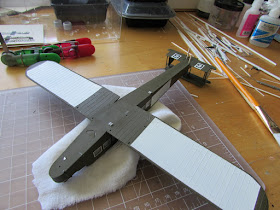
The top wing and stab just posed on, to get a sense of how careful I will have to be while rigging:
The cabin door has to be painted too:
So it is masked both sides:
Registrations on wings, fuselage sides and tail are on a white background, so those areas are painted.
You can see now more clearly the result of the work of eliminating the despicable kit's ribs and create the new ones as described somewhere above:
The accordion triangles are also added on the top wing trailing edges, both sides:
The areas that constitute the white background for the registrations are masked.
The greenish-brownish color (PC10 usually) that everybody loves to argue about everywhere will be next.
The specific hue I will be using is called WIBW (Whatever I Bloody Want)
The usual challenges that one encounters in dealing with arcana are part of the adventurous modeler (and the Shaolin Modeling Monk) life.
Long hours did I spend contemplating in meditation the few images I have of the specific plane I want to represent (as it flew in the US as a demonstrator at Curtiss Field).
The changes of the hue in the photos of the engine gondolas (that are definitely not the same as the rest of the plane) from dark to light to medium tone gave me much to ponder about.
We know as a fact that contemporary planes send to India had blue engine nacelles (others in civil service in England may have too, what that´s not easy to corroborate).
But greenish-brown paint with blue is an aesthetically disturbing thought, to say the least.
There is one other color that I have seen in photos doing the same trick, and it's gold.
So gold it is for my engine gondolas.
They have been kept separate, because I have to fabricate the extra aft struts they need, and add the exposed engine I built for one of them, and I wanted to do that having the lower wing ready.
The gondolas, due to their extension, are given their additional struts:
The smaller parts are being prepared for painting too.
May have to wait for this a bit, since the paints that I purchased for the task did not yet arrive:
First coat for some of parts:
And other color for the others:
The other side is painted:
This is a home-made color, and I worked for that very subtle sheen:
The gold I used on the gondolas is not Alclad, which would have rendered a too shiny and light hue, but an enamel that to my taste matches the gold I have seen in original, unrestored museum pieces:
Masks are lifted revealing the white background for the black registrations:
Time to start to address the gondolas and radiators, especially the one that has the aftermarket engine:
Masks are off, so the fuselage interior and front positions can be seen:
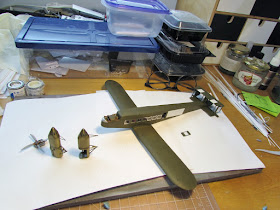
All the other miscellaneous bits are ready too, we can proceed with final assembly:
Mounting the biplane tail components now. Not a complicated affair, but Airfix is no help whatsoever here regarding the rigging of this area. They just ignored the issue.
Looking at the instructions I also realized that only a partial, faint and vague indication is given regarding the control leads that unite tail and fuselage.
The elevators have some little holes where the control horns are supposed to be (I guess), but no parts for it and again only a faint indication for the rigging.
So if you want this area to look like something real, to the photos and references you go, yet again:
The vents that go all around the aft section of the gondola were commissioned as decals and came with the sheet:
They are applied:
The "metal" window frames are added from the vinyl masks also provided with the commissioned sheet.
Little by little, detail after detail, it's coming to life.
The gondola struts and the re-positioned wind-driven pumps or (generators) still have to be painted:
Some progress has been made, now a bit of rest as things settle down:
I spent some time studying in photos the control cables that go the tail, having found a great variation depending on the type of plane. I drilled some small holes for some cables that are pertinent to this version.
Photos revealed areas of walkways around the engines, which are being replicated with two layers of home made decals:
The walkways and the tail decals already in place. The top decal of the walkways is smaller, leaving an all-around edge seen in photos:
Here are the ones for the wings, which look a bit like magic lanterns, having one lens to the front and another to the side:
Started with the rigging of the tail unit:
At this point in the build things seem to slow down, progress doesn't look as dramatic. Instead, details and careful handling absorb a large amount of time, but the results are usually lost to the glancing eye.
Handles and tail light:
A suspicious discharge outlet in the restroom area:
A control horn not present on other version, to which external control cables will be attached:
Windshields:
Finally I was able to figure how all the control leads went on this particular machine (they vary quite a bit from some to the others).
Two pairs of faired guides/supports are added to the belly, and holes are drilled for the exit and entry points. A light is added. I will wait for the Pitot mast until later, not to risk knocking it down:
Work on the upper wing continues with the installation of the control horns (not provided by the kit) and the replacement of the kit's angular rig parts, that are a bit out of scale, have a flatter angle than the real thing, and are frankly a bit toyish :
The gravity feed auxiliary fuel tanks are added:
The rigging and decaling of the top wing is completed:
All control cables on fuselage bottom and sides in place. Decals added to bottom wing.
The engines will be next, but I think I will leave the undercarriage and tail skid assembly until after the top wing is added with its struts and rigging, since I deem the landing gear the weakest point of this kit, structurally speaking:
Engines and connecting struts on:
Due to the extension of the engine gondolas two struts are redundant, so the two that were a little short in my batch were discarded:
Some of the struts are glued sparingly, smaller decals applied:
The Arctic Decals set includes the wheels' lettering:
After some tense moments, the top wing is on and aligned. The remaining struts will be added using the scientifically proven bendin-popin technique, once these first anchoring points are set and secured:
All but two remaining struts already in place. This hasn't been an easy thing to accomplish:
The landing gear main assemblies are meanwhile being readied:
Rigging of the tail, belly and fuselage sides is completed, and now the rigging of the wing begins. This is a bit more difficult. I managed to put on only nine lengths and gave it a break:
Meanwhile other details are taken care of:
Rigging progresses ever so slowly, only a few lengths per session. The dark paint against dark rigging material situation makes visualizing really difficult, not to mention that each segment has to be cut to exact length and then inserted in one hole and then the other, at odd angles, and trying no to bang the tail or wingtips against the visor, the lamp, the table, etc. and avoiding tangling with other details on the model.
Lots of zen attitude: "The are no struts, there is no model, there is no rigging material. All is empty. Even ‹all is empty› is empty":
More rigging is done. At this point it was decided to add the main landing gear, to see what would happen. The gear supported the weight of the model, but the stress is too obvious. The axles that hold the wheels are arched a bit. This gear won't tolerate even a minor mishandling:
The tailskid rig is glued on too:
Model standing on its gear.
I think that if you leave the model on a shelf, and if you come back months later, you may notice that the wheel axles are too curved or have given up. I think that once completed I will have to find a way of relieving the weight from the landing gear, may be using a prop in the guise of boxes or luggage stack under the fuselage:
I have to complete that rigging that is taking ages, in part due to the fact that I am replicating the double flying wires at each station. Then engine front, props, lights and other bits will be added.
The engine front and props are on, as well as the four oleo struts. The latter added much need rigidity, still, a fragile arrangement:
To be continued.....




















Great stuff so far, I look forward to more!
ReplyDeleteI hope more will come, this is a tricksy one! ;-)
Delete