(You can find the completed model here:
https://wingsofintent.blogspot.com/2018/12/rwd-5-poland-to-argentina-flight-zts.html
What were you doing in 1985?
https://wingsofintent.blogspot.com/2018/12/rwd-5-poland-to-argentina-flight-zts.html
What were you doing in 1985?
The Polish were making delightful kits.
Among them the one that concerns us today, a ZTS rendition
of the RWD-5 (and RWD-5 bis).
I love these old but sound kits, that with a little care
can be turned into very nice models. I have built a number of ZTS kits, and all
brought satisfaction and good entertainment, being very appealing subjects out
of the beaten-to-exhaustion-path, nicely engineered and very affordable.
All that said, modelers can still improve quite a bit
through some simple actions (otherwise called real modeling).
My boxing is quite old, but the company is still alive and well:
My plan is to build the machine that crossed the Atlantic (SP-AJU) and eventually reached Buenos Aires (the city I was born). It's not particularly colorful, but with a few touches (open door, some refinements) it should be a nice little model.
So let's see what we got:
Very nice instructions in two colors and a sort of vintage box (old release, now they have pretty boxes):
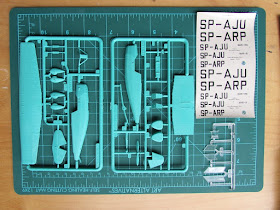
Contents: Very nice transparencies:
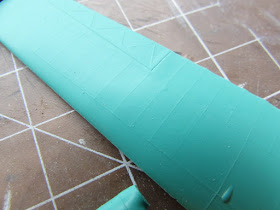
Overdone fabric effect:
This is too much and is better toned down:
The wheels come integral with the pants, a blast from the past that won't do for me:
The nose front, part of the fuselage sides, won't do for me either:
Refreshing to see something that is not made in china:
Sanding the "fabric" a bit (leaving detail, but not too prominent). The nose (metal in the original) is masked to protect it:
The elevators are separated:
Now the surface is much more credible:
The nose tips are carefully cut off:
Those naive wheels won't do:
The wheels are removed and cavities carved:
Small parts removed to be cleaned, there is some minor flash:
Wing central lower part glued:
A view of the parts (door has been cut open):
The tie down holes are drilled (only marked in the kit):
The decal sheet is well printed, and I got a double sheet. The carrier seems thin, but the color of the registrations could be wrong, as it seems that has been established that they were red:
The separated nose tips are glued together and the air intake, vent hole and prop location drilled as per photos:
The fuselage has two handles depicted closer to the tail, good effort, but I sand them away and drilled holes to later install wire ones:
Two half-wheels are prepared to be later glued to the pants:
There are two aftermarket sets for this model, a Part photoetched set:
And a Model Maker corrected decal set:
There are also many other boxings of this kit, some are old and some are new:
The hole for the Venturi is filled, since it was too large:
Some structure is added:
Now a part of the cowling is excised, and a resin engine adapted to resemble the Cirrus-Hermes IIB:
After installed a bit of structure and detail will be added:
The Pitot and Venturi are replaced:
Some components are airbrushed:
The prop is masked to paint the metal spinner. The cockpit pan is ready:
Engine goes in and prop ready:
The aftermarket decal sheet arrived.
Things look good, the sheet seems of good quality, and there is reference leaflet in color on glossy paper, but the manufacturer forgot that the oleo struts were red.
Still waiting for the P.E. set, I think the Polish postman stopped for beer and kielbasa somewhere:
The landing gear part is glued:
The decals err in the position of the wing registrations, which started immediately after the first spar (the solid area in front of the wing), and not over it:
Engine goes in and prop ready:
The aftermarket decal sheet arrived.
Things look good, the sheet seems of good quality, and there is reference leaflet in color on glossy paper, but the manufacturer forgot that the oleo struts were red.
Still waiting for the P.E. set, I think the Polish postman stopped for beer and kielbasa somewhere:
Well, the PE finally arrived, after many, many weeks of waiting:
The fret will need priming and painting, since unfortunately the metal is not silvery, but brass:
The interior is completed:
The fuselage halves are joined and the nose tip, previously separated and detailed, is glued on:The landing gear part is glued:
Starting to take shape:
Working on some details:
Dealing with the seams of the wing lower panels and at the fuselage top. The wheel pant -that I had incorrectly painted red before- are given a coat of aluminium. Some parts from the etched fret are assembled and prepared:
A few structural pieces are glued to add interest:
A gloss back base is applied:
New struts are made to replace the kit ones, that look a bit starved:
Aluminium color is airbrushed to the main elements and the masked windshield:
P.E. parts + film windows in place, together with the kit's windshield. The windshield in my case needed plenty of shaving to match the windows and the contour of the wing once presented on top of this assembly. Not an easy one, this area, by any means:
Flying surfaces are attached, as well as oleos, prop, wheels and spats.
Still to go: Venturi, Pitot, door (with handles), aft fuselage handles, engine cover, decals, and the thing I will forget to add only to realize it after I take the photos:
Small segments of tubing are cut to make for the exhausts:
The after-market decals as you can see bellow depict the plane as not having the red landing gear struts and oleos. That seems correct for part of the flight to South America, but at some point those where painted red, most likely after a panne the plane suffered.The decals err in the position of the wing registrations, which started immediately after the first spar (the solid area in front of the wing), and not over it:
To be continued....


No comments:
Post a Comment