.jpg)
(The completed model is posted here:
https://wingsofintent.blogspot.com/2022/08/bugatti-100p-special-hobby-172nd-scale.html
Special Hobby surprised modelers with the release of an all time favorite of many, the Bugatti 100P. Of unbelievable futuristic lines and design for the time, it seems incredible that the plane was built in the late 30s, in collaboration with designer Louis De Monge. The plane used two Bugatti engines in unusual positions inside the fuselage, with long shafts driving contra-rotating props, a "Y" tail configuration and a complex refrigeration system, plus a completely stylized fuselage with positive arrow wings and retractable landing gear. In fact, the design looks so extraordinarily modern, that it could have been conceived today. Needless to say, the project had to overcome a great number of technical difficulties. The objective was to build one plane to participate in the Deutsch de la Meurthe coup and another, modified, for a speed record attempt. The proximity of the war, felt by all nations, made the French government commission a fighter variant. The plane never actually flew, and it was absconded when Germany invaded France. It still exists today, restored, in the EAA Aviation Museum, and as many of you know a replica was build that had a fatal accident when flown.
If you say "Bugatti" you think Italian, which is right, as Ettore Bugatti was born in Italy, but moved to Alsace -then Germany, but becoming French after WW1- as a very young man and then he became a French citizen, where his firm was established. In fact, Bugatti is a French firm.
Contents of the box:
.jpg)
.jpg)
.jpg)
.jpg)
.jpg)
.jpg)
.jpg)
.jpg)
.jpg)
.jpg)
.jpg)
A couple of contemporary pages:

.jpeg)
Believe it or not -and Seattleans/Pugetians may know this- a primitive injected kit of this plane was released there by Projekts Models Co. long time ago (1980, 42 years ago!). I just bought one, for the heck of it. I will be posting a separate build with it, but here is a photo. I love a challenge!:
.jpg)
Continuing with the Special Hobby kit, you have to buy the canopy masks apart, something that doesn't make me particularly happy. I understand that when a different manufacturer releases an aftermarket mask you have to pay for it, but for one made by the same manufacturer? c'mon guys, include it in the kit, and charge one or two more dollars, instead of the $5.50 plus $10.55 in S&H (total $16.05) I had to pay for it! Cheeky monkeys!:
.jpg)
Extraction of the parts from the sprues and casting blocks has commenced:
.jpg)
.jpg)
.jpg)
You can see here the solution for the vents that SH provided, resin L.E. inserts for the injected parts. The other Bugatti 100 I am modeling used a different approach, trapping inserts between the fin and stab halves:
.jpg)
.jpg)
.jpg)
Separating now most of the small parts. There is a lot of detail covered here, and care is needed not to lose anything. The gates are not intrusive and can easily be removed and sanded when needed. There is very much to-scale detail for example in the props, which are paper-thin, and also some heavy-handed parts, like the wheel covers, which are thick slabs that would benefit from some thinning down. Yes, the covers had flanges and doublers but their edges were thin. Which leads me to my ongoing beef: too much reliance on computer design, too little looking at photos of the real thing. Although no doubt a very nice kit, something in it gives me the general feeling of an Academy kit, some je ne sais quoi, some geometrical approach influenced by the computer software instead of an organic one, not sure. Still, don't get me wrong, nice kit, and very happy it exists!:
.jpg)
Here is a comparison between the old kit seat (to the left) and the new kit. The "old" kit got it right. The new kit simplified the volumes and lost the ergonomic design of the original, and it's much thicker. This is the disconnect I see many times between computer design and reality:
.jpg)
.jpg)
.jpg)
I am not saying -just in case you were wondering- that the old Projekt Models kit is better than the new kit, because it is not (42 years of separation between them mean a lot), but I am pointing out that there is no replacement for a keen eye and a dexterous hand, no matter how much technology or brand power is available to you, and also considering the amount of information that is now at our fingertips. I guess it would be good to take the eyes away from time to time from that computer design program, and look at the real thing (or photos, etc).
The fit of the resin wheel well inserts to the lower half of the wings is perfect. The fit of the resin intakes in the elevators is ok, but filling and sanding will be needed, as those resin parts are just a smidgen thinner than the elevators:
.jpg)
.jpg)
Painting of some items started:
.jpg)
Unconvinced by the joystick in the kit, I made replacements:
.jpg)
.jpg)
Once the resin inserts are partially sanded down, the other wing sections are glued. There is a section at the root that needs additional support (the white styrene bits), otherwise the upper and lower parts may not align, or may displace when gluing the wing to the fuselage, as they are "floating" on that area:
.jpg)
.jpg)
The way the wing halves are designed means that there is a seam to fill towards the wingtip. A plug that forms an air exhaust on the fuselage spine is inserted from inside; more filler will go there, as the solution is not perfect. On the other hand, an air intake immediately after the canopy -also on the spine- is rendered as solid, therefore some modelers may like to carve the intake a bit, or just sand down the volume and replace it with very thin metal foil folded to shape. With this kit it would have been ideal to replace some parts with photo-etched items, like the intake just mentioned, the inst. pan. and its two "elbow" supports, a lever that goes on the side of the inst. pan., the wheels covers, etc. No doubt someone will come up with that...at an extra cost:
.jpg)
The wing is glued to the fuselage. I am still finding fit issues in the form of a gap at the seam chord-wise, and around the separate triangular parts that form the end of the wing root on both sides (containing the air exhausts). This gaps are not big, but in my model they are big enough to require padding with .05 styrene sheet, and of course filler.
.jpg)
The complex, flowing volumes of this plane have no doubt been a serious challenge for the kit maker, and for some things I guess there are no easy solutions. I am building in parallel the old Projekt Models kit of the same plane. Some approaches I feel are better in that kit, some in this. I wish we could have had the best of both worlds. Nothing here is really difficult, just the usual tasks of refining the fit, add filler, sand, etc. that all modelers practice in most kits. It is that I had the expectation of an overall better fit and engineering.
The tail is on. Once more the strange engineering makes the addition of these parts awkward, plus the fit again is not spot on, making the seams not easy to blend. The model is now ready for a first coat of primer that I have no doubt will reveal areas that need further attention. At this stage I tried the canopy on. The transparency is very clear, but it had some flash -easily removable. The bottom "frames" are too thick (exceeding the fuselage width), or perhaps it was just a molding "lip", whatever the case, they had to be carefully sanded down to obtain a good fit:
.jpg)
I love the fact that Special Hobby released this kit, as the plane is of extraordinary appeal, it's from the Golden Age, and it's civil. The complexity of its shape may have caused more than a bit of head scratching to the kit designers/manufacturers, and due to this and their engineering approach, this is not really a very"comfortable" kit to build. Still, I applaud its release, and modelers with some experience can certainly cope with the small challenges it presents.
Nothing more exciting than two Bugatti 100P flying low and inverted over the building board. Foreground Special Hobby, background Projekt Models Guano Works:
.jpg)
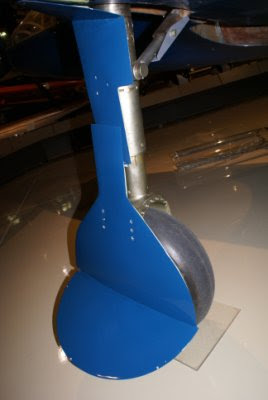
As the last stages of the build are reached, it is of note that whilst the old Guano kit included braces for the landing gear legs (see below), the new SH kit doesn't. The curious thing is that the legs do have a locating hole for those braces, so perhaps someone forgot to include them in the molds. At this stage the landing gear doors were sanded down quite a bit, to eliminate that house door-like thickness, without forgetting some little bits that are provided separately. It's strange that while the props are rendered wafer-thin, other parts that could have benefited from a light hand.
Real plane (thanks to Christos Psarras who led me to these images):

Primer and a bit of painting:
.jpg)
The two Bugattis receive some paint:
.jpg)
The ancillaries are painted at this stage too:
.jpg)
Now for some notes on the canopy: the original had some arcs of the same
plexiglass (or the likes) material from inside at the front section of the canopy,
these were translucent and whitish due to the glue. This effect can be
replicated using Scotch "magic tape", which is also translucent and
whitish, from the inside, as in the original, not as external frames.
Then there are metal flanges at the base of that top section, and other
metal flanges surrounding the aft section and at two hinging points
running lengthwise. Summarizing: there is no blue on the canopy. The kit's transparency has the "arcs" at the front of the canopy molded in relief, which is not accurate. The rest is ok. So to be clear: the first three arcs on the canopy are not metal as the instructions say, they were plastic reinforcements, they may be left unpainted or painted a translucent off-white. The rest of the arcs (4 and 5) were metal flanges, and so was the base of the canopy all along. There are difference in the metal tones, so look at photos of the original at the EAA Museum, not of the (not quite) flying replica.
Since we are at details, the spinner had a little hole at the very tip, and that's absent from the kit. Easily correctable, though.
The canopy is on. The wheel hubs have been masked and the tire color painted:
.jpg)
The wheels are set in their forks, and the legs glued to the wing. The fit of the square hole-and-peg for the legs has to be -once again- adjusted, as the peg is too big. The round stick at the root of the leg is not a comfortable fit in the well either. Minor touches will fix this. Then is the prop six-part assembly: be careful, as the props are keyed with a little pip that goes into a hole, and their pitch is set accordingly to their position (for or aft). Failure to understand how this works will produce a headache. The model ,is ready now for the LG covers, that have been thinned; even so, the small roundish bits that go against the wing are still too thick, and will be further thinned. As mentioned before, P.E. parts would have been perfect here (and in other places too). If AMP (and many other manufacturers) can include P.E. parts in their kits, I can't see why SH can't do the same. Remember that SH forgot to include the LG small diagonal braces, these will have to be fabricated and added:
.jpg)
.jpg)
Completed model:
https://wingsofintent.blogspot.com/2022/08/bugatti-100p-special-hobby-172nd-scale.html


.jpg)
.jpg)
.jpg)
.jpg)
.jpg)
.jpg)
.jpg)
.jpg)
.jpg)
.jpg)
.jpg)
.jpg)
.jpg)
.jpg)
.jpg)
.jpg)
.jpg)
.jpg)


.jpg)
.jpg)
.jpg)
.jpg)
.jpg)
.jpg)
.jpg)
.jpg)
.jpg)
.jpg)
.jpg)
.jpg)
.jpg)
.jpg)
.jpg)
.jpg)
.jpg)
.jpg)
.jpg)
.jpg)