(the completed model is here:
https://wingsofintent.blogspot.com/2020/07/twin-wasp-northrop-gamma-jackie-cochran.html
The Eternal Classic:
Some designs just seem to embody the Golden Age Divine Proportion.
I know we all have our favorites, I have many, but the Gamma is one I keep going back to.
I have built it first a lot of years ago following the original boxing, but more recently I went for seconds and thirds, incapable of resisting
the need to extract more flavorful modeling juice from it,
building it in some of its more exciting incarnations:
https://wingsofintent.blogspot.com/2017/07/modified-northrop-gamma-experimental.html
https://wingsofintent.blogspot.com/2017/05/conqueror-gamma-conversion-completed.html
I have now the Arctic Decals/Dekno resin/decals set that was released
after my build, to do the Conqueror Cochrane again (you need a
particular Azur-FRROM kit for that), but once more I couldn't resist
taking the awkwardest path, and decided instead to do the very long nose
conversion withe the stripy cowl used by Jackie Cochran, powered by a
Pratt & Whitney Twin Wasp Jr. for the 1935 Bendix race.
I got a number of photos of it, and the old and venerable Williams Bros kit.
Again a lot of surgery will be needed to modify the fuselage top, the
nose, and the details on the kit that are not just quite right (rudder,
for starters, and cockpit).
Since I have done this conversion before, I know what I am in for (sigh...).
I am still looking for a plan/drawing of the plane, but it will be very
easy to extrapolate from photos to extend that nose and work out the
details associated with it's Pinocchio characteristics (Pinocchio, now
what that reminds me of? ah! a president!)
The intended plane (images from the SDASM flickr photostream):
Actual work commenced.
I got an old boxing of this kit, with lots of hard flash. Cleanup took a little while.
The boxing included that printed material of old:
A lot has to be done to that wing. Engrave those ailerons, modify those
short stiffeners, remove the central fairing and substitute it for
proper ones, fill those leading edge lights, add the retractable landing
light under the wing, add nav lights to the wing tips, etc. etc.
Not to mention that fuselage, which is far from where it should be for
this particular Cochrane incarnation. The openings and cockpit pan need
to be moved back, the turtledeck changed, new transparencies, and so
forth.
The rudder needs a mass balance incorporated too:
I will use just part of one of the nose plugs, since I have to extend the nose much further:
Here is how the excised ring will fit:
The gap to bridge:
In order to create the needed added section, styrene laminations are wrapped around a tube:
One large opening is created, and then a part to cover the section ahead that is not needed:
The cockpit pan is drastically reduced in width to be able to slide it back:
The front of the plug that I sliced before is also glued. The idea is
that one will be connecting the fuselage with the extension and the
other will be at the front of the extension, holding the engine as
originally intended.
(I ordered the engine from Engine & Things in Canada):
Loop and Venturi from the spares:
The balance portion ahead of the rudder is engraved, the old line will be deleted using putty:
Work has begun on the wing.
Some time was spent on obtaining a good fit, which implied vigorous but careful sanding of the mating surfaces.
Then the central relief on the bottom was obliterated.
Then ailerons and flaps were engraved, flaps ultimately separated, some
stiffeners corrected, and the holes for the "park bench" aileron
supports filled with stretched sprue.
Next will be the drilling of the landing lights, new fairings added to the bottom central panel, and gluing of wing halves:
The assembly would look like this (the engine is just something I
grabbed from a Khee-Kha kit to represent the one that will be there, a
Pratt & Whitney Twin Wasp Jr. ), the added section will be shorter
and the cowl has many cooling gills that need to be added):
The added section at the correct size (dry fit):
The fine raised lines of the kit are used as a guide for the engraver:
The wing halves are united after drilling the position of the
retractable landing lights under the wing, and placing some resemblance
of structure inside the flap areas. The clear leading edge "lights" are
are glued in place, and later will be covered since this model did not
have those:
Something like this:
A small intake and dump seen in photos are made:
Little work on the wing:
Exhaust:
The build so far:
The simple interior was painted...
..and glued to one side (further back, you may remember, to fit the model 2G config.
I used the inst. pan. decal from the very old Microscale set that came with the kit. Surprisingly, and although it took about 10 minutes to soften, the decal did not brake or shatter, and adhered properly:
The nose plug is glued:
The cowl will look like this, cooling gills will need to be added:
After adjusting the mating surfaces a bit (just a bit, the fit is quite fair), the wing is glued on:
The bit closing the front of the cockpit area -needed for this version- is glued in place:
The rudder had a different, angled ending, which is sawed-in. The old lines will be puttied and sanded:
Horizontal tail in. Look at those lines. It must be love!:
The landing gear is on, and a dry-run of the aft cockpit fairing, that needs its base sanded down a bit to sit just a bit lower:
A preliminary primer coat. Some work is need in several spots:
Some work done after the primer, fairing behind cockpit opening to match 2G lines in place:
Things look better now. We are getting somewhere:
Now that the surface has been taken care of, it's time to add those particular items pertinent to this specific version, the conduit on the fuselage side, an air scoop to the left of the nose, the exhaust, and -not visible in the photo- a little dump on the belly. The locations of the Venturi and loop are drilled too:
My losing talents are improving by the minute. Not only did I lose the instrument panel for the Scooter, I also lost the tailwheel of this Gamma, and had to make a new one:
A leftover length of strut end is sanded to a teardrop shape:
Then cut off:
And added on the fuselage where photos show a little fairing of the same shape.
The aileron linkages are added:
I started experimenting with the cowl cooling gills:
I think that if I wick some white glue between the gills, it could give the impression of the interlocking they have in real life. We'll see:
Started to play with the four sections that compose the canopy:
There were two retractable stirrups:
I changed the cowl gills to 0.05 plastic, curving it as did to the previous one before cutting and attaching:
It worked better:
And what do get when you come back from an airbrushing session and place that wood plank on top a cowl?
A flowering cowl! (at least we know it works!):
Repaired:
Trying some mods of a prop from the spares bin to make it similar to the one employed in this plane:
Light gloss grey base and some details painted:
A bit more:
A base coat of aluminium was applied:
Masks for the home-made transparencies are measured, cut, and applied:
Nav lights are added:
The previously separated and summarily detailed flaps are glued:
Following the advice of a fellow modeler, decals are placed from inside, the area later to be painted black.
The retractable steps are added:
The engine from Engines & Things in Canada arrived, was assembled and painted. The canopy sections were masked and painted:
If you want to use the whole engine, the nosepiece I added from the kit is made redundant, thus is removed. The engine can be installed right on top of the styrene extension I added first, giving it the right length to match the cowl:
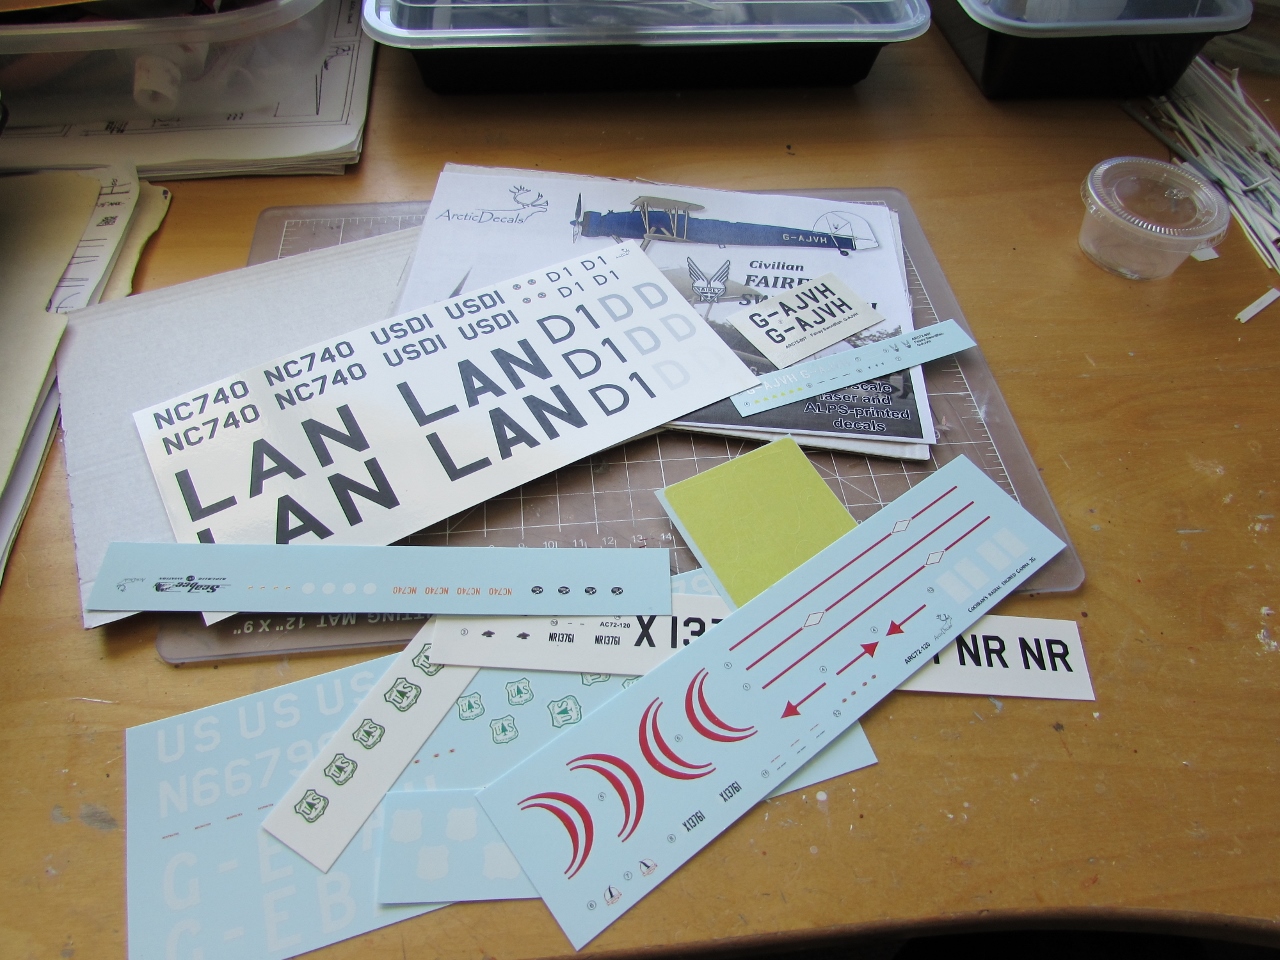
Yeepee! the other envelope with decals arrived!
The world post offices have proved Eisenstein theory of relativity!
The envelope send 75 days ago arrived almost at the same time as the one sent about two weeks ago!
Nobel price for the Post Offices!
A future project:
Now I will be able to complete several projects!
The represented subject had the stab leading edges and root fairings painted red. The maks provided by Arctic Decals are clever and precise:
Paint applied, masks lifted, good results. Notice the size comparison between the Gamma and the Dragon, not very different:
The set from Arctic Decals:
A word about the different schemes.
Under Cochran's ownership, photos show the plane in
different schemes.
The one chosen here has those curved motifs on the cowl, an
X registration -letter that was applied on a white patch that covered
the NR one-, on tail and wings, and a
line on the fuselage sides ending in an arrow at the front, and with a running
hare in the middle on a rhomboidal shape.
The regs on the wings, contrary
to many common misrepresentations, are not perpendicular to the fuselage,
but parallel to the leading edge. This is clear after studying photos, and not
blindly following plans and instructions.
There were other schemes, again still under Cochran's
ownership:
-At the race (which the plane did not complete) a number 55
was applied to the airframe, and the reg is preceded by NR.
-During what seems like the original trials, again the reg
numbers are preceded by X, and no other decoration is visible anywhere on the
plane.
Canopies, Pitot, and an engine disk interface are added:
Landing lights, ventral antenna, and tailwheel added. I started to paint the main wheels. As these rotate, you can do a section at a time:
Engine and cowl on, and decaling starts:
Well, decals have been applied and are setting.
May be tomorrow I can do the photo session of the completed model:
To be continued....