Almost by chance I just found out that the Frog kit of the Spirit of St. Louis is NOT the same mold -as stated in many reviews and kit research sites- as the Testors/Hawk kit. In fact, it looks much better. The ribbing effect is there, in a relief form, not as furrows like in the Testors kit. Wing and stab come as two upper/lower halves, not as one piece of plastic. I do not have a Frog kit at the moment, so I can't comment much more on it, but so far it looks to me as a much better starting point than the Testors/Hawk version.
Since I want to build the Japanese NYP-2, I will try to get a Frog kit and perhaps post a comparative review/building article.
That teaches you not to take everything you see posted out there as the ultimate truth. Same goes for plans and historic backgrounds, which most of times need some kind of "adjustment". The fact that you have a plan against which you compare kit parts means close to zero, since no plans of the same subject EVER are exactly the same (unless one is a copy of another). Spans and lengths and other measures of the real planes often differ in some degree. All of this is even truer for the early aviation subjects some of us like to model.
Always compare to photos, read as much sources as you can, and never assume you "got it absolutely right".
The misfortune is that contemporary -to us- information is taken from publications or descriptions that not always are 100% correct, and since we do not generally have access to the real thing, the info is just copied and so mistakes and errors are perpetuated.
By the way, your scanner and printer further slightly deform the images, so please do not think you are the Millimeter Crusader trying to find minute differences in the kit you are building/reviewing.
Reality is fuzzier than we would like it to be. But you still can be happy.
Sunday, January 13, 2013


Thursday, January 10, 2013
Modified 1/72 Testors Ryan NYP completed
Here is the completed model
(The building article is here:)
http://wingsofintent.blogspot.com/2012/12/modified-testors-172-ryan-nyp.html


(The building article is here:)
http://wingsofintent.blogspot.com/2012/12/modified-testors-172-ryan-nyp.html


Saturday, December 29, 2012
Modified Testors 1/72 Ryan NYP
(The completed model is here:)
http://wingsofintent.blogspot.com/2013/01/modified-172-testors-ryan-nyp-completed.html
After much debate, it is still undetermined when the first 1/72 kit of the Ryan NYP was issued. Although the later incarnations are known, in the form of kits from Frog, Hawk, Airlines, Novo, and the like, the first fossil kits clearly show up in the Cambrian strata, together with trilobites and algae, before even the most primitive dinosaur dared to show its ugly snout. Some scholars go as far as placing them as contemporaries of the first stromatolites. We may never know; but what we do know is that they survived the cataclysmic extinction events that wiped out other kits. We know that in our times, the kit re-popped under the Testors brand.
 Sanding of the putty-filled areas
 Door cut out and "stringers" added, together with some ribs
 More ribbings
 Yet more ribbing
 and yet...even more ribbing




 painting begins, first a black base:
 Then aluminum color
 and also the polished aluminum areas are masked and painted:


http://wingsofintent.blogspot.com/2013/01/modified-172-testors-ryan-nyp-completed.html
After much debate, it is still undetermined when the first 1/72 kit of the Ryan NYP was issued. Although the later incarnations are known, in the form of kits from Frog, Hawk, Airlines, Novo, and the like, the first fossil kits clearly show up in the Cambrian strata, together with trilobites and algae, before even the most primitive dinosaur dared to show its ugly snout. Some scholars go as far as placing them as contemporaries of the first stromatolites. We may never know; but what we do know is that they survived the cataclysmic extinction events that wiped out other kits. We know that in our times, the kit re-popped under the Testors brand.
I hear you, in all those eons the kit did NOT evolve: the
same recessed engraved lettering, the same chunky engine, the same strange prop
blades, the recessed ribbing on all surfaces, the even more mysterious interior
filled with the horror of nothingness...
BUT, is there any other, more evolved 1/72 kit specimen
around? Nope. There is no other contemporary kit in the market of one of the
most iconic planes of all times. The scholars found out that most of the kit
manufacturers are too busy churning out infinite versions of the same
warplanes. Talk about dinosaurs...
The kit: you will need only your fingers to count the kit’s
parts. Scale-Master decals are included, as well as a clear base, which is
something like your appendix, still there after all those millennia, just in
case, but of no real use. Attached to the clear base, by the way, are the
not-so-transparent transparencies. The word “HAWK” in tiny font can still be
seen under the base.
One of the photos shows an obscure statement engraved inside the fuselage sides: "Made in USA". Archeologists and paleontologists are still debating about what that could possibly mean.
One of the photos shows an obscure statement engraved inside the fuselage sides: "Made in USA". Archeologists and paleontologists are still debating about what that could possibly mean.
So, what do you do with your Testors kit? Well, it is long
list. First, forget about that tail skid and the anemometer post protruding
from the fuselage halves, they will be inexorably obliterated anyway during
construction when you try to smooth the fuselage joint. Second, get out the
putty and cover that hideous, unsightly recessed lettering –and the ejector pin
marks under the wing since you are at it-. Third, get another, better engine,
chop the cylinders and replace the kit’s ones.
Fourth, figure a way to produce a credible fuselage and
flying surfaces ribbing. You may replace the sort of chunky tail feathers if
you feel like. Fifth: hey, scratch some interior. Not much can be seen of it,
but you can cut and pose the door open to help with that. Do not fill the
recessed lines on the nose when you deal with the lettering there, those are
panel lines and are sort of OK.
And, did you know that a second machine (Ryan NYP-2) was
built and sold to Japan? Aha. It was registered J-BACC and went through a few
color changes. There, another option for your frozen-in-time, primeval Testors
kit.
Now, a confession. Long, long time ago when I was young-er,
naive and inexperienced, I built the thing, out of the box, in all its tragic
crudity. I know. I will post some photos of it, as penance for my modeling
sins.
By the way, for filling the lettering all over the model I
used Tamiya white putty by suggestion of my son, himself an extremely
accomplished modeler. Forget Squadron and 3M, the Tamiya putty is great. I do
not particularly like their paints, so I was reluctant to buy the putty, but my
son’s advice was good, and so is the product.
So as said before the stringers and ribbing effects were dealt with, a nice interior fabricated for it to show through the open door and windows, and a few external details prepared for later addition. The engine was replaced by an Aeroclub white metal item and the kit's "engine" reworked and used as a master for a vacuformed part . Holes were drilled for the control cables, fuselage handles and stab struts (all missing in the kit). Other details that may be added are the fairings of the wheel hubs, the carburetor intake, a better representation of the anemometer, control horns and cables, the periscope, etc. Different shades of metal paint were used, and a combination of home-made and the kit's decals applied. Beware -to add insult to injury- that the kit's decals' instructions have the position of the rudder ones (3 and 4) reversed. Besides the other mentioned details, the kit is missing a diagonal brace strut that bridges the rear leg attachment of the LG to the fuselage and the top of the suspension mechanism.
So, can you build a decent, accurate replica from this kit? only if you commit a great deal of time to research and fabrication.
Can a 10 year old have fun with this simple kit without any kind of accuracy concerns? you betcha.
But if you are a serious modeler, you know what you are up for. I would not hesitate to scratch-build this one, since the time involved should be actually less than the time I employed here in accurization and detailing. As long as the results are good, then is all fun.
So as said before the stringers and ribbing effects were dealt with, a nice interior fabricated for it to show through the open door and windows, and a few external details prepared for later addition. The engine was replaced by an Aeroclub white metal item and the kit's "engine" reworked and used as a master for a vacuformed part . Holes were drilled for the control cables, fuselage handles and stab struts (all missing in the kit). Other details that may be added are the fairings of the wheel hubs, the carburetor intake, a better representation of the anemometer, control horns and cables, the periscope, etc. Different shades of metal paint were used, and a combination of home-made and the kit's decals applied. Beware -to add insult to injury- that the kit's decals' instructions have the position of the rudder ones (3 and 4) reversed. Besides the other mentioned details, the kit is missing a diagonal brace strut that bridges the rear leg attachment of the LG to the fuselage and the top of the suspension mechanism.
So, can you build a decent, accurate replica from this kit? only if you commit a great deal of time to research and fabrication.
Can a 10 year old have fun with this simple kit without any kind of accuracy concerns? you betcha.
But if you are a serious modeler, you know what you are up for. I would not hesitate to scratch-build this one, since the time involved should be actually less than the time I employed here in accurization and detailing. As long as the results are good, then is all fun.


The first coat of primer and subsequent sanding to soften the ribbing (the procedure will be repeated a few times until a convincing, realistic surface is obtained):


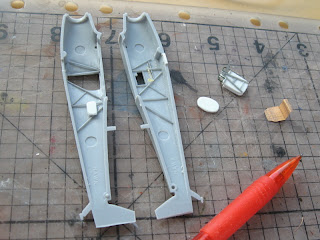
An obscure statement engraved inside the
fuselage sides: "Made in USA". Archeologists and paleontologists are
still debating what that could possibly mean.

Fuselage sides thinned from inside:

Some structure added and the front of the tank and inst. panel basics done:


Other details added, including the "wicker" chair:


Wheel hub fairings and door:


another set just in case:


Wheels covers' stitching simulated and other parts prepped:


Subscribe to:
Posts (Atom)