(The completed model is here:)
The best reference I have found for this Stinson A endeavor (and many other modeling adventures) is Skyways Magazine. You will find a four-part Stinson A article on these Skyways issues:
#75, Jul 2005
#76, Oct 2005
#77, Jan 2006 and
#78, Apr 2006
There is a link at the right of this page that goes to their website.
The Formaplane Stinson A vacuformed kit:
To accuse a dinosaur of lack of elegance and subtlety is not
really fair.
Dinosaurs were The
machines of their time, and you could say that they fitted their niche
properly.
In the same way, it is not really fair to criticize -based
on today's standards- a kit made many decades ago. Or is it? well, the fact is
that while some stand up pretty darn well, like a Rareplane vacuform from
Gordon Stevens, others do not fair as well. Anyway, I am sure their makers
spent a lot of time, money and love making them, and I am still to hear that
any of those dedicated people became rich in the process. So, when I poke a
little fun at this sort of less fortunate, not so well made ugly ducklings, it
its good-hearted, and more in the vein of having a little laugh, laughing with them, as they say, and not at them.
That said, I think that vacs come mainly in three
categories:
a) "Different than the usual injected kit, but Very
Interesting, and a subject that nobody else will likely tackle, nice
accessories, let's build this one"
(The mentioned Rareplane, now O.O.P. and contemporary Khee
Kha Art Products offers)
b) "Oh, I see, a little bit* of work will be needed here,
but again a plane I want to build and no mainstream company is willing to kit"
(Execuform, some similar offers with plain but basically
correct shapes and not much in the accessories department)
* well, may be more than a little bit :-)
c) "Oh dear"
And the winner for the third category is today's build:
Formaplane/ MHW Stinson "A".
You will see further down why so deservedly so.
Actually, to tell the truth, there is a forth category:
"Oh C--p!", but we won't deal with it today.
So, why vacs? You may have seen some of the many I have
built. There are a number of reasons. I
enjoy them a lot, it is a different approach, more involving, more creative.
You learn a lot, and your modeling frontiers expand. They cover subjects that
the mainstream manufacturers tend to ignore or dismiss. Many of the old and
contemporary vacuformed kits are very well made, and not more difficult to
build than a normal kit once you get used to their specific ways.
So, see what I mean, where in heaven will you find a 1/72
Stinson "A" injected plastic kit?
The plastic has a good thickness, forgiving, one may say,
given the level of surgery you will need to perform. Forget about using the
cowls, engines and "ancillaries". They are a totally lost cause. Just
concentrate on the main shapes. No decals on my issue of this kit, no clear
plastic for windows and windshield, and a "plan" that is not to scale,
bigger than the model parts; why would anybody want a not-to-scale plan? Let's
see...hum, that surface detail is not good, especially on the tail and fuselage
sides; that's why sometimes no detail (Execuform) is better than horrid detail;
something will have to be done regarding it later on. Accuracy? it compares relatively
well to a good plan I have in external lines.
The engine gondolas are a thing of fantasy, and will have to be re-worked
to represent reality. The leading edge of the wings inside the gondola is
another mistake, it has the wrong angle. The vertical stabilizer has to go and
be replaced by a scratched one. Most likely the horizontal stab too.
But let's start and tackle the task one bit at the time.
I got this old kit from Scroungy and Smoochy, the kit-trader dogs of a certain Christos Psarras from Parabailarlabamba. I traded it for some bones, flea-powder, and tickets to go see Vance Gilbert, musician extraordinaire, whose song "Put a Prop On Your Ole Jet Mamma" reached the top of the charts at Geneseo. I am also grateful to Lars Opland, Jim Schubert and all other members of the Ornithopters, a secret association of the modeling underground world which agenda you better remain oblivious of. Actually some of its very members are equally oblivious of it too.
The ominous red leaflet:
A plan in a bigger scale than the parts:
General view of the contents, uncensored:
The ectoplasm-made engine cowls, which you actually can hear breathing in quiet nights as you try to sleep:
The....errr....engine?
A profiled Contrail rod is further shaped to teardrop cross section:
The tip is rounded, and then cut. Repeat:
And then repeat again, actually repeat 54 times. No kidding:
Lefover cowls spares bin, engine used as guide to mark bump's positions:
Glue bumps in place.
Repeat, two more times:
The bumps will be later subdued with some sponge-sanding:
The external cowls' trailing edges will be later shorten to size:
The cowls now almost ready and the nice radial engines from Engines & Things from Canada -Lycoming 9 cyl-:
Quite nice thing
The parts are cut free (you can scream freedom!!! and run around the block, much to the delight of your neighbors):
Other than perhaps the wheels, no ancillary parts I think can be used:


The wing trailing edges are rasped until adequate thinness is achieved, here compared with untreated other half:
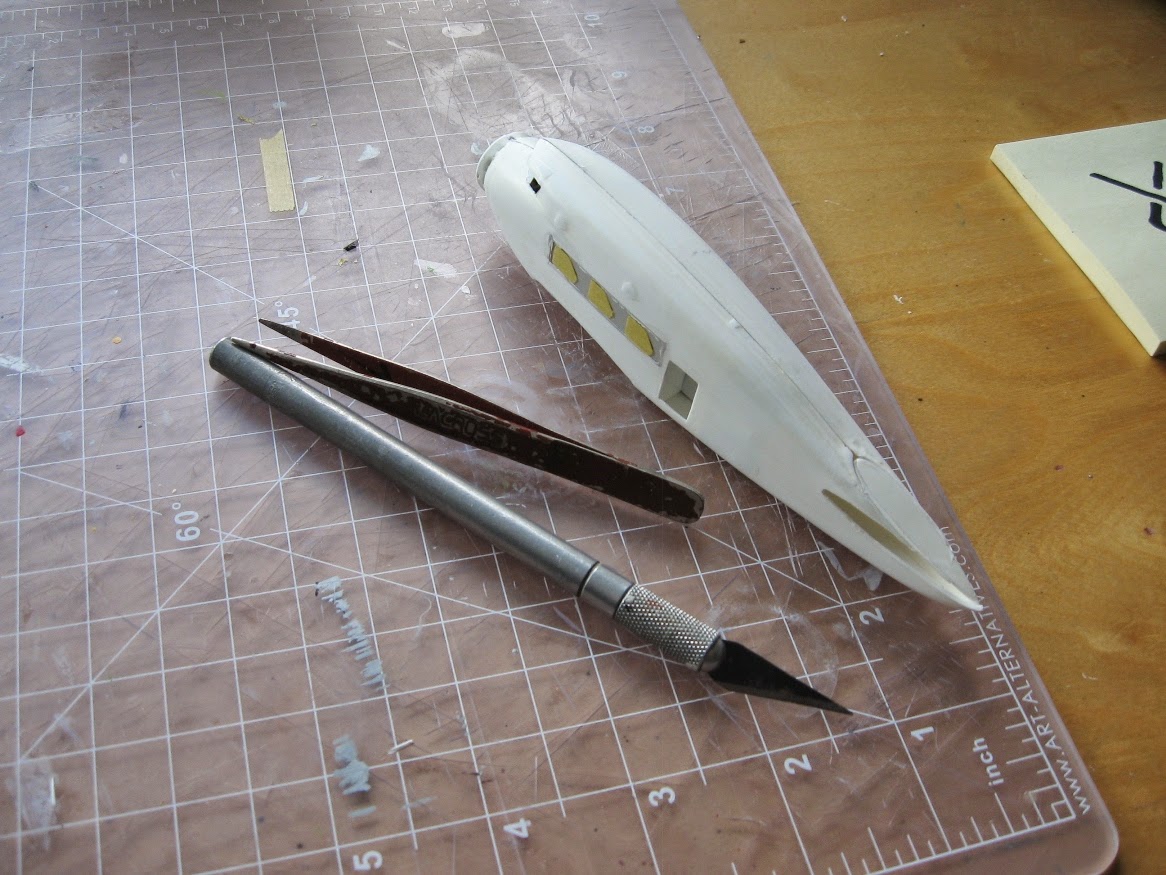
The vertical stab is removed, since it is close to useless:
Windows and doors are cut open, wing halves glued together. The stab is going to be replaced too, not good enough:
Gondola partial transplant
In an attempt to correct the inaccuracies of the kit's gondolas, a large section at the bottom of the gondola is removed (since it is incorrect anyway) and transplanted to the top, where the gondola is exceedingly short in length. This transplant should be sanded and slightly shaped and positioned at the back, close to the trailing edge, leaving a gap to be filled by a manufactured half-cylindrical section.
In turn, the false/incorrect end at the top, should be removed and relocated as a continuation of the front of the bottom gondola, trimmed and shaped to match an area that has to be scratchbuilt too, basically reversing the aft parts of the gondolas. We'll see if the patient rejects or accepts the transplant:
Cut part loosely positioned on top:
Again some dry-fitting to better appreciate shapes, distances and the like:
Removal of top wing atrophied gondolas:
Trying the fit at the bottom wing side:
The "extensions" are glued on top:
Supports are glued from the inside to hold the curved section to be added:
The wing leading edges inside the engines are given their true angles removing some excess material. Later they will be re-contoured:
The added curved sections glued in place:
Using a contour gauge tool the bulkheads are made:
Since the wheel hubs were a little sketchy, new ones are made with styrene rod:
The landing gear wells are given some impression of structure:
The seats are made:
The surface detail on the fuselage is almost totally obliterated, leaving only a faint relief. The wings are also given several passes with a sanding sponge to tone the "detail" down. Flaps and ailerons are given more definition with some engraving:
The last vestiges of the vertical stab are sanded down...
...leaving a gap
A piece of paper is rubbed against the gap to create a pattern...
...with which a styrene piece is cut and fitted to one side of the fuselage. This area will need more work later on:
New tail surfaces are fabricated:
The tail feathers ready:
The landing gear doors (only present in the prototype) are fashioned as said before from the removed top gondola fairing. The windshield is cut away, as well as a small window on the right side of the cockpit. Also the slot for the stab is cut open:
Of course, after cutting out those windows, I changed my mind and decided to apply this time a method that fellow modeler Alex Bigey passed on: an oversize strip of clear plastic that is later one masked with the windows' shape inside and out, and which edges are fused with the rest of the fuselage. So the whole window section was cut out:
Then the individual masks for the windows are applied, outside...:
...and inside -to be able to spray the interior color-:
All bulkheads are made and presented in place. We have in this plane four compartments: cockpit, cabin, restroom and luggage storage:
The individual bulkheads are given details, here the cockpit/cabin door:
Then bathroom door:
The really nice Aeroclub accessories. Pity Aeroclub does not commercialize them online as it used to be. Now they are hard to get, and some retailers charge a ludicrous high price for them, beware!.
The level of detail is good, and have been for me an essential complement to my scratchbulding for years. I miss the Aeroclub online store. These were kindly provided by El Ilustre Caballero Armando Gil, to whom I am very grateful.
A few instrument panels are prepared, to later chose the best.
The overhead baggage bins are added, the cockpit is taking shape as detail is added:
The cockpit area main structures and details are in place:
The fuselage sides had strips added to help with the alignment and contact surface later on when the two halves are joined. This is common practice for vacuforms but you have to be careful of not getting ion the way of bulkheads and other parts. The strip on the cabin ceiling will be treated as a support for the dome lights:
For untold generations modelers have suffered from being deprived of furnishing the restrooms of their models with the proper accessories. This is my humble, scatological contribution to the modeling universe. The method is clear and simple: cut a strip of rice paper, smear on some stick glue, roll the strip on a styrene rod of very small diameter, let dry, cut the rod, add two mounting pieces, presto!:
And the tap since we are at it:
The interior is given some color:
Details are painted and inner window masks removed (do not forget!):
Some leftover round widows from the spares bin are used as ceiling lights:
The instrument panel, seat belts, etc., are in place:
A mirror is added to the restroom:
An impression of curtains and rods is added, other sub-assemblies on the go:
The seats already inside:
A "coat" is printed, then cut; it will be "hanged" somewhere inside:
Fuselage sides glued together:
The part needed for the lower gondola -different in this prototype from the series machines- is carved:
And then vacuformed parts made:
The horizontal tail is glued in place:
The landing lights recesses are given an aluminum tube liner:
Some little exit scoops are added to the gondolas:
A bit of Milliput is used to fill the gap and smooth the joint between stab and fuselage:
The fairings for the lower gondola are prepared and some other support parts are put in place:
The fairings are glued. The retracting path for the aft legs of the landing gear will have to be cut-in later on:
The wings are glued to the fuselage, and now the original and attractive shape shape of this plane is revealed:
The small triangular windows in the cockpit roof are cut out. Various spots are treated with putty:
The rough nature of the original kit, plus all the modifications and added parts, made the job of preparing the surface for painting extremely lengthy. Filing, filling, sanding, putting, sanding again, etc. went over several sessions, possibly the highest number of them I recall of all my models, about twelve times or so. But now the first coat of primer is on...which of course only means that more blemish-spotting and puttying and sanding is on the way:
The completely modified lower half of the engine gondolas are clearly seen here:
And then more details. The cargo and passenger doors are made and the modification of the Aeroclub props to turn them into Smith variable pitch ones:
The prototype's cowls had an air intake at the top, so the model's cowls are drilled in order to insert an aluminum tube faired with then rest:
More sanding, some more little blemishes to be corrected:
Another coat of primer -white this time- is applied:
The Landing gear parts are made from metal tube and wire:
The wing struts are prepared -notice the aft one is narrower than the fore one-:
The model is airbrushed with the basic tone:
Not forgetting the smaller parts (cowls, struts, LG doors, fuselage doors):
The doors are painted with the interior color on the correspondent side:
Decal louvers are applied to the nose as per prototype photos:
The model on its feet:
Some components:
Small touches: the tinted window panes on top of the cockpit, the fuel caps on the engine fairings. At this stage progress seem to slow down,since the smaller details are less visible and therefore their visual impact at first glance is not as noticeable, and also because you have to be very careful not to damage the finish and protruding parts (i.e. landing gear):
One by one the windshield panes are measured, cut, adjusted and glued:
The other side
In the pauses decals are applied:
A view of the building board area:
Yet more decals:
And now the two pairs of wing struts. Still to go: painting the scheme on the three cowls (most likely hand-painting), LG doors, nav lights, doors, glue engine/cowl/prop groups in position, etc. :
Nav lights added, cowls painted, "suit on a hanger" ready to go in on a partition opposite the entrance:
Strut reinforcements in place, engines inside cowls, landing gear doors in place:
Engines glued:
Props in place. Notice the handles just added to the doors:
Now the exhausts are starting to be added, two per engine:
completed model: