
http://wingsofintent.blogspot.com/2017/03/caudron-c600-aiglon-civilian-sbs-resin.html
Every time I have in my hands an SBS kit, I feel I am in modeling paradise.
The exquisite casting, precision of detail, noble nature of
the resin employed, subject appeal, treatment of the assembly sequence,
instructions, accessories, the superb decals, even the sturdy box and careful
packaging, ...everything is just wonderful.
I said it before and will say it again: you all know I build
all sorts of kits, from Frankenkits to good ones, from vacuform to resin, old
to new, small to large, etc., plus my own scratchbuilding. There are incredibly
awful kits and excellent ones out there, and everything in the middle, I have built all types, more than 300
of them only in the last 10 years.
But this is beyond everything I have seen, touched and built
before.
Those who frequent these pages may be familiar with the several
DH88 racers and the Farman F.190 I have built from their kits, always a treat,
a pleasure, a joy.
This Caudron is no different, and boy what a great model
this is.
SBS incorporated some features normally present on injected
kits, like holes and pegs, keys and recesses. All contributing to the alignment,
sturdiness, and ease of building.
It took me less than 20 minutes to separate all but the minutest parts from
their casting blocks (there is no need to rush, though, and please use the
right tools if you want good results and clean parts, and be careful not to
mangle or lose them).
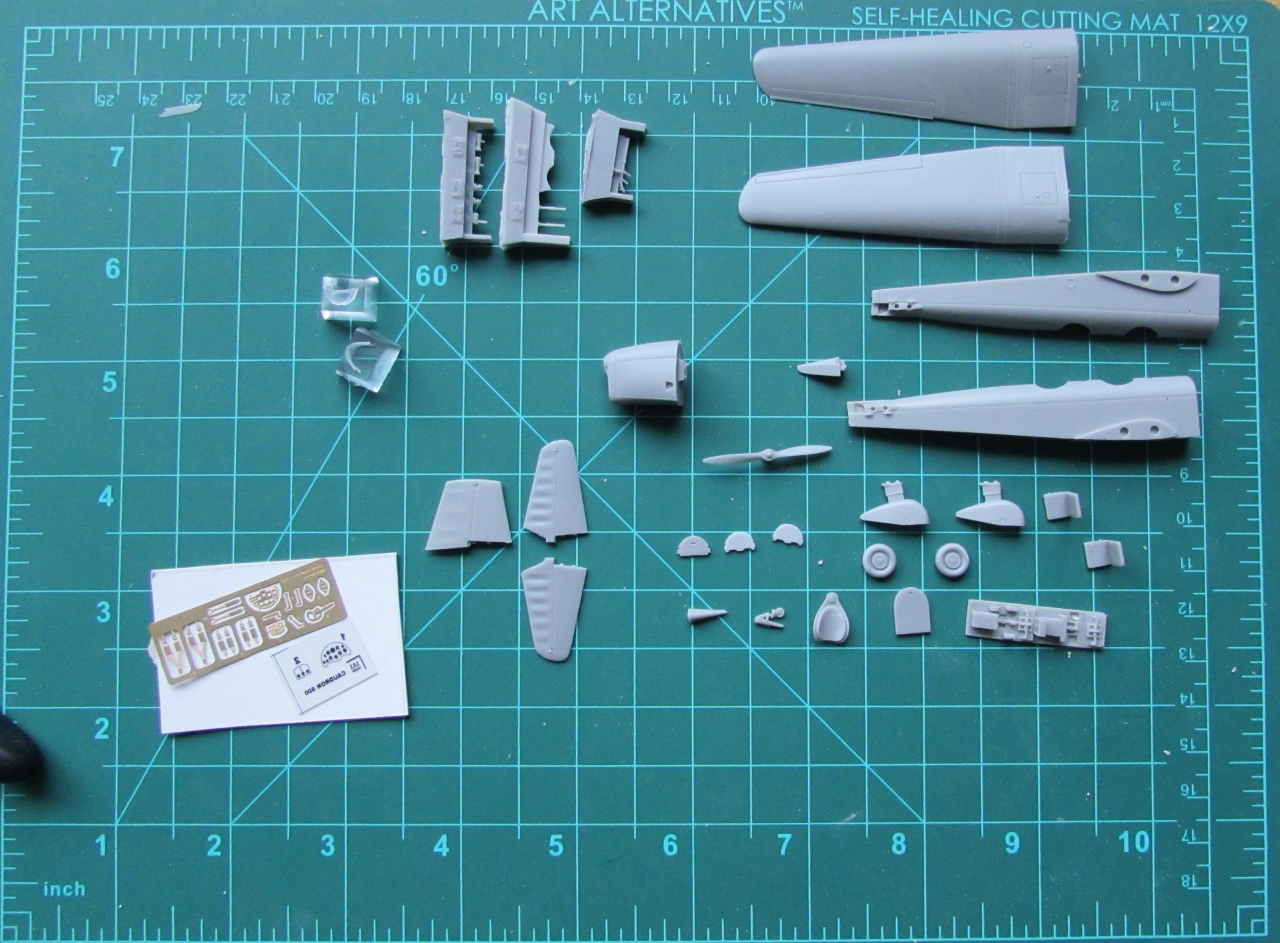
I took these photos to share with my fellow modelers, before
assembly begins and the usual step-by-step account begins, motivated by pure
joy.
If you haven't built an SBS kit, you are missing something.
More details and photos will be presented as the build
progresses, but surely this one is another beauty.
Congrats, SBS, on another impeccable, beautiful, civil, well-engineered,
superbly-detailed, fairly priced kit.
Sturdy cardboard box, contents well protected, and not pre-crushed as usual:


As with any kit, it's a good practice to wash the parts after you are done with the sanding and cleaning up.
It's not uncommon to lose a small part while washing them, so I wash the parts in a container with a bit of dish soap and a brush, and then pour everything into a clean coffee machine mesh filter. Once there I rinse under water:

 Carefully remove all parts from filter, and watch out, because smaller parts will tend to stick to anything and you may lose them:
 Let dry and compare the parts to your parts map, or count them before starting the cleaning and be sure you got them all:
 It is also a good practice to put the decals in a sealed bag, since a couple times I spilled water (tea, coffee) on them while building:
 The fuselage floor has a slot in the fuselage side where it goes in. A dry-fit check told me that I needed to thin the floor base more than I have done:
 Careful sanding and checking the fit, with both fuselage sides closed:

 I think a good guide is to sand until you see through some recesses on the floor that come covered with a thin casting web:
 Once the fit of the floor AND THE BULKHEAD are checked closing the sides, and both parts are adjusted to fit, it's time for the P.E. parts and a couple of extras you provide (like a "stick" handle on the side of one seat as per instruction, and the two "cables" that run from the throttles:
 My sight is far from good, but I managed to deal with the small (and good) photoetched parts. Phew!:
 The general colors of the interior are airbrushed. Details will be later given their colors with a brush:
 Additional painting begins:
 The back of the instrument panel film is painted with white-out:
 The P.E. fret is primed:
 The locating devices, a feature normally found on injected kits, is truly welcome:
 The fit is great:
 The P.E. details are painted:
 The parts in place. ALWAYS check the fit joining (dry-fitting) the fuselage sides. I had to shave a tad the
floor, the bulkheads and the inst. panels to get the halves to properly
close:
The parts in place. ALWAYS check the fit joining (dry-fitting) the fuselage sides. I had to shave a tad the
floor, the bulkheads and the inst. panels to get the halves to properly
close:
 The fuselage is closed and the nose block and headrest are added too:


 The detail and sharpness of the small parts is commendable:


 I separated the clear parts carefully with a new razor blade. It was effortless and clean. Don't do it if you don't know how to handle a very sharp blade:
 The parts are refined, washed and given a bath in floor polish, let to dry and then stored in a separate container until needed:
 Nice day to be doing some modeling:
 The wings and tail surfaces are glued in place always trying to achieve a good alignment.
Commit to gluing only after you have checked the fit. A little rest of pouring block or some debris may ruin your day, so always check first.
For the fuselage halves and wings I would recommend five-minute epoxy used carefully and sparingly. That gives you time to align, and will fill any minute voids or hairline seams. You can remove any oozing epoxy carefully with a razor blade or xacto before it cures too hard. That usually avoids having to use fillers. So I know now for the next time :-)
Here in front of another project, an old vac of the Rumpler limousine. Two different modeling universes:
 Check the seams for any places where filler may be needed. I normally use Alclad microfiller and clean later with a clean cotton swab slightly dampened in acetone. Don't be too enthusiastic or liberal or rub too much as you may mar the truly impeccable kit's surface. The more you check the fit (and the kit has a good one to start with) the less fussing with filler and fixing you will need:
 Primer is applied:
 The gloss black base for the white aluminum color is airbrushed:
 The plane's color is airbrushed. Reputedly, French planes had a white-aluminum finish, so I used exactly that color from the Alclad range, which suited me perfectly:

 An acrylic coat will follow to provide a better surface for the many decals the version chosen has:
 There is a very good reason for why I left these parts to the very end. I forgot.
Just kidding, I didn't want to knock them off.
As you can see SBS kindly provides two Venturis and two intake scoops, whereas only one of each is need. Alas, they provide just on Pitot for under the wing (good for most C.600's) but my choice (F-AOGT) has two, one under each wing:
 So one more Pitot is quickly fabricated with a slim piece of strut material and a length of thin wire:
 The windshields have their frames painted metal color. The part you see on the left that looks like a toilet seat is only relevant for the one-seat version, F-ANSN, also offered in the decal sheet:

 The model and the small parts that remain to be attached (minus windshields):
 The kit's decal sheet includes three subjects. I chose Madame Finat's plane (wife of Maurice Finat).
The decals are comprehensive and include small stencils and little details. They are perfectly printed, the color is great, the inks are opaque, and the carrier is super thin, which is excellent -from my perspective-.
These decals are incredibly good, but won't tolerate mistakes or careless handling. Use plenty of water, plenty of patience, and plenty of time. You may want to further separate some subjects, if you think it may facilitate application. I did not. I had a couple scares but at the end all went ok. No decal solutions of any kind were needed, the images stuck to the model impressively:
 Look at this detail, even the exhaust pipe has a hollow:

Completed model:
It's not uncommon to lose a small part while washing them, so I wash the parts in a container with a bit of dish soap and a brush, and then pour everything into a clean coffee machine mesh filter. Once there I rinse under water:


Once the fuselage is closed the rest is relatively simple:


Commit to gluing only after you have checked the fit. A little rest of pouring block or some debris may ruin your day, so always check first.
For the fuselage halves and wings I would recommend five-minute epoxy used carefully and sparingly. That gives you time to align, and will fill any minute voids or hairline seams. You can remove any oozing epoxy carefully with a razor blade or xacto before it cures too hard. That usually avoids having to use fillers. So I know now for the next time :-)
Here in front of another project, an old vac of the Rumpler limousine. Two different modeling universes:


Just kidding, I didn't want to knock them off.
As you can see SBS kindly provides two Venturis and two intake scoops, whereas only one of each is need. Alas, they provide just on Pitot for under the wing (good for most C.600's) but my choice (F-AOGT) has two, one under each wing:


The decals are comprehensive and include small stencils and little details. They are perfectly printed, the color is great, the inks are opaque, and the carrier is super thin, which is excellent -from my perspective-.
These decals are incredibly good, but won't tolerate mistakes or careless handling. Use plenty of water, plenty of patience, and plenty of time. You may want to further separate some subjects, if you think it may facilitate application. I did not. I had a couple scares but at the end all went ok. No decal solutions of any kind were needed, the images stuck to the model impressively:


Completed model: