Execuform kit of the Sikorsky S.43 runs along the lines of
its design philosophy: simple, basic shapes provided to the modeler as a
platform to build up a replica with some work, accessories and material that
the builder has to provide. In my sample vacuformed wheels and engines were
present but ultimately discarded in favor of more faithful items. I also
discarded the molded float’s struts and tail wheel. A piece of clear styrene
and a length of fishing line for rigging were tacked to the back of one of the
two molded sheets. Good plans and some references, as well as building
instructions complete the package.
As said, it is meant as a starting point, so you will need some
materials, decals and whatever you want to provide for the interior, as well as
any exterior detail and surface detail.
Now, all this does not discourage me, au contraire, it spurs
my building interest.
First of all, references. I decided to build a civil machine,
so I gathered info on six candidates:
-A Russian machine, CCCP H-207.
-An Inter-Island Airways livery from Hawaii.
-A plane privately owned by Vanderbilt and, predictably,
full of luxury trims.
-A restored plane, N-440.
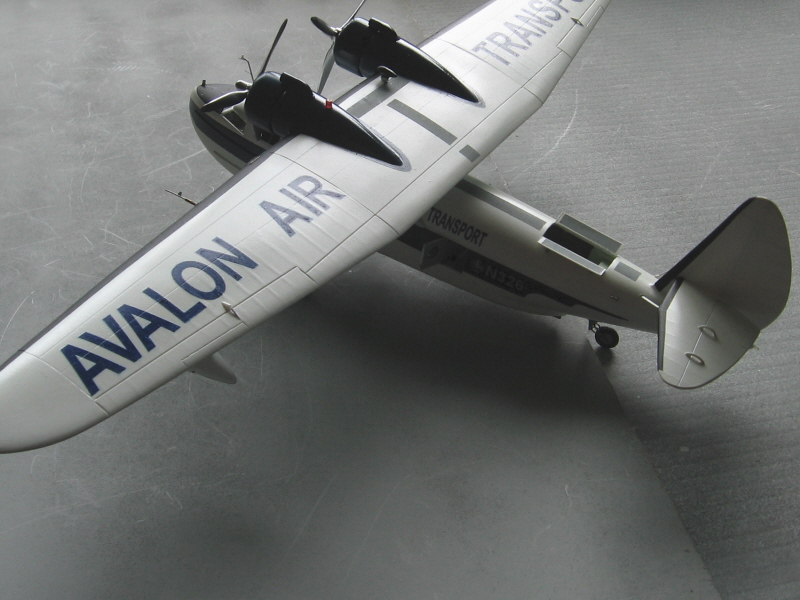
-Two machines that operated in Catalina Island, Avalon Air
transport and Amphibian Air transport. Catalina Island is a beautiful place
which I can see from my window at this very moment.
All had some appeal for one reason or another, and since
interiors varied a decision can not be postponed indefinitely.
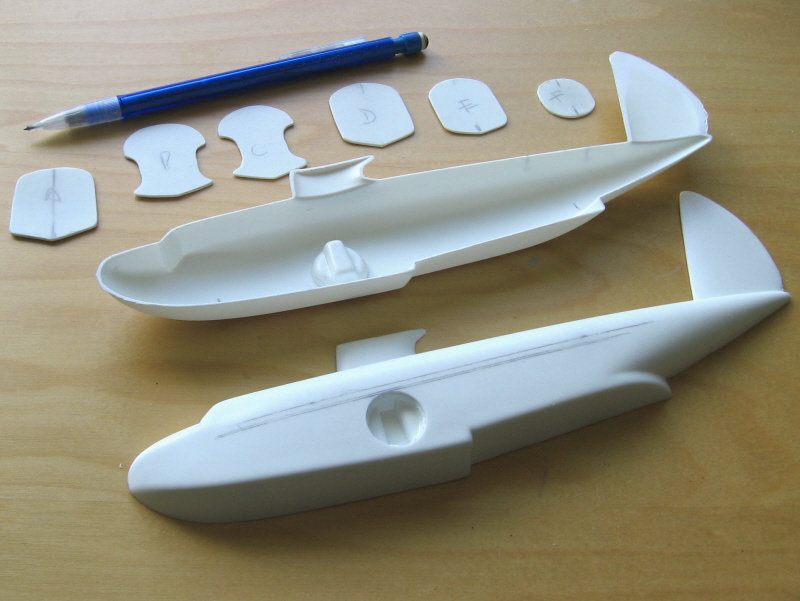
Once the parts were separated from their backing sheet the step
of sanding the parts joining edges flat begun, with some moments of doubt
regarding the area of the engine gondolas, for that I will refer you to the
kit’s instructions.
Holes were cut in the fuselage sides for the wheel wells,
and the kit parts that represent the wheel wells were dry-fitted to
satisfaction. The access hatch was also cut out. Unless you pose your model
with the wheels retracted, you will have to scratch the landing gear mechanism
(more on that later). Now the moment of drilling the windows arrived, for which
you have to make a choice too, since not all window arrangements were equal. Same
goes for the strakes, which run mostly on the nose area of the fuselage and
cabane. I decided to go for Avalon Air Transport N326, which has a white and
dark blue livery. This particular machine has a slightly different window
arrangement, missing also some of them at the fuselage back, and also possesses
two doors there according to photos. Another
access hatch to the left and behind the cockpit was cut out. Barrel-like oil
radiators hang from the engine gondolas, and a red beacon was scratched as per
photos that goes on top of #1 gondola. A football balloon antenna offset to the
right close to #2 gondola was added too as per photos. Recesses were created
for the landing lights; MV lenses were used to represent them and clear curved
covers fabricated. Exhaust tubes were made and cutouts performed in the cowls,
since that arrangement was particular to this plane too. Study your references!
The parts for the internal structure of the fuselage (as in
partitions, shelves, bulkheads) and cockpit and cabin details were made. You
can see in the photos that at some point I created different sets of
replacement cowls, but since the ones in the kit ended up fitting the bill I
left them alone.
New embossed tail surfaces were scratched, since the kit
ones did not have ribbing detail. This created the need to represent said
ribbing on the wing surfaces that partially had it, namely the control surfaces
and the aft part of the external panels. This was done by masking and spraying
with primer to create some relief. The wing was also engraved to create the
control surfaces and some panel lines.
The cockpit windows were opened after all the internal
structure was secured (to avoid flimsiness).
The interior was finished and painted, and some extra
details (like vents and lights for the passengers, curtains, toilet, sink, etc)
were scratched too.
As usual, some tabs were glued along the fuselage halves’
joining edges to assure a good bond. Clear plastic circles were cutout using a
sharpened brass tube to create the windows. Very thin wire was coiled and cut
to make seats for the said windows, glued recessed into the window opening on
the fuselage sides. This way the clear parts can be added later on and would
rest against those rims, without falling inside the fuselage.
As it happens sometimes with brilliant ideas, the liquid
mask I used (Microscale’s) did not work at all, becoming a rigid dried thing
without any “rubber” feeling or behavior at all and had to be removed causing
damage to the paint and ruining some of the metal rings that were pulled away
attempting to remove the mask. Next time, Humbrol Maskol for me, thanks very
much.
Jim the PugetMaster provided props and wheels from his spare
parts bin. Thanks Jim!
The landing gear elements were scratched, adapting Jim’s
wheels and constructing the main gear mechanism with wire and styrene, at about
twenty eight parts each side, including new multi-part wheel hubs. Wing and stab
struts were made from assorted Contrail and Struz airfoiled material, engines
were white metal items from a much-missed Areoclub Internet store. Decals were
created and printed at home.
What defines a Classic? It is hard to tell, but not hard to
acknowledge when you see one.