

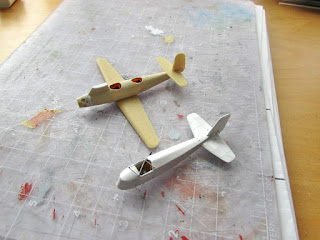
The 1/72nd Darmstadt D.18 I got is a better kit than the Breda 33 that I
previously built:
But whatever you could say about the casting of the Dujin
kits (and with good reason!) has to be balanced against the prolific output of
this French manufacturer and the vast scope of his releases.
You can see in the accompanying photos that the casting in
this kit is better, if not really impeccable either. The web is very thick in
parts and there are some bubbles. A particular annoyance are the pouring
channels at the rudder, in the form of two slabs of resin that you will have to
remove. I kept wondering why the fin/rudder was not made as a whole part
attached to one fuselage side, or even a separate part.
The parts have detail and you can tell the original masters
were good, but during casting some of the sharpness was lost, but nothing
really bad.
In any case, after about 40 minutes or so the parts were
removed form the casting web and given a cursory clean-up and preliminary
sanding (wear mask or do it under running water, resin dust is toxic).
You get a brief historical note with color calls, a scaled
3-view, two sets of landing gear legs and two flattened metal wires that should
serve as struts. It is very likely that I'll end up substituting the resin
landing gear parts -including the tailskid- for sturdier and better home-made
parts. Resin landing gears have very little mechanical strength.
You don't get any decals or assembly guide/drawings.
This is a good kit compared to bad resin kits, and a so-so
but adequate one compared to the best examples of resin kits. The price is
fair, though, and I deem it a good deal for what you get. The interior detail
consists of a cockpit floor with two bucket seats, two instrument panels, and
perhaps a joystick (not clear if a resin part is the joystick or some random
accretion). Again, since there is no parts map, exploded view or similar
device, it is hard to tell.
So where do you start?. Well, fabricating an item very visible in photos: the laminated wood propeller. The kit has one, but whatever technique you use to represent the laminations, it comes out kind of fake. So a real laminated wood prop it is:


The new landing gear legs are fabricated. Photos show shock absorbers of different lengths, depending on the time in the life of the one plane built, so two sets were made. The kit's copper strut material (way too soft) was replaced by airfoiled brass (once again, thanks Andrew):
 An endemic (and annoying) problem with most of resin kits and resin accessories: the interiors won't fit:
 The flying surfaces are well done, refined, well cast and have proper detail:
 The strabic wheels are better replaced. They are small anyway according to all plans. Lucky me, as if he knew, Jim Schubert from Pugetlandia kindly sent several sets of aftermarket white wheels (old Aeroclub stock) and one pair fitted perfectly:
 The other side is kind of ok. You may sand the strabic (inner) side and engrave a circle to salvage them if you can't find a pair of suitable replacements:
 In order for that interior to fit, a lot of material has to be removed from those walls, carefully not to overdo it and more carefully not the breathe-in that pesky resin toxic dust:
 The cockpit pan is also greatly shaved to obtain a reasonable fit:
 The joysticks are made heating styrene rod stock:
 Rudder pedals are also fabricated and the kit's instrument panels are painted:
 Seat belts in place and all is ready to close. A succinct interior, since I will fabricate a canopy -as sported by the plane later in life- that will cover it all:
 The fuselage halves are glued together. This is not a good fit, and if you align the nose, the tail will be off, and vice-versa. The offset can reach up to 2mm, huge for such small scale and model. You may have some re-contouring to do. Do not sand too much either to obtain flat fuselage halves gluing area, or you may end up with a too narrow fuselage girth. Needless to say putty will be needed at the seams.
Since I am building the later canopied version -as said before- the nose will have to be sawed-off and rotated 180 degrees to leave the single cylinder (now on top) at the bottom, and the seam thus created will need to be hidden too:
 Perhaps the most difficult part of this "updating" is the canopy. We can see here a first trial attempt with an encouraging result, and the second wood master in progress:

 The nose as explained before has to the sawed-off and rotated 180 degrees. An alternate method would be to fill the five cylinder locating holes and drill new ones in the right positions.
So this is clear, the no-canopy earlier version depicted by the kit does not need these changes:
 Styrene sheet contoured to shape is glued to make up for the lost material due to sawing and sanding:
 Nose re-glued:
 The superb decals from Mika Jernfors (Arctic Decals) arrived in the mail today. Bear in mind that, since these are Alps-printed decals, you have to separate and trim each subject separately (the carrier covers the whole sheet). You have to handle them properly too, if you do no problems will be encountered:
 Together with the Darmstadt sheet I ordered the "Cuatro Vientos" Breguet XIX superbidón set. That I know, two kits exist for this plane in 1/72 (vacuformed):
 I added some styrene to the top of the wing cabane, since the kit's was a tad short:
 For no particular reason, I glued the lower wing and the stab. Both will need -you guessed- some fiddling. The Dujin kit does not depict the attachment of the lower wing with complete accuracy. Photos show a higher angle of incidence (common by the way in biplane lower wings) that creates the need of a little fairing at the wing trailing edge/fuselage joint. Since the detail is small enough, and it would have involved reworking the area, I left it alone, having plenty to deal with as it is:
 I keep working on the adjustment and surfaces of the wood masters for the canopy. This proved a task that required time, tries and attention.
 Darmstadt compared to the fuselage of the Daimler-Klemm. Both very small models:
 More trials on the canopy:
 Fitting work in progress:
 A notch has to be cut in order for the canopy to "embrace" the wing pylon:
 Another view of the notch:
 Also an upward slope is needed toward the front
 Little by little, carefully and patiently, the fit is improved by removing material:


 Another canopy from the second master, a very slightly smaller one, is also fitted:
 Photos show there were windows on the roof too, up to the second post (the back of the pilot). After that it was solid:
 The results are good, but you have to be careful and posses a modicum of skill (i.e.: not for beginners):
 The seams between wing and fuselage and stab and fuselage will need filling and sanding. Here a dry-run of the top wing. This plane was really beautiful:
 Primer is airbrushed, and this operation often reveals minor blemishes that have to be dealt with. In this case, since the canopy is going to cover most of the back seam, a decent job will do, but the bottom fuselage seam may need more attention:
 All landing gear parts are replaced. The wheels in the kit, besides being off-shape, were found to be too small, even when compared to the kit's own plans. The new wheels came again from James Schubertus' stock. Still to be fabricated is the tailskid:
 Part of the landing gear is installed. It should be slightly angled forward, and not exactly perpendicular to the flight line as described by Dujin::
 A small fairing where the two reinforcement landing gear struts meet the fuselage can be seen in photos, and here it is how it was replicated:


 Painting begins with the application of the doped linen color, a medium metal hue on the nose and polished aluminum on the spinner. The colors on fuselage and wing will be masked later on to apply the predominant red:
 The masks put in place to apply the red color are removed:
 The kit's cylinders' exhaust stubs are replaced (this is before I noticed that this engine is wrong for any version made with this kit):
 A dry-run of the top wing to check appearance:

 A canopy is masked "one way" with transverse lengths of tape. The length-wise frames will be applied as decals:
 And guess what...the kit's engine is wrong, being for the first version (Armstrong Siddeley Genet) or the later and canopied version (Genet Major). The exhausts are completely wrong, the pushrods are wrong, the intake manifolds are the wrong side. A possible solution: Matías Hagen started work on a resin Armstrong Siddeley Major, the right engine for this kit -canopied version- to be sold with Mika's decal set as an "upgrade" after market set, will keep you posted):

 Wrong number of window panes (7, should be six) on the canopy, so another one is on the way:


 Meanwhile, and as a stop-gap measure, I butchered Matias' Mongoose and added some rocker valve covers, but this is just temporary, as these cylinders are slightly smaller than the ones needed, and will be just glued with a hint of white glue until the new engine comes:

 Yet another canopy is prepared. After masking transversely, aluminum color is airbrushed -this will be seen from the interior-:
 After the aluminum color the plane's red is applied. A section of decal paper is treated the same way:
 Unmasked:
 The interior. As said before, the longitudinal frames will be made of decal strips:
 New canopy tested:
 Dry run again of the upper wing:
 Sketches showing the canopy trims and relative position:

 Canopy and upper wing glued in place (the latter anchored with a small metal pin):

 The made-up temporary engine cylinders are very lightly glued in place. I did not bother with the pushrods or exhaust stubs, since a replacement is coming. When Matías finishes the new (and correct) engine they will be put in place substituting the present and more photos taken. Decal application begins :
 The original plane was indeed attractive, and the model is a nice recreation:


 As said, when the new engine arrives from Matías, it will replace the temporary one and after adding a few details (like control horns and cables and the like) the finished model photos will be uploaded in a new posting. Stay tuned.
To be continued....


Since I am building the later canopied version -as said before- the nose will have to be sawed-off and rotated 180 degrees to leave the single cylinder (now on top) at the bottom, and the seam thus created will need to be hidden too:


So this is clear, the no-canopy earlier version depicted by the kit does not need these changes:


A caveat:
Some drawings depict the roof of the canopy as being solid, which is inaccurate.


To be continued....