

(This posting deals with a quickie Arfix adaptation. If you are looking for the Italeri full Corsa conversion please go here:
If you are looking for the S.79 passenger conversion please go here:
The completed model is here:
http://wingsofintent.blogspot.com/2015/04/savoia-s79-corsa-adaptation-from-172nd.html
Here is the conversion of the venerable Airfix S.79 to the
I-ROTR racer that participated in the Istres-Damascus-Paris competition.
Before I proceed I would like to make a hobby-related
comment. I many times express my dissatisfaction when a vendor, manufacturer,
supplier or such does not measure up. I also try to point out any highlights,
good service or nice product I deal with. In working with both S.79s models my
Testors airbrush suffered a "panne", and I have to say that Testors
(now part of Rust-Oleum) offered a truly remarkable customer service. Thanks,
and well done Testors.
This "adaptation" (since it does not really
qualify as conversion) is meant to be a much simpler build to see if more
modelers can be encouraged to venture beyond the constraining borders of the
just-glue-parts-together modeling.
Again my main reference is Paolo Miana's "Lost Archives
- Pictorial history of SIAI - Chapter I - the Sorci Verdi".
I may say that although the book covers magnificently the
greatly modified Corsa version, not much material was found by Mr. Miana in the
archives he researched about this specific "gobbo" machine which was
merely a production line unit, gobba and all, hastily adapted to fill a gap.
Therefore we can only see the exterior, and from there deduct a few
things.
This machine was pressured into the race as other Italian
entries were not ready in time. The "conversion" then did not
actually modify the plane as deeply as it was the case with the Corsa version
(that I just built from the Italeri kit), and consisted only of the removal of
armament (or was it secretly kept to shut-down competitors?), deletion of the
ventral position and addition of extra fuel tanks.
Therefore this is an easy one that most modelers can
accomplish with minimum effort and just a few modifications, since the hunch
(gobba) of the fuselage does not have to be removed.
Why am I using the Airfix kit instead of the immensely
superior Italeri one?
Well, my good friend and Evil Genius Sönke Schulz sent this
model to me as a gift. Why, you may ask, again, yourself? well, since he is
marzipanly malign (he lives in Lübeck), he carefully glues some parts that
shouldn't be glued until a later stage. In this case the wing halves, that
failed to trap the ailerons and the parts for the landing gear. He also glued
the stabilizer halves, again failing to trap the elevators. On top of that he
also lost many transparencies, but fortunately not the windshield. He therefore
sent the kit and now seats down whilst petting Helga (don't ask) and laughs
(you know the drill "mwehehehe, mwahahahahah..") whilst I struggle to
deal with those issues.
In a more serious note, I repeat that you can do this with
the Italeri kit too, but if you happen to have an Arfix S.79, this may be your
chance to play a little without the pressure of marring a good kit, and in the
process learn a couple things and achieve a colorful model that will be
attractive, in civil use, and unusual.
Start by throwing away anything military in the kit. Then
discard the "open" dorsal position that is an alternate part. Later
on you will have to fill the hole underneath the fuselage by the absence of the
ventral position, by the simple expedient of tracing a shape in plasticard, cut
the part, glue it in place, apply putty and sand a bit. Easy enough.
Details will be described as we go, the usual way.
The kit as received from Zoenke, zhe Evil Genius:


The interior is given a few details. I used the Italeri decal for the instrument panel:
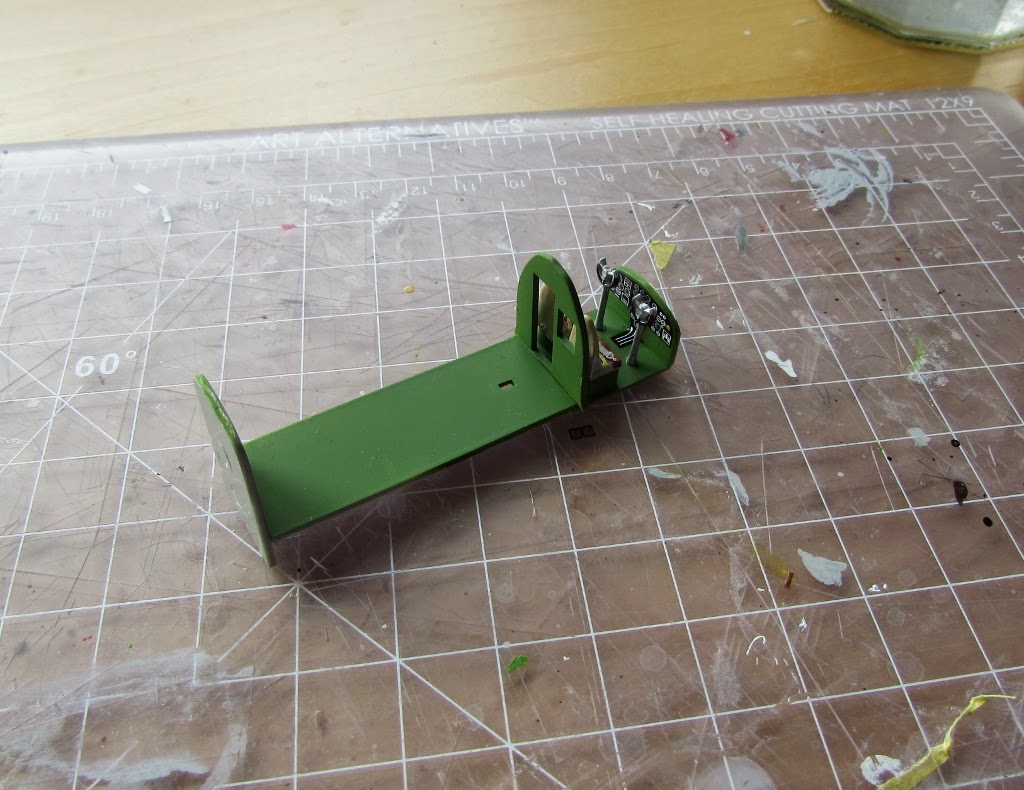
 The interior is glued to one fuselage side. More openings are blanked out:
 And here is the only "scratchbuilding" you will have to do. A paper is pressed/rubbed against the taped fuselage halves to get a pattern of the gap:
 The paper pattern is cut and transferred to a styrene scrap of the same thickness as the fuselage floor (in this case a vac kit leftover, but you can buy a styrene sheet):
 Tabs are loosely located inside the fuselage, to prevent the part to fall inside (doh!):
 Now it is clear what we are aiming to:
 The plastic part is sanded until a good fit is achieved. Putty and sanding should do the rest. You can also see where the torpedo keys are ahead, those four furrows. Better deal with them too with scrap styrene:
 The kit's engines are prepared. They are non-descriptive, generic and underwhelming, so I think I'll be ordering a trio of Gnome-Rhone K.14 / Piaggio P.XI:
 The fuselage halves are glued together. Do not forget to put in the tail wheel, which is held in place by the sides.
The Airfix kit now starts to show its true color, the fit being very disappointing and imprecise.
Again, if you have this kit already, this is a good exercise on a conversion with no stress and features to practice on and correct. If you do not have the Arfix kit, do not buy it, at any price, just get the Italeri one, which is far superior in all regards.
As seen in the photo spots on the wings and ailerons have to be filled due to sink holes or mold mismatching. An old, truly crude kit:
 More recesses are filled with scrap styrene:
 An example of the kit's fit (or lack of thereof):
 Just a few enhancements are provided, since the kit's overall level is not detailed. In this case the mechanism operating the trim tab, present on the Italeri kit but absent in Airfix's:
 Lots of puttying and sanding (cover the transparencies):


 Danger, Will Robinson! If you just glue the wings to the fuselage as they are, you get either 0 dihedral or a slight anhedral. Bad. You should shim the lower lips of the Karmans as shown, to get proper dihedral, and later on fill the gap with Milliput or similar. All good, do not worry, you are learning and this a cheapo kit. Also notice additional spot application of putty, yet to be sanded:
 Shims:
 Proper dihedral achieved:
 Milliput is pressed into the gaps:

 Stabilizers and canopy in place. The smaller plane is a NIAI Fanera 2, which could transport pilot and four passengers!:


 Comparison with the Italeri kit in the same stage:
.jpg) The primer revealed areas that needed further attention:
The primer revealed areas that needed further attention:

 The Airfix kit lacks the flaps linkages, so four had to be fabricated, each one consisting of three parts:

 The Airfix kit lacks the intakes for the oil coolers on the leading edge, so those were fashioned:
 Two airfoiled struts that go from the stabs to the fin are made from profiled extruded plastic stock:

 A fuel tank vent that is located on top of the fuselage is easily fabricated:
 The elevators, ailerons and the tank vent are glued in place:
 The cowls are locked in place via a ring, which actually is an ill-devised solution since in the real plane it would impede the airflow:

 From the rings small sections are cut out and glued to the nacelles at the right places to serve just as guides:

 The alternate -and accurate- engines were purchased from Engines & Things:
 A first layer of paint is gloss white paint applied to serve the base to the other colors. Do not forget the cowls and wheel bay doors:
 The Engine & Things engines are prepared. They are an affordable alternative to the too generic kit ones. They even have their aft accessories section molded, as well as the location for the intakes in the back:


 A coat of aluminum paint is airbrushed on certain areas of the fuselage. Other shades of aluminum are applied to landing gear parts, props, etc. Some parts belong to the other S.79 based on the Italeri kit, being built in parallel:
 The masks shapes are cut in a stiff paper sheet:
 Then transferred on masking paper and applied on the model:
 This will "reserve" the aluminum-painted areas in order to be able to apply the green paint:


 The cowls' fronts are painted cooper, then masked and the rest airbrushed polished aluminum. The set for the Italeri Corsa is there too:
 Green is airbrushed, the masks protect the areas that are painted already aluminum:
 After masking the green areas the red color is airbrushed. Do not forget the wheel well doors and the tail struts:

 The masks are carefully removed:
 A little touch-up here and there, but the paint job came out nicely. Still of course much to do, like applying all the frames of the windowed areas with decal strips of the right color, and all the marks of this particular plane, plus of course all the missing sub-assemblies like landing gear, engines, etc.:
 Parts are prepared:
 The Engines & Things casts will need most of their backs removed. The aluminum extension sleeves that you see are unnecessary, you only have to remove the back of the resin engines right up to the back of the cylinders:
 Styrene discs are cut and glued to the nose and gondolas, to serve as supports for the engines. Anchoring point for the cowls have been dealt with before, as depicted in previous steps. The right wing -as seen from the pilot's seat- cowl in the kit has its exhaust to the other side, while all Corsas had their exhausts all to the same side (in the right-lower quadrant looking at the plane from the front), therefore the anchoring lugs of that specific cowl have to be removed, in order to rotate it and position it like the other two engines:
 Burned steel home-made decals are applied to the cowls in a area which shows a dark metal back plate behind the exhaust in photos:
 Then a decal with the pattern of the whirl pattern is applied:
 Some decals applied and sub-assemblies in place:
 Things start to look nicer:

To be continued....
The Airfix kit now starts to show its true color, the fit being very disappointing and imprecise.
Again, if you have this kit already, this is a good exercise on a conversion with no stress and features to practice on and correct. If you do not have the Arfix kit, do not buy it, at any price, just get the Italeri one, which is far superior in all regards.
As seen in the photo spots on the wings and ailerons have to be filled due to sink holes or mold mismatching. An old, truly crude kit:
The touch-ups with white putty continue in small areas. This is a task that is boring and seems never to end, but is important for a nice finish of the model:
Primer applied:
Eventually all areas that are aluminum color are masked:
To be continued....