

(the two completed models can be seen here):
Academy's:
https://wingsofintent.blogspot.com/2022/02/hawker-hurricane-g-amau-racer-acdemy.html
Airfix's:
https://wingsofintent.blogspot.com/2022/02/hawker-hurricane-civil-trial-platform-g.html
Bonga-Bonga Pum-Pum planes are not my cuppa...unless they can be given a more peaceful destiny. Some time ago I built G-AMAU, a civil racing Hurricane, and had a good time with it:
https://wingsofintent.blogspot.com/2016/11/hawker-hurricane-racer-completed.html
(for those curious this is the building article of that first Hurricane):
https://wingsofintent.blogspot.com/2016/10/academy-172nd-hawker-hurricane.html
Additionally, those interested may find another converted Hawker product model, the Hart, here:
https://wingsofintent.blogspot.com/2017/06/hawker-hart-racer-completed-arctic.html
From the first Hurricane project I still got a decal sheet -that I had as backup-, and therefore this will be used on another civil scheme of the same plane for a friend. In parallel, the idea is to build G-AFKX, yet another civil Hurricane used for trials. For this second incarnation of G-AMAU I will use the same kit as before, the Academy MKII boxing, and for G-AFKX Airfix's MKI. Both need a little tweak here and there to represent those planes.
The Academy kit is from 1997! 25 years to the date! and to my eyes still holding pretty well. Airfix´s release is more modern, dating from 2013 (nine years to the date), and it is indeed a nice little kit that sells for a very fair price! (so did and does Academy's).
Both have a nice interior for the scale, engraved panel lines, and are, in general, a fair representation of the original for most modelers but the more...let's call them "demanding". In view of a possible build of another Hurricane, I have been randomly picking up aftermarket sets, not a good idea before having chosen the actual kit, but there you go, I get my parts where I can find them, and I hope they could be adapted, at least partially, if any use is found for them (as I mentioned the kits are quite detailed, and almost absolutely nothing of the interior is really seem once the fuselage is closed).
So we start washing the sprues with mild dish soap, lukewarm water, and a soft brush, and letting them to dry alone.


The various accessories picked along the way, not all really apply, but perhaps -if needed or wanted- could be adapted, and not all need to be -or will be- used:

I started with the Airfix kit (that hopefully will become G-AFKX ) as it new to me. The general impressions are very good, nice detail, nice surfaces. The gates are reduced to a minimum, and once removed only a cursory clean up is necessary, well done there! Still, in yet another example of computer-designed kit that diverges from actual model-building reality, some aspects are not good. To start with the trailing edges are noticeably thick, more so on the lower wing:


The fit of the bay components can only be described as "gummy", imprecise, and vague. The instructions, that do not correctly depict the way the side components are supposed to fit, are no help at all:


The wing halves are glued. Once again the fit is not good. There are mismatches at the wingtips and a step at the leading edge. I got curious and looked up online builds finding that many modelers see the same issues. A bit sad the this new Airfix effort, so interesting in other areas, is let down by fit issues, with all that new technology. The areas with the arrows, according to many postings on the Net, were not fabric covered, so they will have to be puttied and sanded:


Some parts are prepared for ulterior painting. On the positive side, the plastic is a pleasure to work with, easy to clean, and not fragile. In reading the interior colors on the instructions I have some suspicions, but I am no Hurricane expert at all, still, some color calls (brick for the seat support?) seem a bit off. Why-oh-why are we stuck with ONLY numbers for the paints? not everyone likes or works with Humbrol products, I actually only use a few of its colors, but also many other brands. At least put an equivalent chart, guys, I can assure you that nobody is running to buy the Humbrol range, so don't do this miserable marketing gimmick, in this time and age, please!:

Most of the parts are separated from the sprues and cleaned up. There are alternate parts to represent the model wheels-up. The tires have their base flattened for realism. Once more Airfix should be praised for the clever and unobtrusive way in which the gates attach to the parts, facilitating extraction and cleaning. I will be replacing the prop and spinner for the ones pertinent to the version intended:

The Academy kit wing only needs the locating holes slightly reamed for a perfect fit:


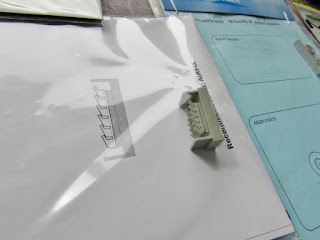
The cannon plugs are tidied, and the chutes are filled:


I think one or both of these may be better off with a Rotol prop aftermarket item:


I had to trim quite a bit of the blades' root for them to fit as indicated by the manufacturer:

I cut and opened up the oil cooler flap on the Academy kit, and fabricated the resemblance of the contents:


An airbrushing session looms in the horizon, but it will have to wait, as dear wife is in the premises and prone to interrupt critical modelling-related sessions with any conceivable trick on the housewife book:

And the basic colors are painted:

Nice little circle masks for the wheel hubs:

After masking, another airbrushing session is due. The Academy kit seat is given seat belts and buckles and installed. Notice that the right wing landing light has been glued in place and puttied, as the racer had it deleted:

For the Airfix kit, which will have an open canopy, a Yahu instrument panel is used, although there is nothing wrong with the decal provided:


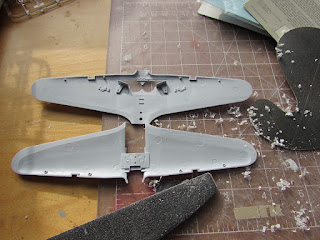
Fuselage and wing glued, very good fit with just a bit of cleaning up of minor mold lines and burrs:

None of the places had mast antennas in the chose configurations, thus they are removed. The front "disk" at the nose of the Academy kit, that looks a bit too prominent, is thinned down and its diameter slightly reduced. The part that covers the lower nose is glued in place:

Academy kit. The aftermarket exhausts are ready, as well as the gold/black/yellow tips prop. Wheels ready, and coaming restored where the gunsight was removed:


The Airfix kit (to the left) has a very detailed landing gear. The multiple components are rendered in two parts, one quite complex and made of multiple elements, and the other being a simple linkage. The main part has to somehow contort its way trough the frame detail and anchor in two places, against the spar and in the leg socket proper. Normally I take some time cleaning the mold seams, but in this case the part is so fragile, and I was so afraid to brake it and then have a nightmare, that I just did a cursory light scrapping (the part was quite clean to start with anyway). Unfortunately the way the leg anchors, added to the "gummy" general feeling throughout this kit, provokes a very imprecise fit that basically can allow the leg to wonder around by many degrees. The Academy kit -simpler, of course- has instead a very positive anchoring that doesn't allow misplacing or getting the angles wrong. This is not good, as if even for me, a seasoned modeler, it presents a bit of a challenge with no really perfect outcome, a less experienced modeler may struggle here. Why not provide a positive, unequivocal fit at the base of the leg? What was the thinking behind this unfortunate choice, and why this "modern" kit feels sometimes like a short-run kit?:

First coat of primer on both models (Academy's to the right):

Airfix's G-AFKX gets its gloss black coat in preparation for the Alclad paint:

The Academy Hurricane is painted too. I have used, seldomly, some lacquers before, and I must say that I absolutely hate "Mr. Color". You really have to suffer a lot to get a good finish, that you can obtain with enamel in a snap:

Airfix's G-AFKX gets a coat of polished aluminium, as many of the metal panels were shinny and kept very clean. These areas will be masked before applying the more subdued tones:

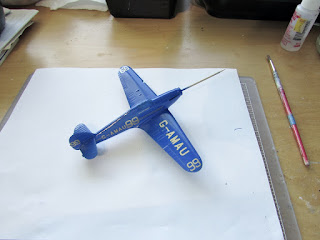
Decaling on Academy's G-AMAU is now complete:
The polished metal areas are masked, and a dullest hue of aluminium airbrushed:

Once unmasked, the different tones produce an effect similar of that in photographs of the real plane:


Still some work to be done, but closer now to completion:

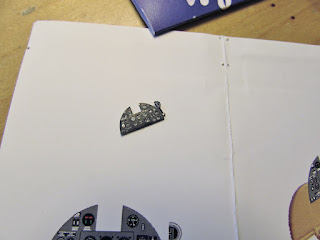
The Life-Like decal sheet for Academy's Hurricane is really good, of great quality. The Eduard masks for Airfix's kit are precise and go on without a hitch. The first version of G-AMAU I build, as explained above, had a different exhaust, plus antenna mast and rear-view mirror (not present in this other version). I have now to print the simple decals for G-AFKX, and then give the finishing touches to both models, adding props, wheels, landing lights, exhausts, and surely something else I may be forgetting and will discover while taking the photos to post (see, I just remembered I wanted to add the stirrup!):


One ready (Academy kit), one more to go. G-AMAU had a different 6-stack exhaust, so a resin aftermarket item was adapted (just a light touch here and there) and used:

Decal application on Airfix's G-AFKX:

Painting the canopy. The idea was to display it open, but after painting and unmasking I realized that to pose it open you have to modify the fuselage and the transparency, otherwise they interfere with each other:
