(this is the step-by-step construction article. The completed model is here:
https://wingsofintent.blogspot.com/2018/05/de-havilland-dh83-fox-moth-half-scratch.html
Not long ago I saw this on Getty Images while looking for something else:
https://www.gettyimages.ae/license/3430428
It was love at first sight.
The search begun, and I learned that there was a resin kit from Aeropoxy and an out of production vac from Aeroclub.
The Aeroclub kit can be seen popping sometimes on online auctions, but is not easy to get, plus it's a bit dated.
The few images I saw online of the Aeropoxy kit didn't tempt me, but in
all fairness I did not have the kit on my hands, so this is subjective.
I think that Contour Creative Studio produced at some point a paper kit
of the DH83, but I have no direct knowledge of it, besides is not the
media I build on.
Since there are in the market now two relatively new kits of civil De
Havillands in 1/72nd scale, the 60 and 82, it could be perhaps possible
to borrow some parts and achieve a credible representation of such
beautiful airplane.
Very fortunately, I was directed by Ebil Genius and friend Sönke Schulz
to a thread on the topic at Britmodeller, where a great deal
of information was provided by "John Aero", to whom I am grateful.
I am using a combination of plans that are available on the Net, although none seems to be completely accurate.
So here it starts this attempt at a half-scratched 1/72nd scale Fox Moth, this time the one with the aft rectangular window.
All this is a bit tentative, and although hopes are high I really don't
know how far this will go or how successful this may ultimately be.
So let's start the road, but bear in mind that I am
very practical modeler.
The flat sides and formers are cut:
Windows and doors are cut. Usually I am unable to extricate the door
cleanly from a fuselage side, and have to carve out first the opening
and then produce a separate door, but this time somehow it worked:
Both doors will be posed open:
One note about the doors: they are tricky little things, and the
midsection expands in a curvature, producing a window the is straight on
top but convex at the bottom.
I bent the doors to conform to that shape, but depending on how they
finally look I may have to produce a master and vac them instead.
My plan is to use the wings and tail of the new Airfix kit of the DH82, which will need some alterations:
It is very small, smaller than I though it will be, how they managed to cram up to four people there I don't know:
The window that communicated cabin and cockpit is carved, seat and controls prepared, and the oil reservoir made too:
The cockpit floor is reinforced before closing the bottom:
And here is the donor, the truly beautiful Airfix kit, a joy to behold and most likely to build:
New Airfix standards are very high, and the product such a joy to have.
It is kind of heretic to dismantle such a nice kit, but I bought two, so I will honor it at a later time:
A few images to give fellow modellers not familiar with the kit an idea of the good quality:
Here is the oil reservoir that I replicated, but it could be excised from the fuselage side to better effect:
Restrained and convincing rib effect:
The angle of the wing panels needs to be altered:
Commendable thin trailing edges:
The parts that I plan to utilize (of the nose, the front only):
Here are the slats that will have to go unless you depict the specific DH83 that had them.
The rib relief is so delicate and nicely done, that this will be no doubt a real challenge.
I see two ways:
to remove them and try to replicate the false ribs relief, or to buy
yet another kit, and heretically butcher it to excise two sections from
the same inner wing to replace the slat areas, which will create a
blending challenge (and destroy yet another truly beautiful kit):
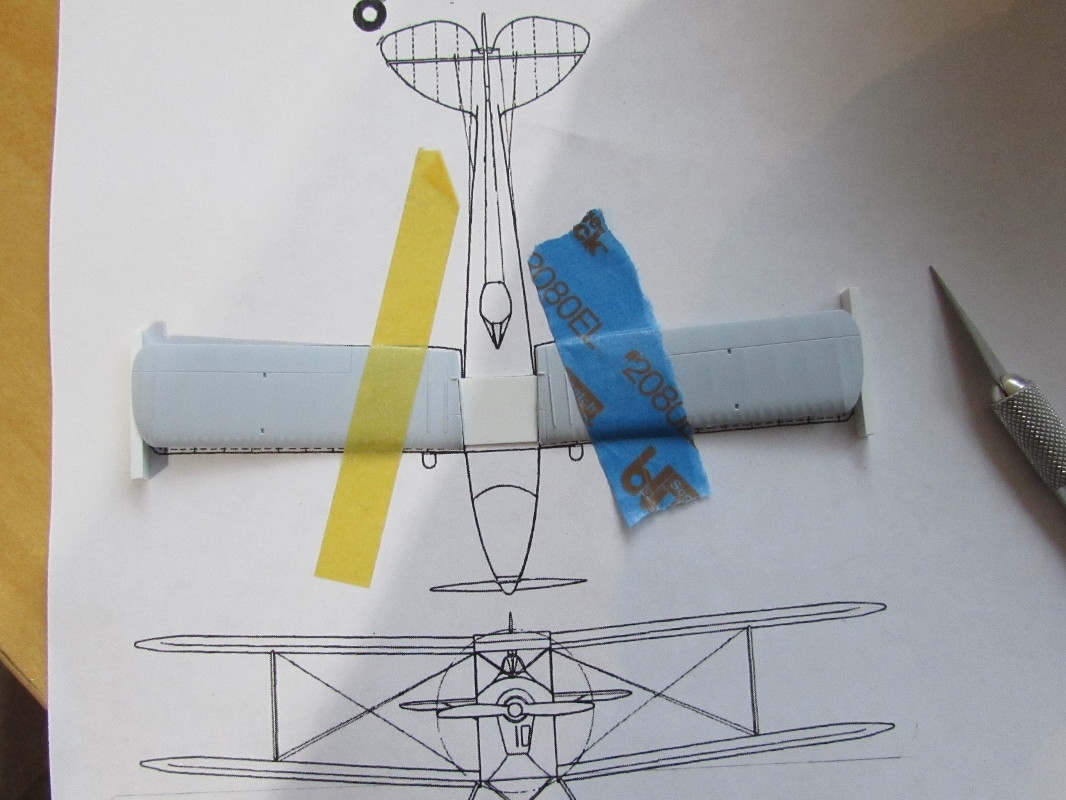
I cut apart the lower wing panels, gave them the needed dihedral and
angle, and glued them to a connecting piece that will be a floor section
too. The gluing area is really small, so this may not work, and in any
case will have to be handled very carefully once set:
The fix is holding on for the moment:
Checking fit, all seems acceptable -the floor of the aft fuselage was glued in place before:
I added a small spar and notched the fuselage side wall to accept it, to add an itsy-bitsy more of strength:
I am concocting here a couple ways to make that wing center section/tank:
Seats, fuselage sides lined with strip, aft fuselage curved deck:
The Airfix kit nose tip is carefully excised, keeping for the moment the "floor":
Perma-Pressing the curvature of seats. Aft curved deck glued on:
Boat serenely passing by:
Different ways to solve the upper wing center section/fuel tank are tried, they all work. Here some images of the process:
The cockpit deck is being prepared (note to myself: do not glue the
cover on until you have painted the cockpit interior and cockpit parts,
and have installed them, with the instrument panel and cabin window
glass. And yes, in case you were wondering, I have done it before)
Nose floor glued on using the -not glued- lower wing center section as a guide:
Deletion of unnecessary detail on kit's part:
Two of the tanks ready:
The doors with their complex curvatures are carved from plastic, mounted on wood and used to obtain vacuum-formed copies. The clear copies are better, since you only have to mask the window inside and out and airbrush. The opaque parts are a backup:
The Airfix kit tail is tried on:
A sort of long interruption is on the horizon, but before the pause, I am trying to solve a few little things:
Oh, those pesky darn little pants. Wood masters and vacuformed ones:
A general view. Some parts are of course not yet glued:
More work on the nose, in the form of a basic geometry that will be covered by plates (or that's the idea anyway):
An old Aeroclub tailwheel (thanks, Jim Schubert!) with a spring added, will make for a nice arrangement:
More nose parts are fabricated:
I decided to do again in a more precise fashion the oil reservoir.
Two plastic scraps are shaped:
Glued onto a very thin styrene sheet:
Cut apart:
The flange seen on photos of the plane shaped:
The plumbing added:
You could use the one present on the fuselage side of the Airfix kit, but this is more fun ;-)
This corner needs to be rounded:
So a strip length has to be glued inside:
Interior of cockpit and cabin is painted, as well as the interior sides of the masked doors.
Details will be picked by hand:
And here is another solution for the no slats issue:
The Amodel kit of the DH60.
As you can see, Amodel kindly provides
another complete set of wings, giving you the chance to take one without compromising the kit's integrity.
The wings are slightly different, a fact you realize when you compare them.
How different? well, if I have used them and never told you, you would have never realized it.
But they are, as said, slightly different: the false ribs at the LE are a bit bigger, and the wing tip contour has a small variation, plus part of the training edge at the root has to be contoured to match the DH83 wing, a thing that can accomplished in less than a minute.
This is something many modelers can live with; however, a very few others will feel this a personal affront and call the Queen of Hearts' justice upon your head.
Your choice.
The option is there.
Why is this good news? because you take a part from another kit without ruining it, and because the no slats option opens the door to a flood of other DH83 potential candidates for the conversion.
That, of course, in case you are wiling to scratch a fuselage as I am doing.
The Amodel wing is separated from the sprues, interior parts are painted>
The Amodel wing panels are re/contoured to match plans>
The correct angle is cut:
Dry-fit and now ready to pin the panels to the center section:
Strangely, Amodel indented the struts' locations on one wing panel, but not on the other:
More work on the interior:
One upper wing panel glued to the center section:
Rest of the interior in place:
Lower wing glued on:
The other upper wing panel is glued to the center section:
Stab in place:
Vertical tail added and general view so far:
Tailwheel in place, a modified Aeroclub item:
The nose cheeks and cockpit coaming are added as sections:
The sections for the nose top and half the cabin areas are measured, cut, adjusted and glued. Minor touch ups will later ensure continuity where needed:
All sections are finally covered. The kit's nose tip is used:
The stringers that run under the fuselage front are added, as well as a partial section from a kit's part.
The space left clears the exhaust:
The proper curvature of the cheek is shown.
Naturally the whole fuselage has now to be sanded and smoothed out:
Then gracile lines of the DH83 start to emerge:
Airfix did a very good job on the DH82 kit, the finesse and detail to be
highly commended. Some minute nitpicking on a detail: the horns on the
elevator were only molded on the upper side of it:
And not on the underside. But the strut locations are there. I think
this is attributable, yet once again, to the "tech" interface, where
people that are very computer able do not necessarily posses the
aviation knowledge needed to realize certain things:
The horns were made from styrene sheet scraps and added:
Some of the airframes had a duct that run along the top of the nose. The
detail is fabricated just in case I chose a reg that had it, but not
glued:
More parts are extracted from the Airfix DH82 kit to see if they can be
used. The landing gear as we know won't fit as it is (too narrow for the
DH83), but may be I can separate and use the main legs. The struts
perhaps can be used too:
You may have noticed the "X" structure that unites and aligns the
struts. This is a clever device added by Airfix to help the modeler with
the ever-present "how-to-glue-and-align-the-upper-wing" issue. You are
supposed to glue the structures and then once all is set remove the "X".
It may help, and it may work, especially if you are careful, dexterous, and use a sharp blade:
At this point I drilled all needed locations for struts and control cables:
The stagger is of course much less in the DH83, so the struts from the
Arfix DH82 kit have to be removed from that hold-in-place structure. The
protruding Pitot may also be removed:
As the build continues and photos are consulted, more details emerge
that need to be incorporated. In thi8s case a small scoop on the right
cheek:
Some airframes had a wind-driven generator, so a three-part one is made, just in case, to keep the options open:
The pants are opened at the bottom to reflect the real thing:
The extended exhaust is made of styrene rod segments. The "muffler" is hollowed
at the tips to insert the fore and aft lengths and allow a tiny bit of
play to adjust. Once all is measured, small holes will be drilled and
thin wires inserted to anchor the assembly to the fuselage in the
corresponding -and also pre-drilled- locations:
The Airfix DH82 landing gear. Notice the black spots. Those were little
holes for the DH82 front LG struts, now filled with black styene and
trimmed:
Legs separated, axles drilled to accept new wire rigs:
New wires in place:
Dry run on the fuselage.
Airfix solution of the aileron linkages (a molded-in triangle instead of
horn and rod) keeps bothering me a bit. In such otherwise refined and
detailed kit it just doesn't do it for me. I may remove and replace
them, my only concern is a sore spot that I may create by the removal
and sanding and adding of the parts, that will not be as neat as the
rest. We'll see.
OK, I just erased those aileron linkages, leaving a minute section as
the control horn, and later will add a piece of short wire:
The jig that will be the base of the male mold for the canopy is made:
The windshield is made of a curved and shaped piece of clear plastic from some undetermined package.
I am the kind of modeler that, in spite of previous experience, keeps
deluding himself with the thought that once most of the model comes to
shape, the completion is near.
But the horizon, as we know, keeps moving ahead, and ahead, and ahead.
The seemingly infinity number of details and parts that need to be fabricated keeps mounting.
And on top of that, I still remain undecided regarding the scheme, so decals can not be started.
I think this is precisely the moment when most modelers just start another darn kit
The bubble canopy jig was filled with Milliput and sanded to shape; then
a clear part was pulled using the venerable Psychedelic Mattel
Vacuforming Machine.
I use that little contraption a lot, and I
am running pretty low on the sheets it uses (opaque and clear). I tried
the various substitutes offered online to no avail. I am down now to
only four clear sheets, that means four more scratch canopy projects and
impending vacuforming doom.
The troubles of a scratchbuilder:
We the ascetic monks of scratchbuilding are not asking why nobody kits
the Kerfuffle-Kaputnik KK-1, of which only one grainy photo exists,
locked in a vault in Volkania.
We are asking why there is no high-quality decal paper -
thin,
white and clear-, or common generic scratchbuilding accessories like
the ones Aeroclub used to market (to contemporary, higher standards if
possible); or good, perforated opaque and clear plastic sheets for the
Mattel vacuum-forming Psychedelic machine of which thousands are around,
and so on and so forth.
For example: I purchased these Venturis -I need one for this model-
which are excellent, and before I either fabricated them or used
Aeroclub ones (of course superseded now as seen in the photo below). The
price was right, the quality is high. I wish more manufacturers would
cater for the scratch (or kit-improver) crowd:
Some manufacturers produce superb, incredibly detailed,
out-of-this-world engines, for example, like Small Stuff. But they
produce (logically enough) only the best-sellers. I don't see many props
around, or the little gizmos Aeroclub used to market (joysticks,
antennas, etc.).
Some photo-etched manufacturers do produce for instance some
interesting generic sets from which I many times use parts. But the
versatility, affordability, quality and variety of Fred Hultberg's
FOTOCUT sets is gone. I dearly miss their Hawker Oil Cooler, their
generic cockpit accessories, their Pitot set which included wind-driven
generator tiny props (I just had to fabricate one for this model).
Sigh......
Primer is airbrushed:
The oil reservoir was mounted on the fuselage side on two wood rails:
The conduit on the fuselage top present in some airframes is added. This makes my choice clear: it's going to be Belgian OO-ENC, the plane Poirot once flew in ;-)
The wind-driven generator on the wing is added:
Landing gear added:
A beacon seen in photos on the wing center panel L.E. is fabricated:
The oil reservoir is glued on:
The canopy railings are added:
It's funny that the task of adding details never seems to finish.
Hopefully after a few more touch-ups the model will be ready top the first base coat of paint (gloss black).
The scheme of this Belgium-registered was the scheme used in G-ACDD, that is red bottom half of fuselage and fin flash, blue upper half and regs, silver on part of the nose, wings and horizontal tail. A white thin line divided the colors.
White double outline regs were painted on the fuselage sides. The decals have been already commissioned.
Some careful masking will be in order...
Black base applied:
The aluminium color is applied all over. Then masking will ensue to preserve the areas that will remain that color:
Pants, doors and wheels are painted too:
At this point I decided to make a little detour and experiment a bit
on props, working with aluminium sheet instead of re-shaping plastic
spares. I have done this before while working on the Rohrbach Roland to
render the Reed pressed metal props, but the machine I finally
represented didn't have those.
So I made for that model real laminated wood ones:
In this case, there is a spinner involved:
And here is an even smaller one that will finally go on the model to replace the "wood" one provided with the kit. Tiny Fairey logo light blue stripes will eventually be added to the blades, as per images of the real plane:
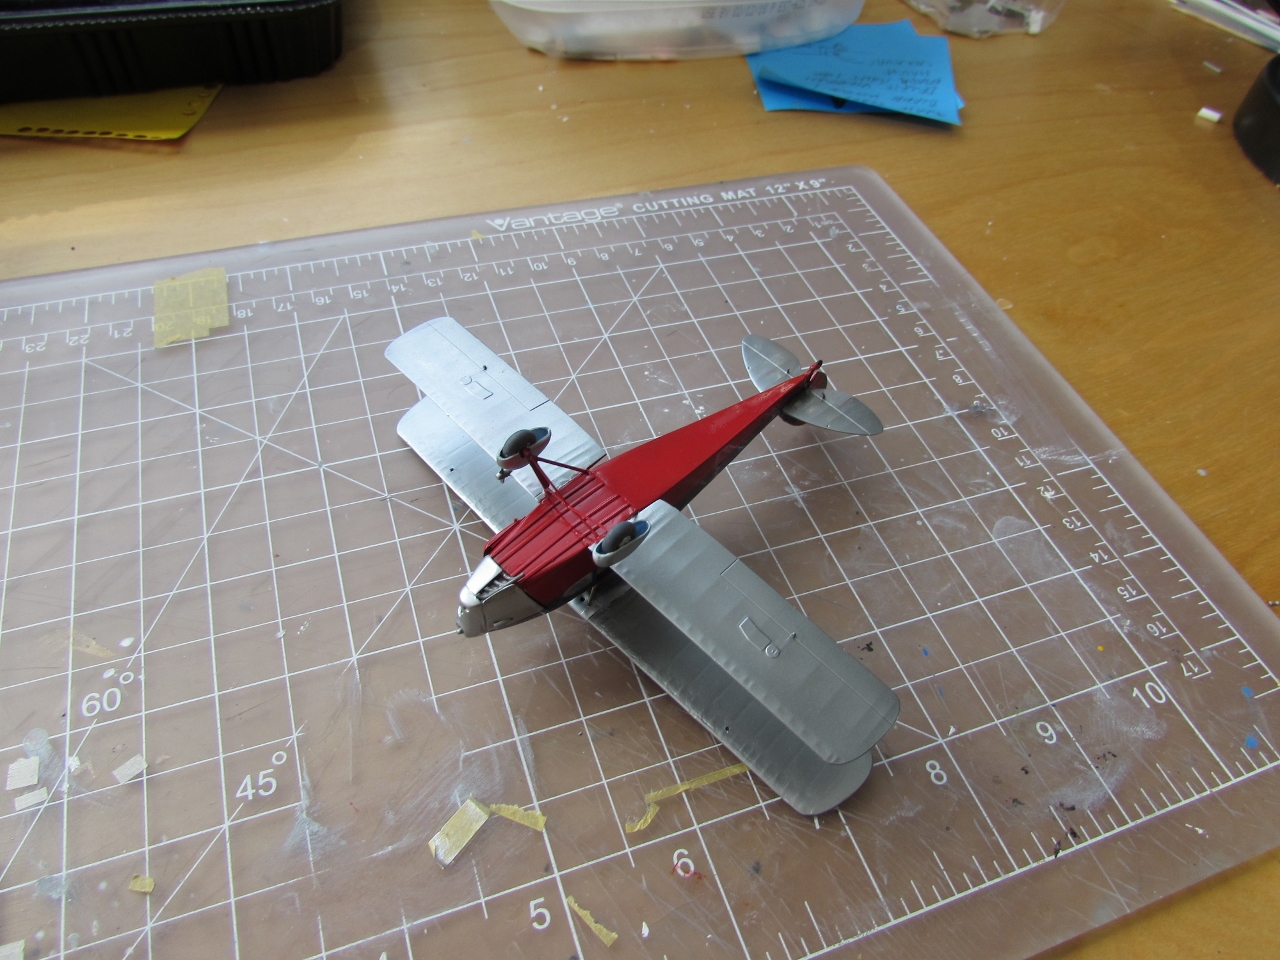
Aluminium color is masked, red is applied, which in turn will be masked to apply the blue:
With the red areas masked, the blue paint goes on:
Peeling the masks off reveals the color scheme:
Wheels inside the pants:
Masks off the doors, cockpit and cabin:
The four main fuselage struts are set:
Top wing on:
Exhaust being prepared. The fore windows were filled with window maker.
If you want to use the kit's top wing (on the side), another option, besides the plane flown by the despicable prince, is to model VH-UAL, that at some point in life had them, see here the top image:
http://www.edcoatescollection.com/ac1/austmz/VH-UAL(1).html
Wheels and manifold go on:
Funny that the model looks the same, yet all these were added: step to gain the cockpit, all minor (6) struts on the cabane, the telescopic jury struts (2), beacon on top of wing, the exhaust plumbing that follows the manifold, the five-slot louvers on top of the nose on each side:
The Arctic Decals transfers arrived:
Superb quality as usual:
All decals on:
Venturi, "metal" window frames and wing struts on:
Still to go are six lengths of tail control cable, twelve lengths of wing rigging, prop and doors.
Oops. Regs were misaligned. Was fooled by this photo here:
https://audiovis.nac.gov.pl/obraz/195414:1/
Now decals removed with Micro Set.
Sigh....
Some not very visible whitish patches were the result of the removal, but just in case, again with paint and varnish:
Decals on one more time:
And then rigging, stab struts, doors, prop. Almost there:
The completed model is here:
https://wingsofintent.blogspot.com/2018/05/de-havilland-dh83-fox-moth-half-scratch.html