


(The completed model can be seen here:
https://wingsofintent.blogspot.com/2022/05/curtiss-jenny-barnstormer-olimp-from.html
As I write this the Ukrainian people are being invaded, bombed, shot at, blasted, and in too many cases forced to leave their homes. Their country systematically destroyed in an unprovoked attack by yet another pitiful, sad, coward, pathetic but very dangerous wannabe dictator.
There is nothing this post can do in the way of helping, but here it is anyway, at least as a small way of demonstrating support and solidarity:
The Curtiss Jenny is so well known, had such a long and illustrious history, and its value proven beyond doubt so many times, that anything I could say would be redundant. Mail carrier, barnstormer, personal mount, besides its well-known service, built in huge numbers and used by many countries, the ubiquitous Jenny is one of those planes so famous that even people that are somewhat foreign to aviation may have heard of it.
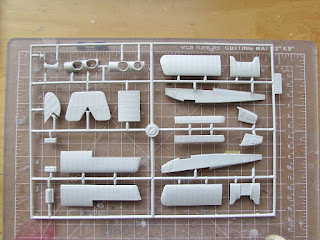
I was very pleasantly surprised when I retrieved this kit from the most inaccessible crags of my pile. I remember buying it thinking that one day I may build one of the many civil, colorful iterations. What better time than now. For the first time having a good look at the contents, I started to smile. What a beautiful little kit! It caters for a number of options, so you get plenty of spare parts. The detail is very nice, even providing an engine (two, actually) and a full interior. The treatment of the flying surfaces is subtle and pleasant. The plastic is amazingly compliant, a delight to work with. This is one of the best examples of the so-called "short-run" technology that I have had in my hands. The sprue gates are unobtrusive and very easily cleaned up, the surface of the parts clean and consistent. Summarizing: what a winner!
Cloned sprues, with many leftover goodies:


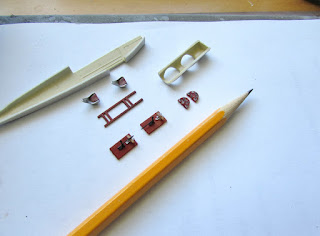
Some spare parts:


Preparing for some painting:

Still not sure what specific civil plane I will be representing, but has to be one that corresponds to the version of this boxing (or very close to it). Most candidates I have have the flat radiator bottom, not the round one provided in the kit, but that's easily fixed, as the kit provides the two fuselage front shapes. More references have to be consulted (I just started reading what I have) before a decision is made.
The engines are simple but nice, just in case I pulled out of a drawer an Aeroclub Hisso and an Engines & Things Curtiss OX-5:

Some basic colors are airbrushed:

The two cockpit floors provided are identical, but actually you need to slightly modify one of them to make them a bit more accurate:

The kit propeller to the left, and one from the spares to the right that better fits the alternate schemes I have on file:

Home-made "wood" decals are cut and applied to the fuselage side frames. Thin wire is added. As per usual, not much of these will be seen:

The interior is in place, only seat belts need adding now, and the inst. panels are in place too:

Whatever engine the plane I choose may have had, I think I am ready:

A very long time ago, when I was much older, I built this free-flight rubber-powered Jenny:

And seat belts on:

Nice kit:


The radiator is cut to conform to the version I want to model, and the external frame restored at the base with a section of styrene stick that will later be sanded to blend in:

The six wing sections are glued using metal pins as reinforcements. This is probably not really necessary, once the edges are sanded true and the sections properly aligned, since the plastic bonds very well using normal cement and the wing airfoil is not too thin:

The plane in which Lillian Boyer did her flying stunts is starting to look promising as a candidate. I found on the San Diego Air and Space Museum photostream what looks like a colorized postcard, not an absolute authority regarding color, but at least a possibility, given that the color of her plane has not yet, that I am aware of, been categorically established:

The San Diego Air Space Museum photostream also has some photos of this machine:
https://www.flickr.com/photos/sdasmarchives/with/51764600347/
Here is one:

Critical Past hair-raising clips on Boyer's aerial stunts:
https://www.criticalpast.com/video/65675038424_Lillian-Boyer_aerial-acrobatics_Curtiss-JN-4_changing-from-auto-to-planeThese clips show that curiously her name wasn't painted on the other side of the Jenny.
The kit doesn't provide the windshields. Use thin clear plastic sheet that doesn't crease or turn white with stress when bent. I keep diverse clear packaging cuts for this purpose. Make double of what you need, and chose the better two, and in case the carpet monster attacks:
The lower wing is attached. Look for a comfortable fit, don't force-spread the wing center, as this will eliminate the slight dihedral or induce anhedral. Check that the wing is perpendicular -seen from above- to the fuselage center, and from the front that is not inclined to either side:

The arms of a figure (Thanks Sönke!) are cut off and re-positioned pointing upwards. A head transplant is performed by Igor, Sönke's Ebil Lair Assistant:


The horizontal tail is added, and the ailerons are glued to the upper wing. The figure is being worked on:

In order to later paint the leather coamings around the cockpits in a neat way masks are made:


As mentioned, if you break one of the wingtip skids (I did not, but they are delicate), you can easily replace them with wire coiled around a suitable diameter tube and trimmed to size:


Depending on the engine you are using, you may have to modify or change the kit's exhausts. Some plane would require that you carefully bend the parts provided:


The Boyer plane did not have the cover over the engine, and the E&T aftermarket engine comes without the admission piping, so this is added from solder wire, as it will be visible:


The figure started to look a lot like Pancho Barnes, so I modified another one. I will keep Pancho for when I build her Mystery Ship:
.jpg)
.jpg)
The only correction so far in this kit is the position of the aileron control horns, which is inaccurately situated immediately behind the wing posts. The instructions, though, have it one rib in -also incorrect:
.jpg)
New holes need to be drilled one rib out, and the old holes plugged with stretched sprue and tidied:
.jpg)
The 10 kit's control horns (nothing wrong with them) are replaced with photo-etched items, which are thinner:
.jpg)
The wings are painted a doped fabric color:
.jpg)
After masking, the green color is applied:
.jpg)
The coamings are painted, as well as the control horns. An instrument decal is placed on the fuel gauge part, and the footholds on the fuselage sides are enhanced with metal photo-etched items rims:
.jpg)
.jpg)
Engine and radiator are added:
.jpg)
The home-made windshields are added:
.jpg)
As I have inadvertently sat on models, crashed with my elbows sub-assemblies, swept parts into the trash cans, and done all the silly things we modelers do, I try now to be disciplined and keep things protected and organized during the builds:
.jpg)
Cabane and outer struts are on. Not sure if this strategy will work, but I have tried every conceivable approach in the dozens of biplanes I have built, and nothing guarantees success of easiness:
.jpg)
It worked, and after the glue on these is set, the intermediate struts will be inserted. Every build is slightly different, but I had to deepen the holes on the upper wing that receive the cabane struts, for the wing to seat properly on the external strut (shorten a smidgen the cabane struts would have worked too), or a combination of both:
.jpg)
The intermediate struts are on. It's raining buckets (we Californians hardly ever see water coming from the sky) Perfect modeling weather!:
.jpg)
Landing gear on. It had to be tweaked a bit to have a comfortable fit. The fore locating holes on the fuselage belly had to be measured and drilled. The LG legs have very small locating pips, some modelers may like to add thin metal pins for a firmer anchoring:
.jpg)
.jpg)
I only partially rigged the tail and the landing gear, and just there are 26 lengths of "wire", measured, cut, and glued individually:
.jpg)
The decals arrived, courtesy of Mr. C. Psarras:

The decals are applied:
.jpg)
More rigging: the elevator control cables, aileron cables diagonally inside the wing bays, and the first cross rigging:
.jpg)
The wing posts are on, and almost all the rigging is done now. Once all is said and done, more than 120 individual lengths of "wire" would have been measured, cut, and glued. Not for the faint of heart. My eyesight at this stage in my life is less than optimal, and it is a challenge to do this:
.jpg)
All of the above are now in place:
.jpg)
But looking at photos I discovered that I am not done yet, 12 more lengths of "wire" are needed. Oh, the humanity!
Rigging done. Still a few things to move around a bit:
.jpg)
.jpg)
To be continued...