(the completed model is here:
https://wingsofintent.blogspot.com/2019/09/mitsubishi-l3m1-nippon-around-world.html
I like this old kit. I'll try to explain why.
The "Nippon" (Japan) was one in a series of conversions for civil use stemming from the Mitsubishi G3M line.
Several planes, not always identical, were converted or modified for a number of civil duties: passenger and cargo flying and "good will", record, or propaganda flights.
The details are complex and extensive, so we'll untangle them later on.
Here is a list, taken from the Golden Years registers, of all the Mitsubishi transports I could find there:
J-BAAS
Mitsubishi L3Y1 Asahi Shimbun
J-BACI Mitsubishi G3M2 Osaka
Mainichi Shimbun and Tokyo
Nichinichi 00.08.39
J-BADY Mitsubishi L3Y2
J-BEOA Mitsubishi G3M2 (Navy type 96) DNKKK 'Soyokaze'
J-BEOC Mitsubishi G3M2 (Navy type 96) Dai Nihon KKK 'Yamato'
(Conversion of 96/G3M2)
J-BEOD Mitsubishi twin engined transport DNKKK 00.10.39 (Conversion
of 96/G3M1)
J-BEOE Mitsubishi G3M2 (Navy type 96) Dai Nihon KKK
'Tatsukaze' (Conversion of 96/G3M2)
J-BEOF Mitsubishi twin engined transport DNKKK 00.04.40 (Conversion
of 96/G3M1)
J-BEOG Mitsubishi G3M2 (Navy type 96) Dai Nihon KKK
'Matukaze' (Conversion of 96/G3M2)
J-BFOE Mitsubishi G3M2 (Navy type 96) DNKKK 'Amatsukaze' 00.03.40
J-BFOF Mitsubishi twin engined transport DNKKK 00.03.40 Forcelanded
in sea and sunk off Haneda
J-BJOD Mitsubishi G3M2 (Navy type 96) DNKKK 'Isokaze'
00.01.41
J-BJOE Mitsubishi G3M2 (Navy type 96) DNKKK 'Hamakaze'
00.11.40
J-BJOF Mitsubishi G3M2 (Navy type 96) DNKKK 'Okikaze'
00.01.41
J-BJOG Mitsubishi G3M2 (Navy type 96) DNKKK 'Namikaze'
00.01.41
J-BJOH Mitsubishi G3M2 (Navy type 96) DNKKK 'Hokaze'
00.01.41
J-BJOI Mitsubishi G3M2
(Navy type 96) DNKKK 'Yakaze' 00.02.41
(DNKKK: Dai Nippon Kōkū Kabushiki Kaisha, Imperial Japanese Airways 大日本航空株式会社)
J-BACI, one of the two subjects that can be modeled with this kit, made an around-the-world flight,
Many of the flights performed by the civil variants of the plane where as said in the category of "good will" flights. However, considering the events immediately after (like Pearl Harbor), one perhaps should be a tad skeptical assessing the real nature of them. And the equipment they carried (cameras).
Regarding the different registrations/machines, it's not just a matter of slapping them on, since there were many differences among machines, some quite evident. As always, base your model and detail on photographic evidence, and pay little heed to captions and written descriptions, many times inaccurate.
For the moment, and regarding the kit, it must be said that this tool -with modifications and additions- was released a large number of times covering a variety of subject through many years.
This last incarnation in civil guise by Arii, is still, in spite of of its vintage, a nice package at a very convenient price.
So what do we get? We get a bag where everything but the instructions is packed: transparencies, decals, sprues. Not the best packaging, as we know. But there is a piece of rigid cardboard to support the load. The transparencies contain many parts not to be used, as they belong to the bang-boing-paf versions, for which I care much less than little. The decals cover two civil versions, J-BACI and J-BEOC. The parts are modified to cover this civil versions, but still something may need to be added.
The surface is interesting, consisting -again, old mold- of myriads of engraved rivets and panel lines. Of course a bit exaggerated. Nothing that an invigorating exercising sanding session -or many- won't take care of. A blast from the past: the place for the hinomarus is also engraved on the wings -now that is vintage for you-.
The interior detail I strongly suspect belongs more to the other versions than to the civil ones . No cabin detail whatsoever, but some cockpit detail. The landing gear legs can rotate upwards!! -this always reminds me of the early Beatles:-)
The rest has a rational break-down and again interesting surfaces and detail, we will see this as we advance on the build.
I think this old kit in its new guise can be turned into a nice model -and you can see many good ones on the Net, some exceptionally built.
Let's see what we got:
The transparencies are not bad at all:
Although the surface is slightly pebbled and looks faintly milky. Future bath in its future, no doubt:
The hinomaru placement mark (I know...), the hail dimples or golf ball rivets, but quite restrained panel lines. My idea is to sand the surfaces quite a bit to reduce those golf ball dimples to their minimum expressions, and refresh the panel lines if needed:
A view of the second sprue:
The engines are molded integrally with the cowl. If not awfully wrong or offending, I nevertheless just ordered after-market ones and will remove them, which also facilitates painting -however, the cowl was black on the original plane, so you may get away painting everything black and picking the engine up with a dry-brush of silver-:
The main sprue. The Japanese figures look a bit circumspect or pensive:
Some of the parts, a bit of flash, some ejector pin marks, the usual:
Instrument panel, not bad if you want just a quick build:
The props, not really accurate but passable, again, if you just want a quick build:
More flashy-flash:
Nice detail on tail parts:
The fuselage sides adapted to the civil release:
The kit lacks the round hatch/window on the back of the fuselage aft the canopy, and the little window on the door, both only marked in the kit:
The loop for the finder is a bit overscale and will benefit from a wire replacement:
The aileron linkages are better replaced too, and perhaps the interior of the wheel wells will look nicer with some added structural detail.
I acquired two nice engines to replace the kit's fused-to-the-cowl ones:
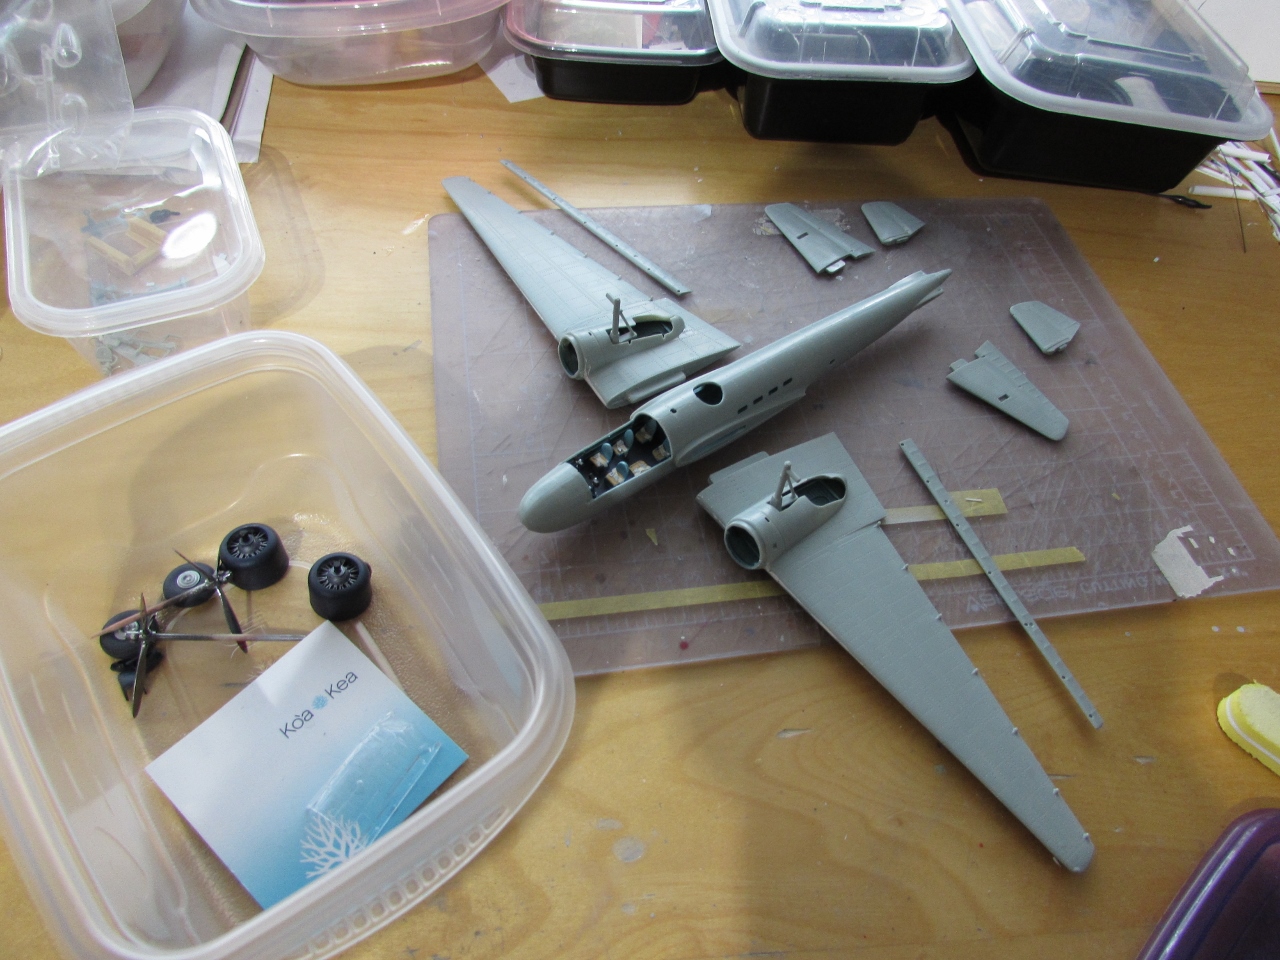
Some of the parts are separated for familiarization and clean up:
Apparently there are two sets of masks (but only for
Hasegawa's G3M), one by Montex and the other by Eduard.
Does anyone know how similar the canopies are? will it more or less fit on this one?
Hasegawa's G3M is a different mold:
A modicum of sanding is preformed:
The plane I intend to model had glazing in this circular area:
So it is carved:
There was a window on that door:
So it is open. If I get reliable information on the special interior for this particular plane I will open that door, if not, it will remain shut:
All the parts are now cleaned up, a long and tedious job that insumed a whole morning, given the extensive presence of flash and many ejector pin marks and burrs:
There is a bit of a mysterious step in the instructions, that apparently points to the need of removing a flashed-over area in order to clear the way for the landing gear doors to be later positioned, if the model is to be depicted with the gear down:
Therefore the area is removed:
Thus enabling the door to be locked in place later on:
The fit, if you would like top position the LG retracted, is not the best:
The kit has a provision for installing a rotating gear, a throw-back to more naive times in modeling history. Beware that the locking part is sided:
Posing the gear down created the problem of a very bare bay. References should be consulted to come up with some detail (and if no luck, some sort of credible arrangement put in place):
A resemblance of structural elements is put in place:
The surrounding interior will be painted black and the structure aotake with a mist of a darker tone to make it less evident:
The interior, a bit crude, is provided with the additional positions that can be seen in photos:
The loop antenna, also crude, is replaced with a home-made item:
Paint is applied to some sub/assemblies and parts:
A bit of structure is added to the fuselage sides on the cockpit area. Some detailing is done on the cockpit pan and engines:
I lightly sanded everything. As I suspected the panel lines (which are
faintly engraved) almost disappeared before I even made a dent on the
potholes. So I had to re-scribe them and I left it there.
I love to turn toads into swans, but I overestimated this kit, and,
even if it is indeed a nice kit for its time, you can do so much without
having to re-invent the wheel. Airfix's Anson in that respect,
strangely enough, is a more pliable raw material.
I love to open all doors and hatches in these endeavors, but lack of
reliable information regarding the interior of this specific machine
prevented that part of the fun, so I am letting this one be as it is,
with one or two refinements and that's that.
I am really concerned about the decals, which I just examined. They are
of the overly thick type many times seen in Japanese kits,
the thick pancake type that usually ruins the appearance of models,
presenting a step visible from two yards away.
We´ll see how that goes.
More painting ensues:
Meanwhile the wing halves have been united.
The pips and dimples that are supposed to align them do not work well, and the pips are better eliminated. I had instead enlarged the dimples, but still had to really clamp the parts together for a good joint. Otherwise a somewhat thick hairline gap would show at the trailing edge.
The leading edge will require putty, because aligning the parts at the trailing edge will produce a visible step at the leading edge. As it is often seen in kits, the seams around the engine nacelles are uneven, needing filling and sanding:
The fuselage halves are glued together, other elements are completed and ready to go in in due time:
The decals do not provide the double red line for the tip of the propeller blades, so I tried to use an old discarded decals that, as it is their wont, disintegrated at the sight of water. The remainder was varnished in hopes it will hold:
It only partially worked, so another discarded decal sheet was used, this time successfully, but 12 individual stripes needed to be cut and applied:
A couple of instrument sets are used inside, to convey the feeling of equipment:
We may say this is half-way now:
I just tried the fit of the canopy -seen in the plastic container drying from its floor polish bath- and it is very good, one less thing to worry about.
The only sink marks in the whole kit:
Wings and horizontal tail on. Vertical stabilizers will be added after painting, since I will use different hues for metal and fabric areas. The fit is not bad, but it isn't good:
A warning note:
Parts 33 and 34 are the aileron/flap actuators.
Parts 31 and 32 are deceivingly depicted in the instructions also as actuators, seemingly connecting the moving surfaces with the wing, which is incorrect, since they are just the counterweights and should only be attached to the control surfaces in a way that the weight at the end of the part is more or less aligned with the datum line. Their shape is wrong, as the angle of those components is much wider:
A test with a spare decal form the same sheet corroborated my concerns, the carrier is thick and conspicuous. All images will require close trimming of the carrier, and large decals should be cut into individual subjects as free of carrier as possible:
First coat of primer is airbrushed. The canopy was masked just to preserve it for the moment, since I ordered a masks set that is actually meant for the Hasegawa kit, but I am hopeful that at least it will be partially useful, since there are so many panes in this one. I still have to fabricate the round hatch for the spine, which has a radial window arrangement:
Counterbalances are made to replace the kit's inaccurate parts. First attempt -to the left- a tad too big, to the right, a reasonably fair group:
The circular hatch is cut out from clear stock, bent a bit to follow the fuselage curvature, and masked:
Little painting together with parts for concurrent projects:
Trying to eliminate as much carrier as possible:
The small circular hatch missing in the kit and present in this plane -as explained above- is masked and painted. Not an easy thing, this one, since I had to make the masks from miscellaneous bits and then some cuts:
Inner side aotake color (the hatch will be displayed opened, but only matte black paint will be inside the fuselage). I still have to bend it:
New actuators:
The areas that were fabric-covered are given a coat of gloss white to help with hue variation:
A series of air scoops and a small window barely visible in photos (most likely for the restroom) are added:
After masking the white areas, a gloss black base is airbrushed in preparation for the Alclad:
The little forest of small ancillary parts is painted:
The ebil plan with the white and black bases worked perfectly, producing the hues of metal and fabric aluminium, visible in movie clips:
And then disaster stroke.
For many, many years, I have been a user a staunch defender of Testors' Aztek airbrush.
I have owned perhaps four or more in the last 20 years. To me they were practical, easy to use, easy to clean, and would withstand the occasional drop to the floor with no consequences, something that other airbrushes will hardly ever do.
Unfortunately, because of their relatively cheapo materials (but not cheapo price) if you really use them, as I do, almost daily, in two years they are a total mess, completely worn down, and (among other things) paint starts to come big way inside the body, and from there EVERYWHERE on you, your painting station AND your model.
So far, Testors honored their warranty, and when the time came, I would send the old airbrush, and get a refurbished or new one. This happened may be three times.
Last time, they sent me the one I am using now, and a note saying that the company that now owns Testors, Rust-Oleum,
is discontinuing the product, and with it their support.
How corporately great, as usual.
Not only that, but the one they sent last time just did this (see below),
the same-old crap, paint in the body, and from it to your beloved model. Perhaps they did not replace pin mechanism, or just kept the old one, in spite of me telling in the note to customer service that precisely that was the issue.
Well, thanks, Testors and Rust-Oleum, for not repaying 20 years of loyalty.
To add insult to injury, they put in the return package a note telling me how to use it. Really? after 20 years and close to 500 models?
Migrating now to Iwata (which I got already) and then I will get a second, a Paasche, the first brand I ever used, long ago.
The Alclad of course ate trough the finish, so I will have to wait, sand, re-prime, re-coat in gloss black, and re-Alclad.
Darn, extra-darn, and recontra-darnation.
The surface is re-done, and the aluminium paint is applied:
Masks removed. The windows are filled with window-maker:
Vertical stabilizers are glued in position (they are sided, differentiated by the locking device), as well as wheels, cowls and the engines' exhausts and intakes:
The decals proved to be very stubborn, and will take a very long time to become loose from the backing sheet. We are talking here 20/30 minutes, when the normal time is seconds. Once released, they behave well and can be re-positioned -with care- since the glue is a bit slimy.
The manufacturer failed to realize that there are also "J" identification letters on the stab, a common practice then. Spares were used. The ones for the vertical stabilizers are present, though:
The small "J" also go underneath the stab.
Carefully studying photos and especially the movies I found, it seems to me that the edges of the wing tanks and the fuel caps were painted. My guess is red for the fuel caps, a common choice, and yellow for the edges. Therefore I took the risk and added them from sliced and punched-out decals:
Ailerons, home-made hatch, nav lights, loop antenna, wire antenna mast and Pitot (under the nose) are added:
More details. An important one is a metal flange at the base of the windshield (perhaps to deflect rain). Still to add: nose light and cover, wire antenna and insulators, props, aileron horns and rods, aileron counterweights, etc. etc.
(the completed model is here:
https://wingsofintent.blogspot.com/2019/09/mitsubishi-l3m1-nippon-around-world.html