Photo courtesy of Warren Wright
(this is the building article, for the completed model, please go to:
https://wingsofintent.blogspot.com/2021/05/bellanca-ch300-cf-atn-floatplane.html
The pleasant, graceful and serene lines of the CH-300
Bellanca monoplane seem to herald the type of flight you would have on one.
Many Bellancas, like this one, being bush planes, spent part
of their lives on floats. Unfortunately there isn't yet any aftermarket item
available for them, so a pair was modified/converted from those on the
Matchobx/Revell kit of the Norduyn Norseman. For data and tips on this
conversion, I thank Lars Opland from Alaska.
For this model I will be using, as a base to be modified,
the Dora Wings release.
The kit has been extensively analyzed during the previous
builds of "Liberty" and "Cape Cod", so I will refer modelers to those builds
to evaluate for themselves the findings.
Here is the building post, common to both:
https://wingsofintent.blogspot.com/2021/01/modified-dora-wings-bellanca-j-300.html
The kit's engine/exhaust will be substitute for a more accurate resin part from Khee-Kha Art Products, and other many details will need redoing and/or modified.
Summarizing, the Dora Wings kit can be turned into a fair
replica and attractive model, if the
modeler invests some time an effort to correct inaccuracies, product of less
than ideal research by the manufacturer. The level of detail is overall nice,
but the instructions can't be followed blindly, and the engineering once again
shows that CAD does not, per se, produce a perfect kit, thus the modeler will
have to reinforce some areas and rework some parts. Still, I welcome a civil
kit any day.
In spite of being a windowed version, the common use of the mold for all versions makes the modeler do the work of clearing the material. This in not thin wafer plastic, but solid one that needs a careful hand:
Done:
In this sample (the third kit I am building of this release) the mold mismatch, faint in the first ones, has become now very evident, may be too many copies are being drawn and it is starting to show:
Work commences on the floats from the donor kit:
This plane had clear areas on top of the cockpit, thus more carving is needed:
Now most carving is done:
Float halves glued together. Much more work will be needed on them to obtain the necessary shape and details:
With the widening at the bottom to increase the sides' camber angle, and the addition at the top of extra plastic, the floats begin to take shape. Next step is the building up of the bottom flutes and eventually the addition of details like inspection hatches, anchoring points, struts, and water rudder:
Dora Wings cleverly approached the always intrusive sprue gates, making them attach in some parts to the back, or the gluing surface. Still, caution is advised as in some of those parts -like seat bases, aft cabin bulkhead, engine fronts, to name a few- they can be easily confused with very small locating pips. So during cleanup after removal, look closely.
The multipart approach to the louvered fuselage nose does not have a perfect fit, and some very small "channels" on the gluing edges of some parts that correspond to relief on the adjacent parts, have to be enlarged. This is one of the typical results of CAD design, tolerances that look good on the computer screen, but do not translate adequately to the master and then the actual injected part. Besides, edges may be sharp on the screen, but soft in the actual parts.
Pips and corresponding locating holes many times need some re-drilling, as the parts won't get together seamlessly.
In spite of all seat bases having four locating pips, the back ones had only two recesses on one side:
The plane I intend to represent has a landing light, so a home-made one is prepared, its location will later be drilled:
The four-part nose is assembled, this has to be done carefully:
The plane represented had two airscoops, one facing forward and the other backwards. As the kit provides none, home-made ones are fabricated. A styrene ro9d is heated and bent:
The ends hollowed:
And the two parts separated:
The parts are separated and cleaned up. Be sure to use the parts pertinent to your version, as there are alternates for different version:
The wings are molded as upper and lower halves:
The lower halves are partially inset into the upper halves, but as molded they create a step (exaggerated in the photo). You have to sand down the lower halves until they fit flush with their corresponding surfaces:
And yet again somebody is asleep at the wheel at Dora Wings. The doors, that are of course present in any passenger version, are absent in the kit, and, unlike the windows, are not engraved inside the parts to give you the choice. Oh my oh my, with these Dora Wings chaps. I penciled the outlines for ulterior cutting. Such a nice kit, so many oversights. I would like to pose one or the two doors open, will see...
Other smaller parts are readied. The bowlegs are present in the seaplane, if of course just the upper part. I am waiting for input from the plane owner regarding interior details (type of joystick, seats, inst.pan., colors, etc.):
Selecting some airfoiled stock for the spreader bars, and having a bit of fun with the paddle seen in photos of the real thing. Floats of course still just the basic shapes in progress:
The seats as they come in the kit are too tall for this version, thus the top of them has to be removed:
Bits removed. The "softness" of the top of the seats is restored with some sponge sanding:
The right-side door is very carefully excised, to pose it open and show a bit of the interior:
The left-side door is engraved:
As pointed out in the previous builds of this kit, the interior pan had to be sanded a bit in order to allow the fuselage halves to close properly, another ill-translated CAD feature:
Tape the areas adjacent to the seam in order to protect the surfaces, and then putty and sand:
The control surfaces are glued to the tail, and the wings are ready for primer:
The float flutes are filled with Milliput, and eased in place with water and fingers. The basic shape is setting in:
Looking at photos of the actual plane being modeled (always a good practice) it was found that the back seat is one piece, not two separate seats as in the kit, so that will need some parts fabricated:
Time to wash the parts inside a tight mesh coffee filter, so not to lose any:
In this plane the front seat was actually two seats, so a division is incised:
The control columns were slightly different, thus new ones are made:
Metal control horns are added to the control surfaces, but not the kit ones, which are a tad coarse:
Suppose you break/ruin the door while you try to excise it from the fuselage -as this is not an easy thing to do, I was just lucky-. No problem: cut a clear sheet in the shape of the door, mask it on both sides, and paint it with the inside and outside colors. Presto!:
A group of parts is given the first coat of paint. The prop tips are red, so that's the first color applied, that will be masked to paint the black and light grey:
In this boxing, the photo-etched parts are of some coppery metal, instead of the other boxings where it was silver color:
The parts that belong to the rudder pedals arrangement are in place:
This plane has four climbing rods with end-plates. At this scale they are minuscule, but I found a way to fabricated them. I heated an aluminum lid from below and carefully pressed the airfoiled rod from the top, until the end-plate formed by slightly softening the plastic:
Easy-peasy:
Work on the interior progresses:
Dry-run to verify fit:
Ailerons are glued:
The transparencies include on the outside of the sprue frame, for some reason, two canopies for the company's 1/144th Gee Bee, and two alternate smaller window panes that cater for the release of the Bellanca Skyrocket. The instructions on these kits are often flawed with generic indications that do not apply to the several variants offered in the boxing, and other minor nuisances. On the other hand, they are well printed. This follows a trend for all industries nowadays: Put the effort in making it look good, and not so much in making it good.
The modification of the fuselage top for this specific plane requires that opening -as explained above, and the structural brace, which is positioned a bit below the fuselage surface, in order to support eventually a piece of clear plastic:
The window locations have in the kit sills, or recesses. But the clear parts do not correspond to them:
The clear parts don't fit the inner space (too big) or outer space (if you eliminate that sill) which is bigger than the clear parts, so you either remove material form the clear part or the sill, one by one, dry-fitting as you go:
After some time they are all in place:
The fuselage is closed, and instead of using the kit's vinyl masks, which tend to lift when primer is airbrushed, I made my own with Tamiya masking paper (Montex makes a set that seems to be fabricated using some black paper):
The nose sub-assembly is added:
Water rudders under construction, the exhaust end is hollowed for realism:
The indifferent fit of the parts of the kit means that a little persuasion must be frequently used. The fuselage top is added:
Two little bumps visible in photos were absent from the kit, so they are added:
This particular plane has nine battens under the wing fuel tanks, the kit has four, so the rest is added from thin heat-stretched sprue. The first one is added in the photo below:
All battens added, and the recesses for the two lights under the wing drilled:
This plane had spray deflectors added to the chine of the EDO floats, inside the track, to prevent the spray from damaging the propeller. The corresponding parts are fabricated:
The fuel caps are not correct for this specific plane, so they are deleted:
New ones are added. Hooked vents are made from thin wire, and their locations drilled behind the caps for later installation:
The spray deflectors are added to the floats, and a coat of primer is given before adding the remaining details on deck and stern. Exhaust ring and prop are painted. The Hamilton Standard logos added (from the Arctic Decals prop logos set) are not necessary for this specific plane, as the prop did not have them:
The floats are glued to the spreader bars, checking for alignment. The "bulldog" landing gear legs are cemented (they allow floats and skis to be exchanged). The tail feathers are added. There is a space between the stab and the fuselage and fin, that is normal and present in the actual plane, and it allows to change the incidence of the stab:
As commented above, the kit comes with masks, but they are vinyl, and tend to detach and curl under Alclad primer, so I made my own from Tamiya tape. But there is a Montex set for this kit too. I may try it with the windshield. The plastic sleeve follows the current trend of providing a bag that fits so tightly to the item it contains, that removing the item becomes frustrating. But we know that if something it's impractical and silly, chances are the industry will implement it:
The tail nav light is fabricated:
An oil cooler installed in this plane is fabricated following photos. A Venturi that goes on its side will be added later:
Struts for the floats are being made:
A light coat of primer to spot blemishes:
Replicating now the detail on the floats. The main struts are on, as well as some detail for the water rudders:
The other side of the wings is also primed:
More water rudder detail is added to the floats:
A coat of color:
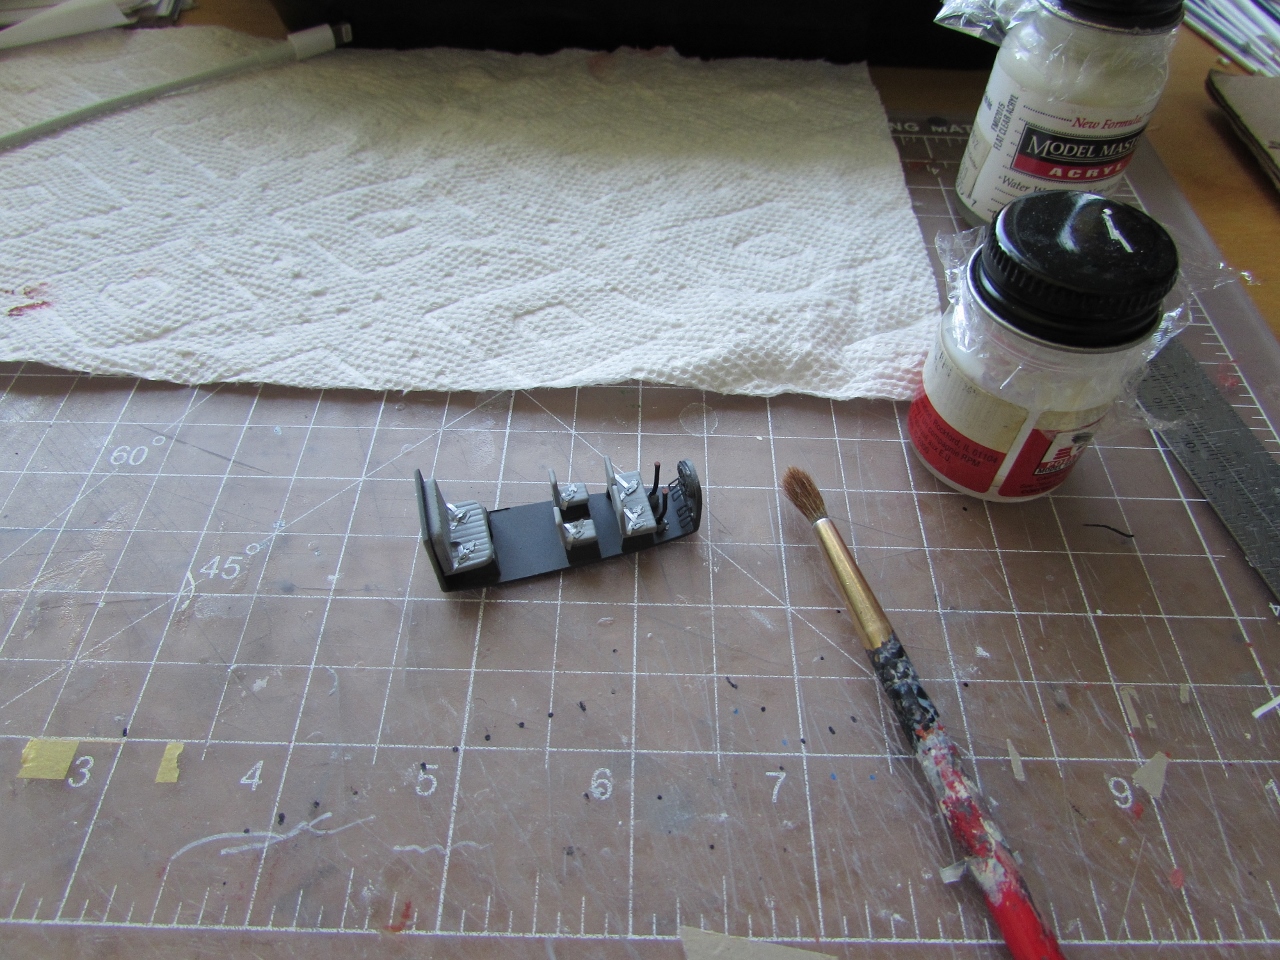
Pulleys for the floats diverse cables are made punching three disks per pulley, and then gluing them together. If anyone sees my eyes, please return them to me.:
Circular lids present on the top of the floats are punched from
aluminium sheet, domed with a tool and pricked to simulate the fastener:
The fuselage and wing struts, a couple of ancillaries, and some lengths of thin struts for the tail are painted:
Getting closer, but still a lot to do:
The kit's masks are applied to the windshield and forward windows. These
are made of vinyl, too translucent, which makes difficult to see where
you are positioning them, and not accurate, some being too large. A let
down
that could have been easily solved with paper masks, that are far
better:
I am trying something. Since many photos show the side front windows slid aft, I re-used the kit´s masks and applied them on a very thin clear plastic sheet, thinner than the molded windows. Then I airbrushed the metal color. I am hoping to use these instead:
I will be using the mooring cleats that come with an unrelated set of floats from Khee-Kha Art Products:
The floats are given a base of gloss grey lacquer in preparation for the aluminium color. Additional strut material is also prepared to be used to complete the structural setting of the floats:
The door (one is a spare) is "folded" to clear the strut as in the real plane, and a handle is added:
The rigging (4 lengths), control cables (6), and struts (4, some planes like this one had two additional diagonal ones) are added to the tail area:
The windshield and additional top windows were added, as well as metal pins for the wings:
Still some distance to go:
The fuselage is masked and metal color is airbrushed on its nose, together with the floats and strut material:
The floats are attached to the fuselage:
Inspection hatches are made from decals stock painted aluminium and then "riveted" before application:
The float decals are applied, and the aft strut of the floats glued:
Now begins the task of adding of the rigging and control cables to the floats and its struts, not an easy one. The ladders on both sides still need to be added:
Before the remaining rigging is added, the two paddles on the floats are added:
The oil cooler has a Venturi attached, so one is prepared:
The oil cooler is installed in the armpit of the left bowleg. Small round caps on top of the floats are added:
The complete structural and control cable rigging for the floats is completed. The floats took about thrice the time the rest o f model required:
The engine is readied:
The climbing ladders are added to both sides. A pause now has to be made, as I wait for the decals (you know how the mail is going these days, the speed of snail) to arrive, as I prefer to apply them on the fuselage before I add the engine, wings and struts:
With a slight adaptation I am using Khe-Kha Art Products resin engine. These have many times helped me with scratch and conversion projects, or to substitute sub-par kit renditions:
Engine and exhaust were added:
The decals arrived:
Decals are on. Then the wings and struts were added:
Now the least details are being added: the reinforcement of the wing struts, the ?-shaped vents for the fuel tanks, the propeller, the folding door. If my list is correct, the only things left are the rudder navigation light and the four climbing steps on the nose, and I will be seeing you at the completed model post later on:
To be continued....