-This is the building article, the completed model can be seen here:
http://wingsofintent.blogspot.com/2014/02/dr-design-clement-ader-avion-iii.html
Frenchman Clement Ader, aviation pioneer, built in the late
1800s a series of steam-powered "avions" with a unique
"bat-plane" flavor to them. Reputedly the first one, the
"Eole", barely lifted and flew erratically for a little while. The
Avion III -represented by this "dR design" kit- is a further
development that again, reputedly, took off -tethered- from a circular
track but crash-landed. These
"flights", although neither spectacular nor really effectively
controlled -more like hops-, precede nevertheless the Wright Bros. historic
flight by many years.
The Good, the Bad, en the Ugly:
Like the movie title, remember?
I should clarify, though, that when I say Ugly I don't mean
Clement Ader's creation, but I am referring instead to certain aspects of this "dR
Design" kit.
That a manufacturer from South-America will venture into the
kit market with a daring subject and a complex multi-media kit is surely
something to praise. I am certain they had to deal with many issues and
challenges, and they have to be congratulated for the mere fact of having put
some kits on the market. But when the final product is not quite there, no matter how good the intentions
or how limited the resources available, then it is a little disappointing.
The Good:
Hey, we have a kit of Clement Ader's Steam Punk Machine, the
Avion III.
The Bad:
Some solutions of the kit's engineering are not the happiest
ones (for example the propeller axles' nacelles).
The box, made of some sort of very thin flimsy clear acetate
is inadequate. I guess they have this idea of a "clear" box to show
the etched parts, which are visually attractive, but the idea did not pan out
and the box is squashy and you have to struggle to close it. The parts are
correctly bagged, though; but large parts will emerge "pre-bent", not
necessarily in the way the kit intends it, though.
The Ugly:
The kit's resin parts and instructions are sub-standard, especially
the instructions. Not because the kit is from Brazil and captions are only
in Portuguese -close enough to my native Spanish anyway-, but because the
images are unclear, and the captions have been partially deleted or cropped,
therefore some of the text is lost. This is a serious flaw that nobody on their
side seem to have noticed or have the will to correct.
I have built and posted here other kits from this
manufacturer (Otto Lilienthal glider, 14 Bis), showing exactly the same trend:
good subjects, bad instructions and bad resins.
In this particular case the photoetched parts are good, not
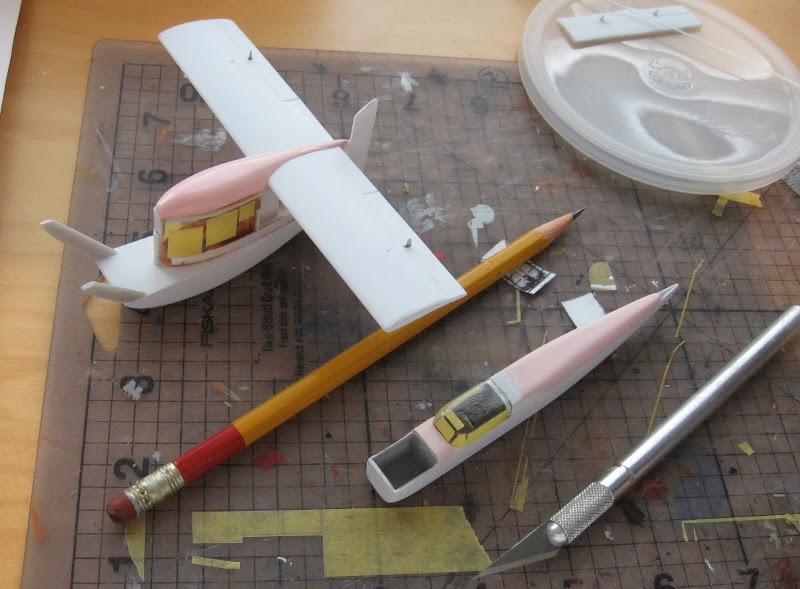
the disappointment that were in the sample of the other kit I built, the Santos Dumont 14 Bis.
My sample provided a duplicate -spare- set of the engine
nacelles, which are the fiddliest parts, so that's good. Please notice that the engine nacelles are of different length (one longer
than the other). The photoetched parts are thick enough to -mechanically-
hold and as said the cut was clean in this sample. Other kits from this
manufacturer provide covering material,
a sort of paper, but none came with this kit. Perhaps it is intended to show
its complex and beautiful structure to the fullest extent. There is no 3-view
of the plane, and compared with images of the original plane it fairs quite
well, but a few things are different. There was, a long time ago, an injected
plastic "Brifaut" kit of one of the others Ader machines, the Eole -similar
but with a single-propeller-.
Can you build a nice model from these kits? yes you can,
with some effort and ingenuity. Some head-scratching because of the horrid
instructions, correcting or at least cleaning and filling the
less-than-mediocre resin castings, and fiddling with the occasional photoetched
part that won't behave.
You could cover if you wish the areas that were canvassed in
the original with Japanese tissue or similar.
Although with some issues, this kit will allow you -if you
are committed enough- to have a nice Avion III representation on your shelf.
Remember I said "the propeller axle gondolas are of different sizes? Well, the shorter one won't fit in the frame. This asymmetry in the kit was perhaps intended to accommodate the props that rotate in the same plane and interfere with each other, but in the original plane one of the props has "angled" stems so it rotates on a plane forward of the other prop. Therefore of the spare parts one more long axle pod was fabricated. The props themselves had to be drilled to mount them on the pins. Sigh.
Meanwhile I managed to send to the Twang dimension he part that holds the tailwheel and one wheel (but there was a spare one, so I am OK):