Styrene

Styrene

Friday, July 26, 2019

Short Satellite, AVIS 1/72nd

*The completed model is here>
https://wingsofintent.blogspot.com/2019/08/short-s4-satellite-avis-172nd.html

I am elated by the release by Avis of a plethora of charming and good-looking civil planes in 1/72, a welcome break from the usual gloom and doom, with less common and sometimes colorful types, and all this at affordable prices with a reasonable level of detail.
I am acquiring their releases to support their choices, eager as I am for not really common civil kits, having been many times forced to resort to conversions of existing kits, or scratch-building, to satisfy my preferences for graceful, well-meant, significant and why not many times cute and adorable little flying things. 
All the late Avis releases are short run, meaning that you have to put a little of yourself there, you know, that thing, modeling. 
The Short Satellite belongs to the Light Plane category, the same league for which I scratched ther De Havilland D.H.53 and the Parnall Pixie:
A good reference for these types is The Lympne Trials, by Ord-Hume.
 I have had a file on Satellite for many years. In comparing the kit to my files I found it to be quite spot on, even having in the sprues the two engines (Cherub and Scorpion) that the plane had (The plane attended the Lympne light plane competition in 1924 and 1925 with a Cherub, and the 1926 one with a Scorpion).
The kit provides a closing part for the aft cockpit for the version with the registration (as depicted in box art), but it also flew with that registration with the aft post uncovered. Parts are provided of course for both positions.
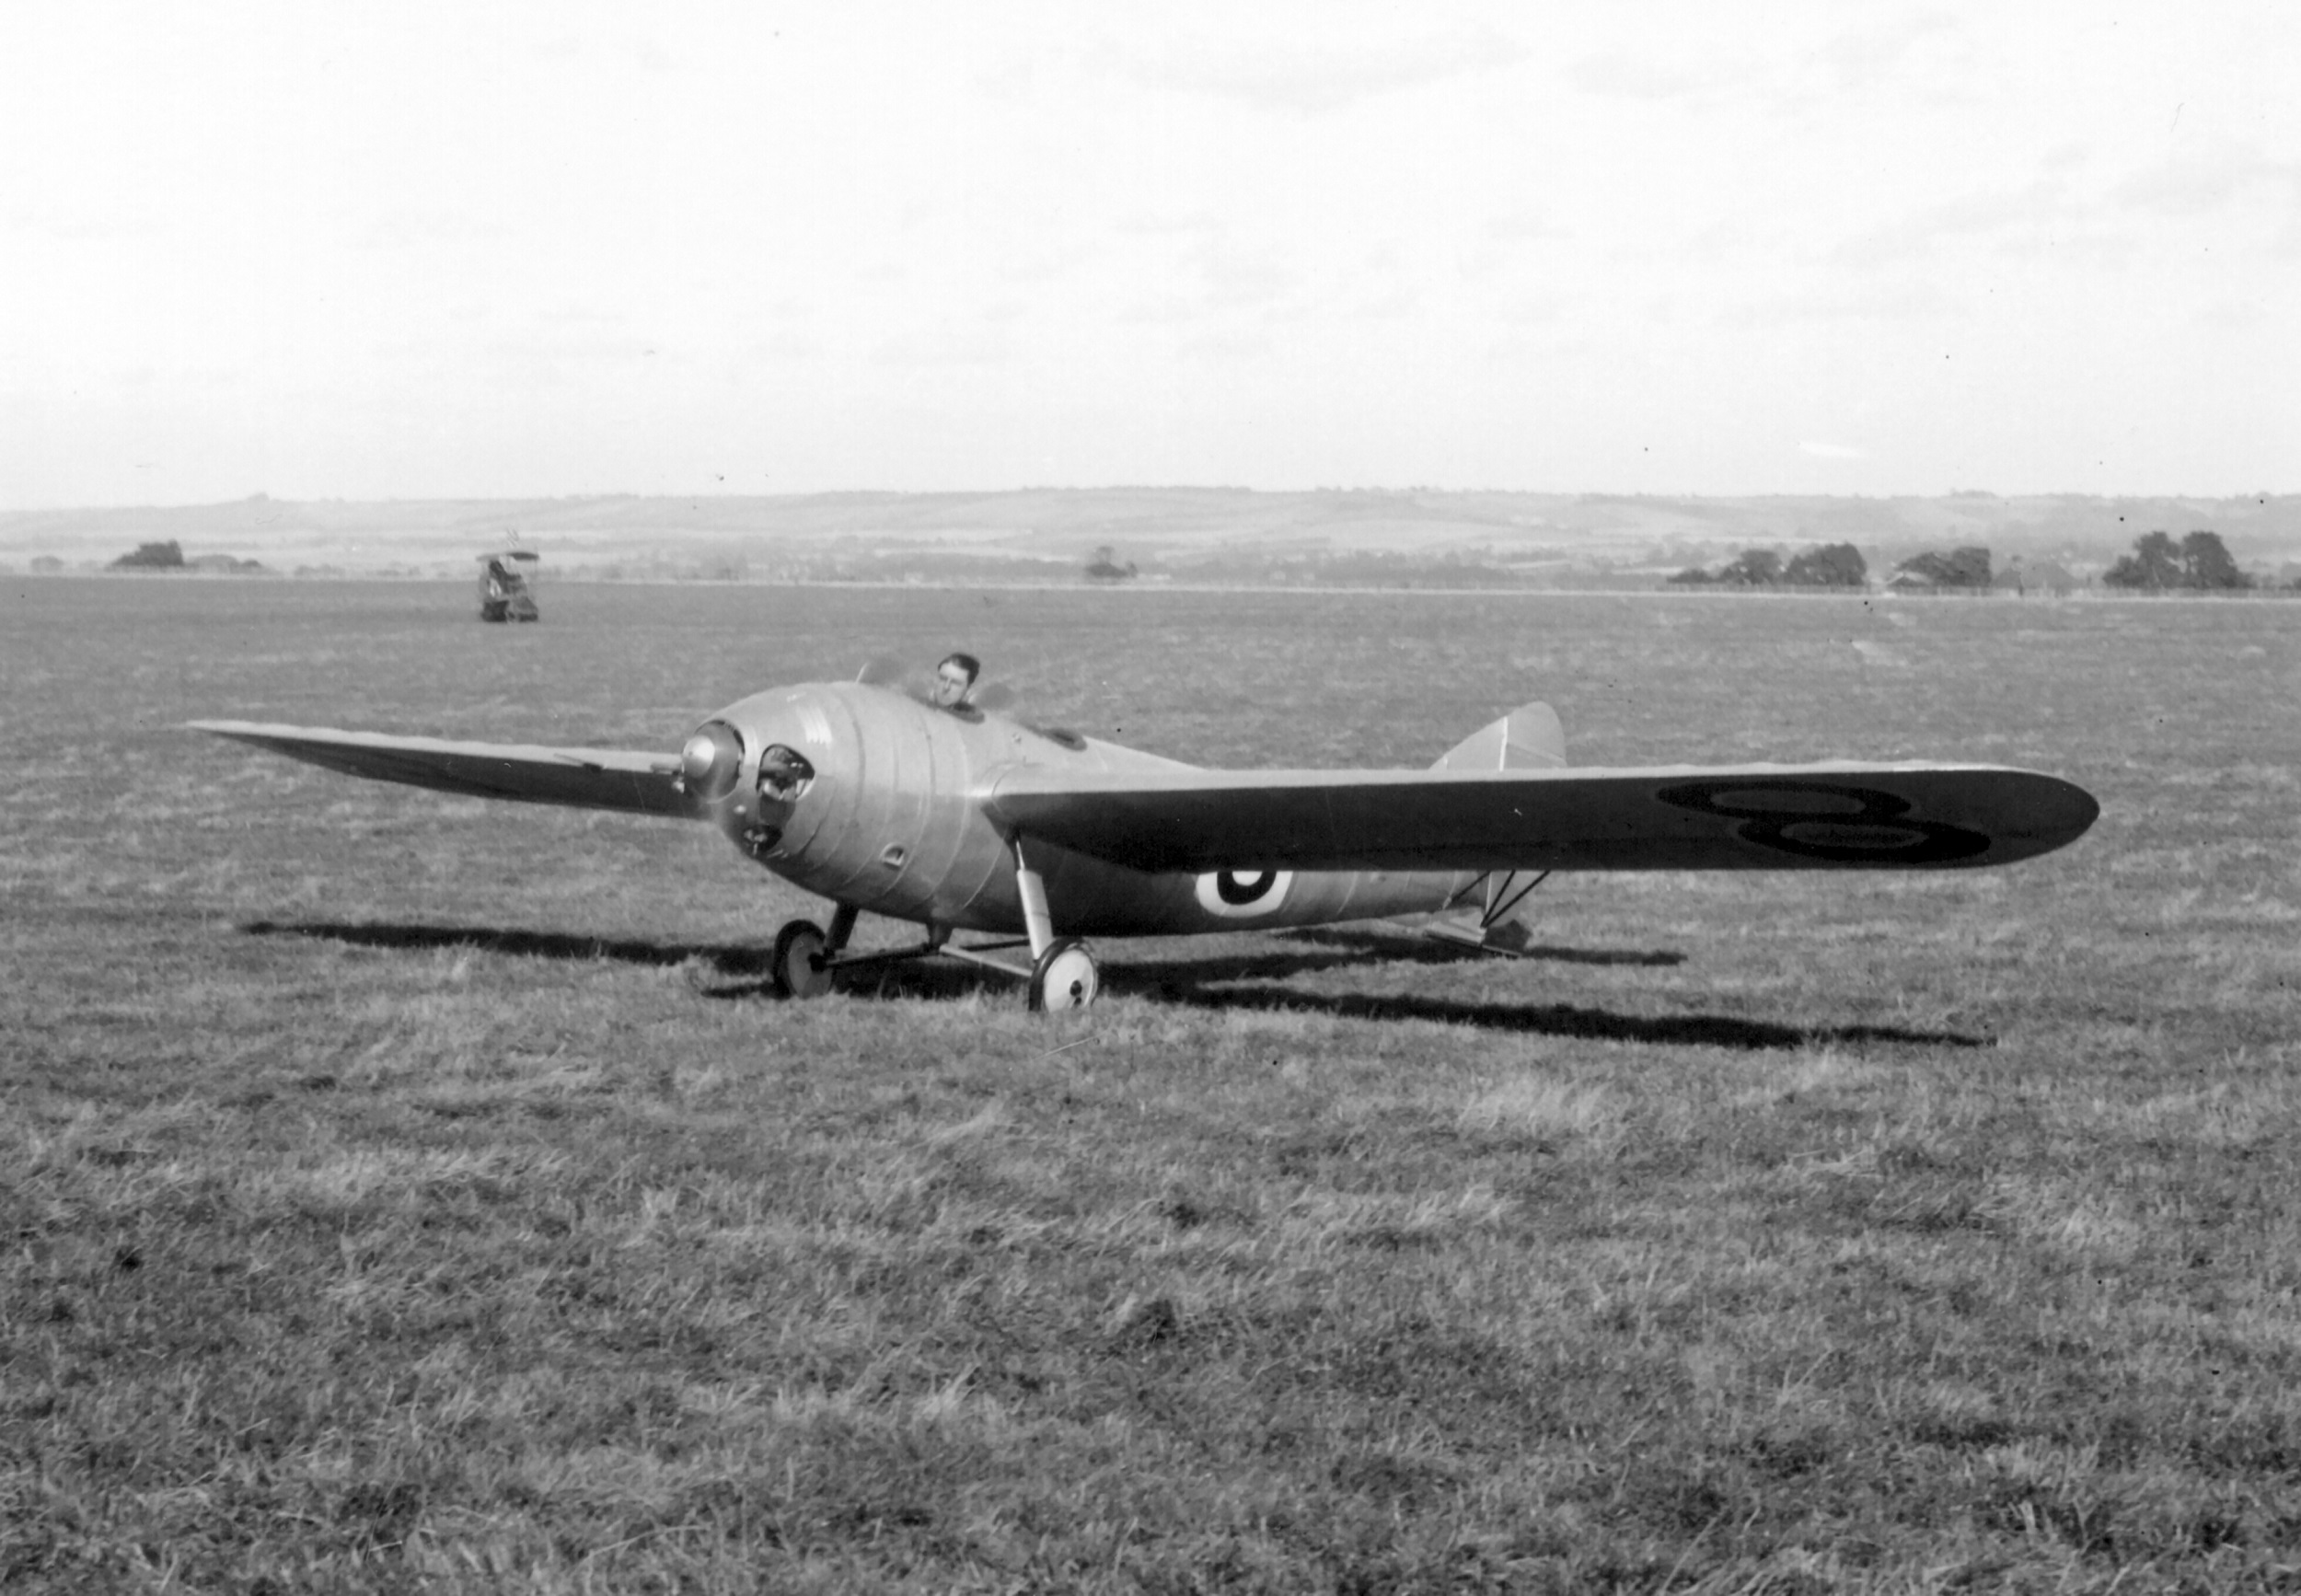
There is a very small omission on the decal sheet: the scheme with the number 8 should have also two number 8 under each wing, with a white outline:
 http://www.shu-aero.com/AeroPhotos_Shu_Aero/Aircraft_N/Short/Short_Satelite_S_4_G_EBJU_01_large.jpg
There as an additional scheme with the number 15 too.


 Contents, including a printed film for the small windshields:
 Good instructions:
 The level ,of detail you would expect for this type of kit:
 Surface detail:

The instructions are missing a diagonal third tailplane strut:
 All parts separated and cleaned up in a matter of a half hour:
 Some internal fuselage detail:
 The wing roots had a thicker airfoil, so Avis solved this issue with a separate half part to avoid shrinkage and sink holes and preserving the thinness of the rest of the wing, that would have been otherwise affected by a lower and upper part arrangement:
 Again, careful cleanup and dry-fitting, and then glued with no trouble, but the seam (which runs on a rib) will need tidying:
The interior is being prepared:
Painting of the interior and other parts begins:
The fin has spigots that pass through holes in the stab. I needed to enlarge those just a bit for a comfortable fit:
 The nose of the fin should touch the fuselage spine, but as it is leaves a small gap, so a small piece of styrene is glued in place to be later re-contoured:

The interior is in place:
 The fragile tailskid may not last, so better replace it with some wire later:
 The seam is masked and puttied:
 And that's that:
Fuselage halves united:
Just for the giggles, fuselages of Anson and Short Satellite compared:
First coat of primer to reveal blemishes:
After treating some blemishes, the wings are glued, and the tail unit is assembled:
The tailskid was replaced with a drill bit shaft. The compression legs for the landing gear are too long. I ended up drilling their location on the fuselage and shortening the other end a bit for a comfortable fit:
 Gloss black base:
As the build approach the final stages, I have to make a decision on which type of engine I will use, Cherub or Scorpion. The kit as said at the beginning provides both, if in a rather simplified rendering.
Here are the options on the instructions:

 And here the parts on the sprue (only one each is photographed, but they come of course in pairs):
 The other side:
The inst. do not specify which is which (the simple cylinder is meant to represent the ABC Scorpion) of with which decals they should be used, so it's up to you to do the research. 
I think the more "complicated" cylinder (Bristol Cherub) head position is not correctly depicted on the instructions, and should be sideways, with the exhaust at the front sticking downwards.
Now, compared to photos of the real engines, none of the parts look particularly faithful. 
I have many photos of those engines, but none of the photos I have of the Satellite shows, to the fullest extent and with pristine clarity the actual arrangement of those cylinders, which tended to vary quite a bit depending on installation, model, etc.
I will go for the "sideways" -contradicting the instructions- installation of the Cherub, because it's closer to reality and resembles better what I can see in photos of the Satellite, a somewhat flat cake against the surface of the cowl.
It also seems that the exhausts were rotated from going to the sides to going down.
Decisions, decisions...

All flying surfaces (fabric-covered) are painted white aluminium:
A note regarding changes in time of this plane:
As we know photos show three different schemes
a) Number 8 (that photos clearly show under the wings too outlined in white, missed by the kit's decal sheet)
-This scheme can be seen with and without the louvers on the nose.
b) Civil registration (G-EBJU) and G on rudder.
c) Number 15 and the Seven Feathers Aero Club logo on the nose. G on rudder, regs on wing only, Seven Feathers logo on the nose.
The prop is seen in some photos painted in metal color, or on wood color with small metal spinner tip.
The aft position is seen covered and uncovered, and with or without windscreen.

-All the tail control cables were added, as well as the three struts for the stab (that you have to make yourself). The cables that go to the upper elevator control horn pass trough the stab and emerge on the other side
-The decals are by Decograph in Ukraine. Sharply printed, thin, easy to apply (i.e. no fold-overs if applied carefully), will admit playing a bit to find right position.
I trimmed each individual large reg. letter for the wings:
 The Pitot is added. Photos show an alternate position for it, quite unorthodox: the right leg of the landing gear. The Cherub heads can be seen on the ground:
I finally decided to tackle the fuzzy render of the engines choosing the Cherub head provided and adding just a few stacked cylinder fins to it so it can fit comfortably in the recess provided:


  The windshields are next. Four are provided, which is great, because I lost two in the first three minutes of trying to cut them and positioning them:
 Prop, engine and windshields on:


To be continued.....

Thursday, July 25, 2019

Civil Avro Anson G-AMDA, London School of Flying, conversion of Airfix 1/72nd vintage kit

Work on the second Anson started, and this time the goal is to reproduce a machine used by the London School of Flying, G-AMDA.
The previous experience with the recently posted Anson
 https://wingsofintent.blogspot.com/2019/07/civil-avro-anson-modified-airfix-172.html
should be of help, and an opportunity to improve a thing or two that I missed on that one.
G-AMDA also flew in other guises (Derby Aviation), equally attractive, but the elegant two-tone blue scheme of this one definitely appealed to me.
This airframe needs a few things modified: new clear nose, different cowls, a slimmer landing gear, the addition of a football antenna loop fairing, and other minor details.

An old release:
 With documentation!
 I acquired a set of masks and a Flightpath photoetched set.
You can see that I have made already the new cowls and gotten new engines:
 The rib detail is erased, since there were panels on the surface:
 As many times happens with old kits, there are missing parts, a wheel in this case, so one had to be fabricated:


 The turret detail inside the fuselage has been deleted:
 The other internal details, partitions and locators, were eliminated too:
 Although a new landing gear is needed, I am dealing anyway with the ejector pin marks on the legs, just bin case I may need them at some point in my life:


 The photoetched set is extremely comprehensive and detailed, but caters mainly for the military version, so most parts will discarded. The US post office managed to mangle the set in spite of the rigid envelope it came in:
 The effort poured into the instructions is serious and again comprehensive. In spite of all the graphic material and my many years of modeling experience and my many hundreds of models, many areas are to me still unclear or confusing. I surfed the Net for quite a while without finding any photos of this set being actually built and applied to a model:
The nose tip is separated:
 This detail has to go:


 A clear part is vacuformed with the plug:
The window frame is a good fit to the kit. It requires that you fill the void with clear material, which I have. I will pass, though, on redoing the kit's front transparency area, since it seems to create much more problems that what it solves, with high risk of messing up. So I will only partially be using the provided frames, which, by the way, like any other part in this set are superb, if a tinsy bitsy thin and flimsy for my level of photo-etched handling dexterity:
 The task of removing and re-sizing ailerons and flaps is under way:
 As you can see I used part of the removed flaps to extend the areas on top that goes immediately above the flap. I will do the flaps with sheet styrene, if simpler no doubt, better for my purposes and with the correct length:
Wings halves glued:

Just for the giggles, fuselages of Anson and Short Satellite compared:
A back bulkhead and some paneling on the sides to cover the kit's mess:
Preparing the part to occlude the void:

Work starts on some of the photoetched parts:
I found a suitable Aeroclub football antenna. Thanks to John Adams for having made those available at the time!Those accessories keep rescuing my builds:
 The position of the seats, control columns and inst.panel is inaccurate, but I will used the plattform provided. A cabin floor was cut from styrene sheet:
The interior starts, with parts of the photoetched sheet and scratchbuilt ones:
Primer applied:
Some priming and interior painting:
 The oil coolers are next. Fiddly little buggers:

New transparencies are measured, cut and fitted to the corresponding openings:

 The door and aft window ones:
 The ones on the roof:
Correction of blemishes continues on the wings, inst. panel elements are painted black, the interior assemblies are given a base color:
The P.E. set includes the wing lights frame, the corresponding section is cut off:
 Section excised:
 New L.G. parts required for this plane:
The interior is almost ready to be assembled, but first I have to determine if I would use the P.E. set arrangement for the front of the glazing or the kit',s and if the former, chop the front section of the lateral framing:
I decided to cut off a section of side windows to negotiate the curving of the structure, gluing first the aft part to the fuselage (the acrylic is about the thickness of the kit's plastic):
 I may install the remaining front sections, or replace them with the same clear film I plan to use for the windshield. We'll see how it goes:
The internal structure is put in place:
 The external frames are just laid over (loose, no glue) to appreciate the effect:
The interior is glued to one side and let to dry with the other side just clamped together, not glued, to secure a good positioning:
I found this glue among my supplies, tried it, it glues nothing to nothing, no matter what plastic you try to glue. Just for the record, since it says it is specifically for plastic:
Now the fuselage halves are glued together:
Two thinner front panels were added to the side windows, and now before proceeding with the rest of the complicated solution of the windshield and roof, masks are applied to protect -hopefully- interior and transparencies from the hardships of puttying, sanding and priming, of which this kit unfortunately needs a lot:
The absolutely ugly state of things, until sanding and priming comes:
Impersonating Salvador Dali:
 Wings and horizontal tail on:
The wheel hubs are separated from the kit's legs, which won't be used:
 Other parts being prepared:
 First coat of primer and prop yellow tips painted:
 Last touches (they seem never to end):
A gloss white coat is laid down in preparation for the light blue. Painting of props and antenna fairing is done:
The flaps and flap recesses are painted:
Light blue is airbrushed, darker blue will follow for the upper nose and cowls:
Decals arrived!:
 The second color is applied, and all masks removed.
I have to proceed now with the application of the framing on all windows, and to build the windscreen and cockpit roof with the parts from the P.E. set. Good luck to me, it's all I can say:
The engines are glued to the nacelles. The photoetched frames corresponding to the side windows and cabin roof are now in place, after a nerve-wracking session.
As I feared, the two photo-etched parts that make for the windshield no not conform well to the shape and angle of the nose and windows, and the P.E. part that goes on top of that is a bit too big.
Even playing with the folding angle of the front two panels did not provide a suitable fit. How will I solve this, is still obscure to me.
I left it to rest so I can tackle it may be tomorrow, with fresh senses and restored patience:
The landing gear was reworked to represent the one present in this plane:
Meanwhile the lights are added:
Landing gear, flaps, and Pitot on:
Some other tense moments spent patterning, cutting and gluing on the panes of the windshield from inside, utilizing a very noble and thin material that used to come with the Jordan Highway Miniatures kits:


Finally, after much trials, the front parts go on. Still some thin gaps to fill, more likely with white glue and paint, but it is in place now.
And now for the next riddle this set forced upon me: the area above the windshield. Sigh....:
The wood master to vac the upper section of the canopy is started:
The wood master is gradually adjusted and then a copy is pulled:
 The vacuformed part is then in turn carefully adjusted, shaving little by little:
 The frame is presented to the vac part, and it is a fair fit:
Canopy glued on, props, decals, antennas. Still some details to go:
Fifteen parts are presented here. One of the limitations of P.E. parts is that to represent volume, they have to be stacked, which is a rather fiddly operation when you use C.A. glues:
 Control horns in place, clear nose in place, small stick thing on nose in place.
I attempted several times to glue the windshield wipers assembly, with than frustrating results, since the parts, again, seem not to adjust well to their positions. In the process a couple parts separated. This is the last detail I need to add, will give a try later or tomorrow separating all parts (in any case the representation of round cables and rods with P.E. is rather sadly flat) and just leaving the mechanisms, adding very fine solder for their connections, and if things continue no to work, I will leave it out altogether:


To be continued.....