

(The completed model can be seen here):
https://wingsofintent.blogspot.com/2022/04/boeing-377-modified-academy-172nd-scale.html
The reopening of the international civilian passenger market in the late forties and early fifties and its fast-growing needs required airplanes of great capacity and range. One of the companies developing such a design was Boeing, a name that used to be -to a certain extent- associated with quality, good business practices and reliability. One of its most remarkable products -a derivation of a wartime bomber turned cargo plane- was the Boeing 377 Stratocruiser. Massive, shiny, pressurized, luxurious to a level that a passenger today, even in normal first class, could not imagine, with a cocktail lounge, beds and/or fully-reclining seats, plenty of space between you and fellow passengers, meals catered by Swiss chefs under the direction of Maxim's from Paris, free-flowing champagne, and smiling flight attendants that didn't need to be scared of being threatened, insulted or hurt by unruly passengers not complying with safety rules or health regulations. If the future looked bright inside the Stratrocruiser, it must be said that from outside it looked fat -with its double-bubble cross-section and blunt nose- and decidedly ungainly, especially when compared to the contemporary Connie. One more reason to build a model of it.
Browsing references I found a Pan American World Airways (PAA)
flight that reached Buenos Aires, Argentina, from New York,
called "El Presidente", most likely named so to ingratiate the US and
the airline with the local government. Furthermore, the plane that inaugurated
that flight was christened, the 4th of July of 1950, "Friendship" at Ministro Pistarini Airport, yet another gesture. Believe it or not, at the time Argentina was a very rich country (mainly due to the much needed goods it exported during WWII), ranked among the best in the world, and its international airport amongst the largest then.
The build:
My dear friend Christos of Sinking Florida (and his Floating Dogs) had started long ago a sustained campaign to interest me in Riveted Sausages, with little effect so far. He made my buy such shiny sausages as the new Airfix DC3, the Heller Lockheed Connie and this Academy Boing-Boing. I decided it was time to give it a chance. Relatively unfamiliar as I am with non-Golden Age types and said passenger sausages, I was impressed by the size of the kit's parts. After some light research and a glance to reviews it seemed necessary to improve the kit with a few aftermarket sets; one of them in resin and metal is from Lone Star Models, it's very comprehensive, including propellers of a type not provided in the kit but also used by this airliners, new engine cowls with integrated engines, exhausts, wheels and a detail part missing in the kit associated with the front landing gear legs. I will further elaborate during the build, as there are some caveats. Another purchase, from Scale Aircrafts Conversions, is a cast metal set to replace the kit's plastic landing gear, much more adequate to bear the high loads that a massive model like this imposes (think of the necessary nose weight to avoid tail-sitting, the resin cowls + metal props, plus the normal weight of such huge kit). In addition a set of painting masks was acquired from Vintage Flier. Thus equipped, I embarked in perusing the kit parts. My sample was second hand, so I hope there will be no surprises down the road. Most parts were already separated from the sprues, some not very delicately, and the decal sheet looks ok, but as this kit has been around for a while (20+ years it seems) and you never know where/how the kit was stored, let's hope no decal disintegration ensues during application, if I decide to use the ones provided and not going for my usual tangent of alternative schemes. The kit appears to be decent enough, but alas, those minuscule windows, through which no interior whatsoever would be seen. Those who know me or visit this blog know that I frequently delight in providing interiors (especially restrooms), but this is not an option here, unless perhaps the entrance door is opened and some of the adjacent furnishings described. Bear in mind that interiors varied greatly from airline to airline and from service to service. The cockpit seems lukewarmly populated, an although an Eduard P.E. set did exist -for other variants of this plane- that spruced that area (and more), said set is unavailable now, besides is not really very useful for the 377.
References show two types of windows, as some airlines used square ones instead of the original round ones, and others used a mix of them. Experienced (and tireless) modelers may convert the kit to represent those airlines that used them.
Here is the Boeing 377 kit fuselage compared to Hughes' Boeing 100 special:

The Lone Star Models aftermarket set:


The mask set:

Neither doors nor hatches are engraved on the fuselage, they are provided as outline decals, a concession to the other non-civil versions the molds cater to:

The non version-specific parts go to the spares bin, hoping for a better destiny:

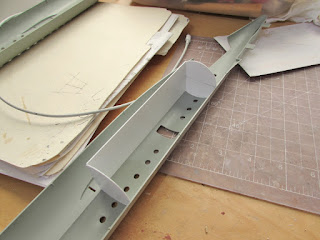
A curious finding. The non-civil version deck has a detailed nose gear well, whilst civil version doesn't. The detailed well can be easily removed -it's integrally molded with the cockpit floor, unlike in the 377 kit- and substituted, as it fits perfectly where it should and shares the same nose gear parts:

As a side note, it should be mentioned that there is no one-kit-fits-all solution, as every airline had it's own equipment and interior choices, reflecting in different layouts and exteriors. If you are one for accurate details, better study photos of the plane you intend to represent, as it may depart from what is offered as standard by Academy. Antennas, nose details, radar, finders, exhausts, props, spinners, flying decks, changed from plane to plane and during the lifetime of even the same plane. One example: if you are doing PAA, the flight deck needs a few changes to reflect their choice of layout.
I opened the door of the crew's restroom and cut a window in the cockpit door. The detailed wheel well is removed from the spare part:


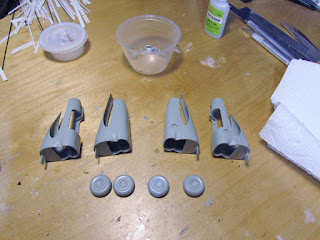
The engine nacelles are built. They consist of three parts each, and the contact surface is very limited, so a good alignment is critical. After the glue had set, I did a very informal dry run on the wings, and they seem to fit ok. The kit's wheel halves are glued, as photos show the hubs were more like them, and not like the resin set, but the thread is that of the resin set (parallel furrows) and not like the kit's (diamond pattern). It seems you can't have it all😆:
The tail surfaces halves are glued together. Very good fit here. The antenna mast has been removed as per instructions:

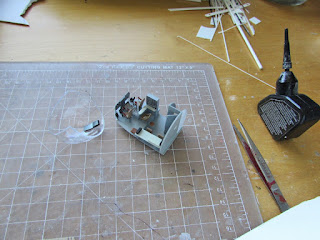
A divider panel is installed to shield the toilet from prying eyes. The toilet is added. A bar that wraps the instrument panel is added:

An extension of the engineer table is added, the stool to take nav. readings (there was a circular window at the cockpit top with a periscope:


A consideration of some details. Here are the kit's nacelle, cowl and exhaust:

Here is reality:


As you can see there is almost always a shrouded section after the "bullet" fairing. The kit's cowl is missing the bullet, and attempts to "submerge" the exhaust more or less where it should be, but not to a good result.
These are the Lone Star cowl and exhaust, much better, and reaching to the "bullet" but unshrouded:

But that only happened sometimes:

The kit's exhaust is not hollowed as the resin part, but both have a flattened end, while in reality this was round, no biggie to me:


The kit nose wheels, one (inner) side of the hub simplified, wrong thread, small, and with ejector pin marks. The resin wheel to the right, correct thread, right hub detail on both sides, and bigger:

Before I forget this bit: the 377 made use of "turbulators", leading edge devices designed to retard stalls and make the wing still effective at higher angles of attack. In this case there were two short lengths of triangular cross-section between the fuselage and the engines, and outboard of the outer engines. Sometimes they are visible in photos, but occasionally not present:


The wing and flap halves are glued. Contrary to some reviews I have read, the fit so far of all assembled parts is good, no complains there. In fact, the kit is very nice, much nicer than newer kits I have recently built. Not sure why Academy presented the flaps separated, though. These are Fowler flaps, that is, they not only go down, but also out a long way, and the parts are not detailed or prepared to do that, nor I know of any aftermarket set that caters for that need. I think it would have been better to mold them as part of wing, following the path of the tail surfaces, which have no control surfaces separated. Maybe this arrangement has to do with the different versions the molds were stretched to cover (from B-29 to C-97 to 377). In addition, once you assemble the flaps, they just but-join the wing, in a not very efficient or precise way. If you instead glue each flap half to the corresponding wing half, you will get a slight side misalignment side-to-side, and the edge of their trailing edges will have to be coerced together, so it's better (I think) to proceed as I did or figure tabs or pins -I didn't- to provide a fair joint:

The metal landing gear arrived. It was referred to me by Zönke Ebil Enterprises A.G., Volkania. It's a good cast and a direct swap:

A bit of priming and painting (also on a parallel project) will ensue as soon as the weather allows it:

The fit of the flaps is absolutely horrid. The flap separation that Academy perpetrated was a modeling crime, committed under the excuse of extol more versions from the mold, but very poorly engineered as a but joint, with no support, no locating devices, no flanges, in sum, no way to align the parts, which do not fit naturally at all in any case. Much prodding was necessary to align the flaps in a sort of barely acceptable way, and there is sanding and puttying in the future no doubt. This is a self-inflicted wound on part of Academy, that then passes the buck to the unsuspected modeler. All builds of this kits I visited online tell the same tale about how Academy screwed the flaps (and the modeler in the process):

As mentioned, the doors and cargo hatches are not engraved on the fuselage. Although the kit window positioning is not a matter of perfection, I rather followed it matching proportions with photos. The openings were marked, then taped, drilled, cut away and tidied. I chose to do the passenger door and the front cargo/crew access:


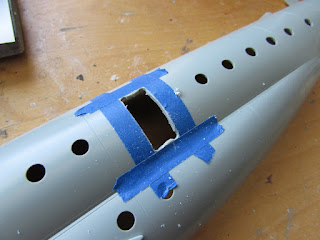


The door and hatch are replicated with curved styrene sheet. They will be later detailed:


Door and hatch detailed:

The nacelles are a fair fit, without being excellent. Some filler will be needed:

A section of the cargo bay will be depicted to lend some depth:


It is clear that a lazy Academy just didn't bother to actualize the components of other versions, and the seats are not good for the civil version, not that it is too relevant, but just saying:


A console is glued to the canopy:

The aftermarket props revealed with the primer some pores and nicks, common on home-made casts. They are being dealt with:


A bit more of paint:

The nacelles -as mentioned- were a fair fit, and the flaps a dismal one. Here some work on the nacelles:

More touch-ups will be needed:


A little more of paint:

I found only one sink mark of note, just above the wheel well. It is puttied and later smoothed-out:


I try to tackle things that may hinder the way later on during the build. One such element, that will be visible through the open cabin door, is the structure that contains the downward spiral staircase to the cocktail lounge and the rafts' storage:


A partial spiral stair is constructed and will be added after all the seats are in place, so I can lay the cabin floor flat:

On to the seats now. As I am not involved in resin casting, nor I want to, the seats have to made the long road way:


A loose dry-run:


Toilet and galley proximity are not uncommon in airliners:


A bit more of paint (still dry-run):


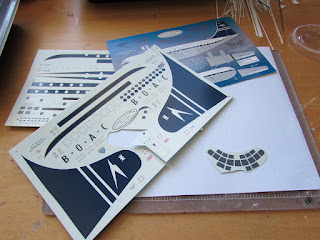
This is BOAC's arrangement as mentioned, the decals are in transit. They cater for the latest livery version, with solid color vertical tail. I would have liked the intermediate one, that is sober, elegant, and yet appealing, also better covered in references. The first BOAC scheme was just too bland and completely uninspiring, like the Boeing's house scheme applied to the first two machines.
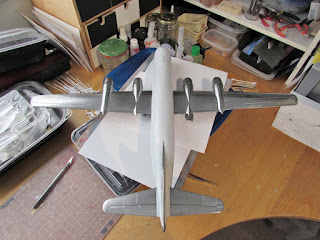
Here is Da Beast in all its deconstructed splendor:

The kit decals are so crappy, that the ones I used on the cockpit came off by themselves, they just simply detached. I re-glued them in place with acrylic floor polish. So if you have no other option than to use the kit decals (I pity you), besides all the defects mentioned above, you may like to apply them with some sort of light adhesive, otherwise they will eventually fall off:

The Flying Colors aftermarket decals arrived. They are well-printed, in perfect register, and have great definition. The images are not on a continuous carrier, but each subjects is a separate decal, like a normal decal sheet in a kit. The carrier, though, is incredibly thin. This is of course a very good thing, but the other side of that coin is that the decals are VERY fragile. I cut a window to try (as I will use the clear ones in the kit), and even handling it with great care, it broke on application, which is a very serious bad omen. Once in place, I put some Micro Sol on it. No reaction. I applied later a second, heavier coat, and then the decal stuck like a limpet (I applied it on a part with a prominent ridge to see how it adapts to surface detail, it did splendidly):


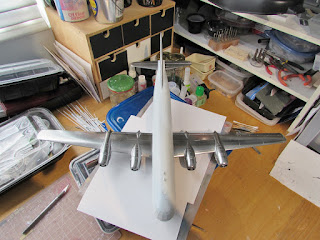
Meanwhile, I taped the model together* and evaluated how much weight would I need in the nose tip to keep the CG ahead of the main landing gear. It came to 63 grams (that's a little bit more than 2 ounces, you troglodytes living in the Technological Middle Ages), but mind you, this is with the resin aftermarket cowls and metal props, which add quite a bit of weight, so if you are building the model as it is, much more weight will be needed to avoid a tail-sitter:
*In the process of this dry-run I noticed that the vertical stabilizer is a nice snug fit, the horizontal tail a very sloppy one, and the wings on the spars also a disappointingly loose fit, unfortunately.

The aftermarket resin cowls are epoxied to the nacelles. The fit is very good:

Some of the round-window, solid blue tail BOAC planes (G-ALSB, SD) had "football" directional finders fairings, and not the ones depicted in the kit, thus a couple of different pairs are prepared, to later decide which size is more accurate:

These fairings in the kit were not present in all the 377s, so check photos of the plane you intend to model. The only BOAC plane I have photos with them was G-AKGH, but a number of PAA planes had them:


One more dry-fit before adding windows and curtains. What of this is going to be visible once the model is completed? just a peep through the cabin door, perhaps enough to see the galley, the toilet and a few seats. Not sure what may be visible in the cockpit, but their toilet is there too, just in case:

The transparencies are bathed in acrylic floor polish previous to their installation:

While things are drying, a generator -seen in photos on the tarmac connected to the plane- is scratch-built:


A bit of paint:

The GPU is almost ready, only needing the electrical cord to attach to the plane:


The fuselage windows are installed, all 38 of them. In their unbelievable genius, generosity and forethought, Academy gives you...0 spares. It was thought by their board of directors that including one or two spares would have driven the company to bankruptcy:

If you tape the openings from inside, leaving just a narrow margin around it, you will not have to plug that area for painting, and once finished you just pinch the tape out:


Curtains are on:


The BOAC Heston steps from Aircraft In Miniature (AIM) arrived today in the mail. Together with the decals (that you have to buy separately). The decals, in green color, seem inaccurate). The "instructions" say "paint the model". Very helpful. On one hand I am very glad somebody produces a set of stairs of this type, on the other hand, and considering the price, I am a bit disappointed :


Given the less than poor instructions on the header, I went to AIM's website, where I found better instructions (a PDF you can download, with typos included). There it is stated that in the website they feature also downloadable decal graphics, took me a while to find them. Nevertheless the assembly began, and to be fair the system used by the manufacturer is easy enough and practical (following the good version of the instructions on the site):

The stair is primed and painted gloss grey:


White is applied to the corresponding sections of the stair. I departed from the stairs' suggested scheme as I found a photo of it with a different scheme I liked better:

The fuselage halves are glued, taking care of not forgetting the spars. The fit is quite good. I glued it progressively, in sections, with very thin liquid cement, squeezing the seams a bit as the glued set:

The ventral section that plugs the fuselage -where the tanker version has a different configuration- is added. The fit is not good. The vertical stabilizer is also added. As some of you may know, it folded down on its side side to allow the plane to get into the hangars that were not as spacious. Strange that Academy choose to make the seam with the fuselage spine not at that very point, but quite ahead of it. A correct brake-down would have offered the model the possibility of presenting the vertical stabilizer folded -with some extra work of course:

Mamma Mia! (dry fit):

The fit of the transparency is not good:


The transparency is on. I ended up removing all tabs, and yet the fit is far from satisfactory, needing sanding down in some areas (fuselage sides, where the canopy is slightly wider) and filling up in others (the bottom canopy/fuselage seam at the very front, where the canopy is about 1mm larger). The horizontal stabilizers were added, the fit is very good (no gaps) but also very loose, not snug at all. After taping the windows, I am at the moment in the process of dealing with the seams. The part that replaces the fueling probe present in other versions resulted to be a veritable pain in... the same position it is on the plane: the butt. The fuselage seams above and below need care and patience, as this is a big model, and several putty/sanding/priming iterations:

Using the decal image file from the stair manufacturer website, I printed a set, only to discover that the images should be mirrored for the other side (perhaps only in my reference photo, but I doubt it), thus had to use a graphics program to mirror the bird, change the inclination of the letters, plus adding on my own the lettering at the base, present in my photo but absent from the manufacturer decal file:


The base has recesses, not mentioned in the instructions, that are ideal to add a support for the first step on the stair:

I had previously (before painting) cemented a little plastic strip:

A dry run, as the correct height to the cabin door will have to be established once the model is completed:

Panel lines are restored after puttying and sanding, and before priming:


The prominent step between transparency and fuselage is filled with Milliput, and later will be sanded down to proper contour and feathered:


The steps created by the not-so-good-fitting transparency are mostly dealt with, hoping only minor touch-ups will later be needed:

A mist of primer to see where we are:


The fin had a beacon. The base is made first carefully drilling, and then inserting styrene rod:

The beacon itself is fashioned from clear sprue with red permanent marker and glossed over:

More putty/sanding/priming passes. It seems that now we have a decent surface preparation:


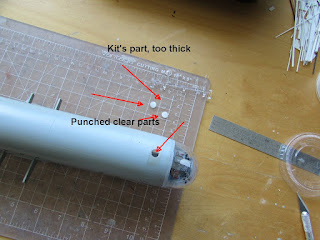
The navigator's window clear part in the kit is too thick, it would visibly protrude from the surroundings. I punched another one of the right thickness from an acrylic sheet. Luckily enough, the normal office puncher was the right size:


Dealing now with the landing gear parts that need to be painted together with the rest. At this point I realized that the attachment of part C44 is a bit imprecise and definitely weak. Those arms should lodge into recesses of the LG doors, you may have to have a look at positioning and securing C44 before committing. As you may have read I am using replacement metal aftermarket legs, but those need some plastic parts from the kit attached too:

I forgot that for the version I am building these have to go:


Let´s suppose you don't have spares, because like my friend Christos from Sinking (in more than one sense) Florida, you buy kits just to put them in an altar and worship them. Grab a styrene rod of appropriate diameter. No rod? ok, grab a piece of sprue:


The teardrop loop antenna housing, usually opaque, was occasionally clear, as in this DH89:

The cabin door had an interesting glazing, small and round outside, and rectangular and offset inside:


Here Academy instructions regale us with grammatical errors, misspellings and unintended neologisms. How many seconds would have taken to check those words online or with a dictionary?:

The fuselage is ready to be painted. Not sure if I should glue the wings on and paint everything, or proceed to at least partially paint the fuselage at this stage to make it more manageable:

Now that the painting stage is approaching, I had a better look at the Flying Colors aftermarket decal set I purchased for BOAC. I realized that it covers the airframes with the modified window arrangement, but strangely not the ones that are a more direct fit for the kit (i.e. G-ALSB/C/D), and only cater for the G-AK.. regs. It seems that I will have to be making my own registration decals, as those G-AL.. are the regs I want. Another detail to consider if the G-AL.. regs are wanted, is that the sheet includes two extra round windows cutouts that the G-AL.. regs did not have, and thus they will need to be filled up:

Given that the only image I tried (a small round greyed-over window) broke on application- I started to get anxious. So I separated an image I won't be using, the greyed-over cockpit windows, to have a second trial, as there are pretty massive subjects on this sheet (vertical stabilizer and window rows) that need to be quite tolerant to allow for an uneventful laying down and positioning:
Normally decals "curl-up" as they are soaked in water, and then eventually flatten-out when ready. This didn't, remaining curled in the same position for about 20 minutes. I gently prodded it, found that it was loose, and very, very, very carefully applied it:

In spite of all the care I am capable of (look at the 400 or so models posted here), one corner broke off and then shattered. The main broken part could have been made to rejoin the rest of the decal, but there were tiny splinters that just dusted away, rendering the image incomplete, and in need to touch up if this would have been the real model. Frankly, I tremble considering the size and complexity of the rest of the decals. This is looking more and more like a nail-bitter. I don't think I will be rushing to buy sets from them in the future, as this is two for two, to images applied, and the two braking. The carrier is thin (a good thing), the color solid (another good thing), and they settle very well (yet another good thing) but they brake TOO easily. If you try to prod the decal into recesses, it simply cracks, and there you have the cause of this decal problems: the ink used is a bit rigid, and not flexible as it should have been:

Painting of the fuselage top in gloss white starts. The last dredges of the last tintlet of Humbrol Gloss White went on, and that wasn't enough, as this is a very big beast. Shortage of supplies mandated that instead of using my old reliable choices in products, new stuff has to be tried, its secrets learned, and their idiosyncrasies tamed. So far, all the new brands and products I was forced to buy and try due to the various pandemic-related disruptions resulted more in failures than successes:

As I still have to complete this fuselage top and the Gulfstream jet model (all with gloss white), I am trying different paints from other manufacturers, mostly lacquers. These have produced problems in my home trials, mainly three things: not rendering a uniform gloss coat, paint that lifts when masks are removed, and paint runs, something I have not experienced in my last 20 years of modeling.
More ancillaries are painted, first gloss black, then aluminium:

There were two air intakes missing on the kit:

They are carved in:

The section of the fuselage that will remain white is masked:

The base of gloss black for the metal color is airbrushed:


Metal hues are applied, and the masks are removed:


Fortunately, it seems that only a few little touch-ups are needed. Decals will follow, and they better be good, or, in the words of Samwise Gamgee, someone is gonna catch it hot.
The whale (dry run):
The window masks are removed after a coat of clear acrylic was airbrushed. I used Alclad II Aqua Gloss Clear, which resulted noticeably inferior in shine and easiness of application to good ole floor polish. That'll teach me. The vinyl masks, as usual, resulted in some extra work, especially at the cockpit area, as many of them surreptitiously lifted a bit during airbrushing of the paint /they invariably tend to do this on curved surfaces), and therefore some time had to be spent with a toothpick and a moist Q-tip cleaning the faint overspray, some run-ins, and other minor blemishes. Give me "kabuki" paper masks any day!


The many louvers are applied on the wings. These come from the kit's decals sheet, and even after all these years they behave quite well. Beware, though, that have almost no adhesive, and they tend to "walk" a bit as they dry (especially y the small items), so you must keep an eye to be sure they remain where you put them until they completely set:

The landing gear legs and doors are installed. The after-market metal set is a good match. The after-market exhausts are hollowed a bit more (they have only a shallow dimple at their ends), given a drop of black inside, and prepared for addition:

I started now to apply the decals on the fuselage, whilst the wing are still off for comfort. The decals are a mix of the kit's sheet (for some of the smaller subjects) and now I start with the "Flying Colors" sheet, beginning with the vertical stabilizer big decal. It instantly curled as it touched the water, which is quite common, if a little scary on such big image:


Very carefully it is applied on a wet surface, trying not the stress it, starting to slide it off at its base, and removing the backing sheet slowly. It went ok, but it didn't like minor adjustments very much. It started to break at the trailing edge, so I left it alone. How this very large image will adapt to the double curvature at the tip, where it is visibly wrinkling now trying to adapt to it, we'll see. I am surprised that the maker did not account at all for the very deep recess at the hinge line (or made the decal in two sections) and that's going to be fun to fix, no doubt, by slicing the decal in the middle. The decal is very fragile, and doesn't like bending at all:

To give you an idea of how fragile these decals are, here is what happened when I attempted to push air bubbles off with a Q-tip. I am grateful somebody took the time to make these decals, but some extra thought and better quality would have been appreciated:

I decided to cut one of the long window strips into two, just a panel line present in the kit, as I can tell the alignment of the windows is a little off. The version these decals cover is not the one I am building, so there are windows missing, that I will have to later somehow remove following the relief of the windows behind. Good luck to me, I say!:

As I feared, the windows' cutouts alignment is off, even separating the strip in two. As you can tell they are off to both sides of the windows, and the only way to fix these is to cut sections of one, two or so. Not my idea of a good decal sheet, plus when you cut the subjects, even very sharp scissor produce some ink "shrapnel". True, it's a difficult task to get it right in such long decals, but then if you can't do it, don't sell it. Not sure how I will fix these, with a very fine brush and matching paint, hopefully, and a LOT of patience and a super steady hand and eye (which is not the definition of my talents). Darn, "Flying Colors"!:


As mentioned above, these decals are for other version of the 377, and this section of the tail decal caters for added windows (as the kitchen moved back, and sometimes a deluxe suite in other versions). These "holes" will have to be filled later with bits of an alternate section that is provided on the sheet, phew!:

The front section of the strip does include the cutouts for the cabin windows, but conveniently forgets to include the cutouts for the cockpit windows. One more delicate task for the modeler, that now has to excise those sections by hand, following the faint relief on the mold of the clear part:

Not only that, but the alignment of the windows is off at the front section too:


I officially now characterize these "Flying Colors" sheet as total crap. Online you will find other catastrophic failures of this same sheet, ruining the work of modelers.
Disintegration keeps happening:


Gradually, application continues, all day long...

...as every decal is a challenge:


Most items are now applied. A long road of fixes is ahead, and the final result isn't guaranteed. I deeply regret having used this set, among the worse I have seen in a long time. I dread to think of the task ahead trying to fix the nose area, already full of wrinkles, the white "crescents" at the sides of many windows, and the challenge that the large vertical tail will represent, once I start to cut the decals to allow it to properly follow the hinge line. The nose and vertical tail are by far the worst engineered areas of this sheet, without forgetting the completely uneven match of the cabin windows.

Emergency exit decals are the ones remaining to be applied on this side, as the sun sets.
An additional note on those: whilst the fuselage color strips do have the cutout for the windows, the emergency exit decals that go OVER them, so not. So you will have to remove the area of carried over the windows yourself, 9 times. All day dealing with these bad sheet. Then it is onto another day, once I regain my patience and good mood:

As mentioned above, the vertical tail large decal should have been designed as a two-part affair (not to mention a much better quality decal material and inks), covering fin and rudder separately, even with some extra bits to make up for small glitches, let's say around the around the hinges. BUT, the sum of horribly fragile decal materials with careless design results in this, even using extreme care and sharp, new, razor blades:

The images just shatter into smithereens as soon as they are touched, as they have been doing all the time, that bad they are. I guess the design philosophy is "pass the buck to the modeler":

This is a posting on a modeling website, by fellow modeler TonyW:
I've attempted a bit of repair/recovery of the decals on the Stratocruiser. Paint re-touching on the fin looks OK from a distance but terrible close up. The area around the nose is also pretty poor. Despite me really not wanting to admit it, the only real solution is to remove the lot and start again.
One more disappointed modeler, for exactly the same causes, using exactly the same decal sheet that, after investing a lot of time, skill and effort into producing a good, satisfying model, sees his work ruined by this despicable decal sheet.
As I try to repair, touch-up, and seal the decals, I am having just more problems, and I wouldn't be surprised if I also have to spend even more time removing all the decals, and in the process risk marring an otherwise good finish.
Well, this is how the model looks like now, total trash. Thanks, decals!:


There, I managed to remove that trashy decals out, leaving only a few small images that surprisingly looked ok.
Needless to say, even with utmost care, in a few spots the paint lifted too. Next it's going to be a session of small touch ups with the airbrush, covering the adjacent areas, and brush were this is not viable. And then ordering a set of GOOD decals.

So, alternatives: I ordered a Vintage Flier set of the latest PanAm livery, the one with the globe. This was not my first choice, or second, or third, but it is what it's available. No experience with them, so we'll see how they look when they arrive. If I decide to use them, I will have to modify the details on the model that belonged to the BOAC version (remove the football antennas, re-install the ones underneath the nose and other minor details, plus masking and painting to add more white area. Not really sure I want to mess with that.
Other option would be to combine the kit's PAA decals with a different home-made tail area (to be able to use the white/metal painting scheme) and new regs., depicting the plane I was talking about at the beginning, the one that inaugurated the "El Presidente" service to Argentina (Clipper Friendship). This livery would require a bit of masking and painting, but not much.
Yet another option would be to commission a different set of BOAC decals, combining painting the blue areas and decals. Again, masking and painting would be necessary.
More than the job itself of re-masking and re-painting, is the risk to lift the paint that is already there. As I had awful results with the Mr. Color gloss white that led to peeling and repainting already, I am understandably weary to get tangled yet again.
If I go for anything other than BOAC, all the work with the passenger stairs, the purchased BOAC vehicles, and the scratch-built APS, can't be used. Bummer and more bummer. All the fuss a bad decal set can cause.
Because I had that big decal covering the vertical tail I didn't bother with the paint overspray, but now the alternate liveries require a clean white tail:


As I forced now by the disaster with the crappy Flying Color decals to revert to a different type, some carefully placed or deleted details need removal or addition, like the antenna fairings under the belly or the football antennas.
Had to fabricated the deleted blisters:
.jpg)
.jpg)
.jpg)
.jpg)
.jpg)
And at every step I have to re-do, I dedicate a not-so-pleasant thought to those two items, the failed decals and bad paint.
The leading edge stall strips, that I dismissed as the BOAC plane got rid of them, have not to be added. They are painted as well as the black blisters for the belly:
.jpg)
I printed some decals to be combined with elements of the original kit decal sheet. If all goes well, the plane represented would be the one that inaugurated the service to Buenos Aires. Meanwhile little mods and patches keep going on to be in line with the specific plane:
.jpg)
.jpg)
Some details are added, commencing with the shortened reg ID:
.jpg)
.jpg)
.jpg)
All these corrections and extra work to compensate for a bad decal sheet. Live and learn.
And the joy seems not to have an end on sight. The area where the soccer antennas were located (they had to be removed for this new "plan B" version) had to be repaired and repainted, but as I used a good white and not the crappy Mr. Color paint, the white was "too" good in a way, and jumped to the eye:
.jpg)
.jpg)
We keep rowing on, not that gently -or merrily-, up the river.
Application of the kit's decals ensues, in combination with the already applied home-made ones. As reported by other modelers, they tend to crack, and I had a few that did. In some places they will fall a tad short, and they are a bit stiff, so they don't adapt well to the double curvature of the nose area. You have to help them slicing -with a new razor blade- small slits where the decal wrinkles, very carefully. Some small bits especially at the ends brake off. Be prepared to mix some blue to match the color of the decals for several and diverse touch-ups to follow. Since this is a bit of a mix-match, I still have to add pieces of white and blue here and there, the fun never ends!:
.jpg)
The decals for the other side are applied. Again they cracked in a couple places, but nothing terrible. Same issues not conforming to the nose, and beware that the adhesive is not great, and water from one side will likely loosen -and occasionally displace- the decals on the other:
.jpg)
It's somewhat incredible that after decades upon decades of hobby industry the two single appearance factors that can ruin a build, that is clear parts and decals, are still frequently an issue.
Comes to mind the exquisite moldings and detail of the now OOP vehicles of Jordan Highway Miniatures, a standard of injected plastic that scale model plane manufacturers -decades later- find difficult to achieve, same for its decals. I have even used ancient Keel-Kraft decals that are much better than some contemporary ones. Technology and "progress" alone do not substitute knowledge, dedication, passion and skill. Sigh...
And now, for some self-inflicted damage. In shuffling the three liveries I had to change between -BOAC, Basketball PanAm, and white top Pan American World Airlines- I forgot I had to extend the white a few millimeters down along the whole fuselage for this specific version, something I noticed just now, after applying all decals and spending time fixing their described many issues. So I am starting to add lengths of very narrow white decals -not easy to cut or apply at all- to fill the space between windows and lower cheatline, and below the lower cheatline. To add insult to injury, in applying those white lines, due to the zero adhesive properties of the kit's decals -even after treated with decal solutions- as you wet the area for the white lines, the other decals start to loosen. A perfect definition of Modeling Purgatory:
.jpg)
Application of those white lines continues:
.jpg)
There were lights under the wings -marked on the kit- that were drilled for home-made lenses to be installed:
.jpg)
It seems that all the decals are on now. Phew!
.jpg)
Once the decals set, the nose gear will be added, then the wings, and then the many small exterior details, and eventually the cabin door, cargo door, antennas, etc.
As the BOAC airstair I built can no longer be used with this PanAm model, I ordered a generic resin airstair that I saw online. It doesn't look great on the sellers photo, but we'll see when it arrives if it can be used, or refined and adapted.
Gluing the left wing. Yes, I am using the office trash can to be able to balance the model, so the epoxy can set. And yes, I felt many nightly tempted to use that same trash can for its intended purpose, when the Mr. Color paint and the BOAC decals failed:
.jpg)
.jpg)
Friend and fellow modeler C. Psarras and his unsinkable dogs are kindly printing some additional lettering to replace a few seen now on the model (Clipper name, for example).
The two black fairings and antennas are added:
.jpg)
.jpg)
Bye-bye BOAC accessories...:
.jpg)
.jpg)
-1.jpg)
-1-1.jpg)
.jpg)
.jpg)
The only problem is, I don't have a big enough "tarmac" to photograph it comfortably. May have to fabricate one as I wait for the remaining decals...perhaps.
.jpg)
Meanwhile, a sudden draft closed the door while my finger was at the hinge -I was looking somewhere else- and smashed my left index finger. I guess activities may have to pause for a little while:
.jpg)
The airstair I saw online arrived. It solves a problem, and I don't have to spend hours scratching it, but it is a bit on the rough side and needs attention. As you can see, a bit was missing:
.jpg)
.jpg)
.jpg)
.jpg)
.jpg)
.jpg)
.jpg)
.jpg)
.jpg)
The PaAm -later livery- decal sheet also arrived, but meanwhile I had decided to do my own Pan American intermediate livery as seen above. The decal sheet, with an all-encompassing carrier, seems nice, well-printed and sharp, and with instructions that look good. They came well-packaged and well-protected:
.jpg)
.jpg)
The second aftermarket airstair is painted and decaled with home-made items:
.jpg)
.jpg)
.jpg)
.jpg)
.jpg)
.jpg)
The additional decals arrived, courtesy this time as explained above of Mr. C. Psarras and his unsinkable dogs, Itchy and Scratchy. After opening the initial normal rigid PO envelope, I found a second, home-made, multiple-stapled container:


Inside it, you guessed, A polythene bag. An inside that bad, a Mylar pouch:


So you know, my friend did not work in ancient Egypt mummifying pharaohs. It's just that he is a little bit obsessive. I spent 10 minutes applying the decals (for this model and the Curtiss Jenny, included in the same sheet), and a whole afternoon unpacking them. The package/s were further protected with Skunk spray and Lion urine, as a deterrent for humans and beasts alike seeking to tamper with the contents. The decals were free, so was the shipping, the handling cost me a one-pound ingot of gold. A bargain, one could say.