

An Argentine D.H.89a
(This is the building article, for the completed model please visit:
https://wingsofintent.blogspot.com/2018/06/normal-0-false-false-false.htm
As much as I have a soft spot for old Airfix, my nostalgic heart goes to old Heller.
Would it be a platitude, a common place, to state that
Heller kits have a je ne sais quoi?
But it is true, dearest subjects and unsubjected: Heller had
a lighter, more delicate, more refined (French, after all) hand.
Paradoxically, it's one of Heller's British subjects what today congregates us here: the ubiquitous De
Havilland D.H.89a.

Of the hundreds of models I have built, only two subjects
were ever repeated: the D.H. 88 Comet (five times, three Airfix and two SBS), and
the D.H. 89a (two times before, not counting this one).
The first two times I built Heller's D.H.89a the parts had
plenty of flash and horrible sinkholes, and the decals left much to be desired.
This box I got now, a relatively old Heller release, has no
sinkholes and little flash, and the decals are, besides being a sadly bland an
unappetizing choice, again not really of quality.
I wanted to tackle this third build to use the newly-produced
set from Arctic Decals, which includes the "metal" frames and masks
for the transparencies. And also to see if many moons later I could produce a
better model than the previous ones.
I would like to build
any of the several machines that operated in Argentina under an array of
successive civil transport companies.
Heller's D.H.89a is one of those
models that offers almost infinite possibilities regarding decoration/liveries.
Provided that you can either find (aftermarket), produce or commission the
decals you want. There is also plenty of free-access material on the Net about
the subject and it's details, and plenty of "living" airframes, so no
issues there.
I am sure you
heard the expression "shake and bake" in reference to certain kits.
Well, this one certainly was shaken
during the years it took to reach my building board, and half the parts were
rattling around loose, facilitating the initial job of detaching the parts from
the sprues:


Very carefully the door is separated from the fuselage side. The good (not brittle) nature of the plastic allowed this task to be conducted without a glitch:
 These ejector pin marks and little imperfections may prevent your window strips from seating comfortably where they should. Clean them thoroughly:

 All parts have been cleaned-up:
 The split-flap areas were slightly and carefully excavated towards the leading edge of the flaps. The flaps will be fabricated from styrene sheet and shown half-deployed:
 The flaps recesses are given some structure, and the split flaps are fashioned:
 The engine fronts are a bit lacking:
 More detail is added to them, and the scoops on the gondola drilled too. You can see that cilyndres and pushrods were fashioned to add detail inside the "engine":
 The props, one of the meh points of the kit, have inaccurately shaped spinners:
 And not so accurate blades:
 Blades are removed:
 Spinners put in a chuck:
 And easily sanded to shape:
 Rapides in service in Argentina that flew with TAASA (Taxis Aéreos Argentinos Sociedad Anónima) were modified by the reinforcement of the bottom of the fuselage with metal sheet, the elimination of the lower part of the engine gondola fairings (revealing the LG legs and full wheels), the adoption of different props and spinners and other less visible changes. Accordingly, to obtain an Argentinian version so modified, parts of the kit have to adapted or replaced.
Just in case I go for one of those, I started to make new props:

 The detail on the split flap bays is toned down:
 And since I don't care much for Heller's solution for the rigging, I glued the lower panels to the upper wing:
 The seats' legs, rather thick, are removed:
 Small lengths of wire are cut, the seats drilled:
 Wires inserted, later to be trimmed to proper length:
 And the triangulation lengths added too. The seats are not 100% accurate, but are much better now. The cabin floor has been straightened:
 The interior is being assembled:

 Rudder separated:
 Elevators deflected downwards (they are upside-down):
 Dry-runs with both wings prove there is nothing wrong and the fit is good enough:

 An MV lens will be used to replace the kit's part (which was lost absent from the sprue, anyway):
 The Argentinian Rapides had a particular spinner and prop, the shape of the prop is as depicted on this sketch, with this strange prop tip:
 Metal horn in place on the rudder:
 The transparencies are separated form their sprue, and one side is cut in three sections to follow the modification practiced to the kit to show the door open:
 Once the door is opened, some of the interior is made visible, therefore the spars are added to the ceiling, which is the bottom of the center section of the top wing:
 Many Argentinian machines had as explained above their landing gear exposed. This created the need to fabricate them:


 The surplus section of the nacelles is removed:
 The halves are glued together:
 Some re-shaping is ahead, since the aft part in the Argentinian machines was more curved.
Also a partial bottom will be needed enclosing the nacelle, minus the area where the legs exit.
In order to curve the aft part, some Milliput or epoxy should be added there internally, to allow sanding without creating gaps:
 The legs were glued to a styrene tab. Then the inner lips of the nacelle where the legs go were thinned down. The legs were then inserted expanding just a tad the gap, to be pressed so to speak between the sides. Once in place, checking correct angle and height, cyano was applied:
 Then the reinforcement struts were cut from wire and glued too:
 All elements in place. The bottom will be covered with styrene sheet sanded to shape, then some little epoxy will be added from the top, carefully, to anchor the gear firmly:
 The pan receives a generic grey tone:
 The parts that will cover the bottom:
 Glued on. They will later be sanded to shape. Notice that I forgot, when I painted the cabin pan, about painting the "ceiling" at the bottom of the upper wing, in the background:
 A generic cylinder is added behind the nacelles' front -clearing the edges-, before gluing the latter on:
 My ebil plan: to use two sets of Arctic Decals masks, one for the exterior and another for the interior, that way when you see through the open door you won't see a glossy piece of strip window in the cabin, but the same tone as the rest of the fuselage. That means I will glue the transparencies first, mask, and then paint the fuselage interior (note to oneself: do not forget to remove masks before closing the fuselage):
 The nacelles are completed:
 The interior is ready:
 Transparencies are glued on. They do not completely adapt to the curvature of the fuselage sides, buy I didn't want to "flex" them in the opposite direction for fear of breaking or crazing them, so I glued one extreme first and then the opposite end:
 Masks applied from the inside (you will need a second set for the outside). The nacelles are glued on the wing; their fit is indifferent, so they need a touch here and there, but still no perfect fit:
 The interior is given a base color:
 A few more details:
 To build fast has its advantages and disadvantages. The P.E. sets have arrived, but being not completely aware of its contents I already dealt with some of the details myself. You may notice that there are two sets: the second is for other DH89 I want to build the MacRobertson entry Tainui, ZK-ACO:
 Nice set with good instructions. Not all is for me doable, being some of the parts beyond what my eyes can handle, and others I rather do in a different way (seat belts, for example):
 Assemble of the photo-etched components begins:
 Almost ready to close the fuselage:
 Fuselage is closed. Here I am doing a dry-run of the photo-etched window frames. They go quite well. Since this Argentinian machine had the frames painted over with the color of the fuselage (red), I will be using these metal ones, saving the Arctic Decals' "metal" vinyl ones for my next DH89, Tainui, that will need them:
 Dry-run of upper and lower wing, no problems here:
 Those seams of course will need attention, all over the model:
 The lower wing is glued in place:
 A view of the components:
 Arctic Decals masks are applied on the exterior:
 The pre-painted instrument panel is very nice, but the kit's inst. panel is decent too, especially for 1/72 and its almost hidden position:
 The upper wing and canopy are glued in place, checking as usual alignement.
I read an article by Paul Bradley on SAMI, where he used a styrene veneer to solve the issues that the Heller kit presents regarding the absence of stringer relief on fuselage top and bottom. This can be solved in other ways, but this approach seems practical, so I made those "skins":
 This is just a dry-run to try to grasp the effect:
 Same for the lower one. My only fear here is that styrene glue on thin sheets causes issues, so does cyanoacrylate glue. I may risk it, though, since this little trick may save a long time spent on filling and sanding:
 I almost made a mistake! this plane had a metal reinforced bottom in order to deal with unprepared landing fields, so no stringers on the fuselage bottom!
Here the particular home-made props this plane had, with unusual tips:
 The top fuselage "stringered" cover is on, after cutting out the emergency exit circle.
7-minute epoxy was used, thinly spread on the part. A piece of cloth dampened with alcohol was at hand to remove epoxy stains (there were several). I had to keep prodding the part in place.
So unless you know what you are doing, kids, don't try this at home:
 This plane had the bottom of the fuselage covered in metal sheet to avoid damage from unprepared terrain, therefore the bottom is sanded and the seams puttied:

 The plug for the dorsal hatch is cut with a sharpened brass tube:
 The De Havillands, hopefully soon a happy family:
 A mist of primer is applied to reveal blemishes:

 Fellow modeler Paul J warned me about the misplacement of one aileron linkage, underneath the righ bottom wing:


 Struts and window frames base color painted for both DH89s:


 Red is airbrushed, without forgetting the struts, and the three different colors on the rudder (white, light blue, aluminium horn:
 Some of the masks off, revealing the aluminium:
 Masks protecting the white lightnings on fuselage and nacelles are off.
Next step is to remove windows and canopy masks:


 The photo-etched frame from the Kuivalainen set is added. The left side frame, because of the door I opened, had to be cut in three elements. The fit is very good, but you have to very gently bend it to follow the fuselage natural curvature. Gluing them in place requires patience and a steady hand. I did not use here the vinyl "metal" frames from the Arctic Decals set because the frames were the color of the fuselage:


 All struts glued in position:


 The three in-progress models in their portable hangars with notes on details:


Just in case I go for one of those, I started to make new props:


Also a partial bottom will be needed enclosing the nacelle, minus the area where the legs exit.
In order to curve the aft part, some Milliput or epoxy should be added there internally, to allow sanding without creating gaps:


I read an article by Paul Bradley on SAMI, where he used a styrene veneer to solve the issues that the Heller kit presents regarding the absence of stringer relief on fuselage top and bottom. This can be solved in other ways, but this approach seems practical, so I made those "skins":


Here the particular home-made props this plane had, with unusual tips:

7-minute epoxy was used, thinly spread on the part. A piece of cloth dampened with alcohol was at hand to remove epoxy stains (there were several). I had to keep prodding the part in place.
So unless you know what you are doing, kids, don't try this at home:


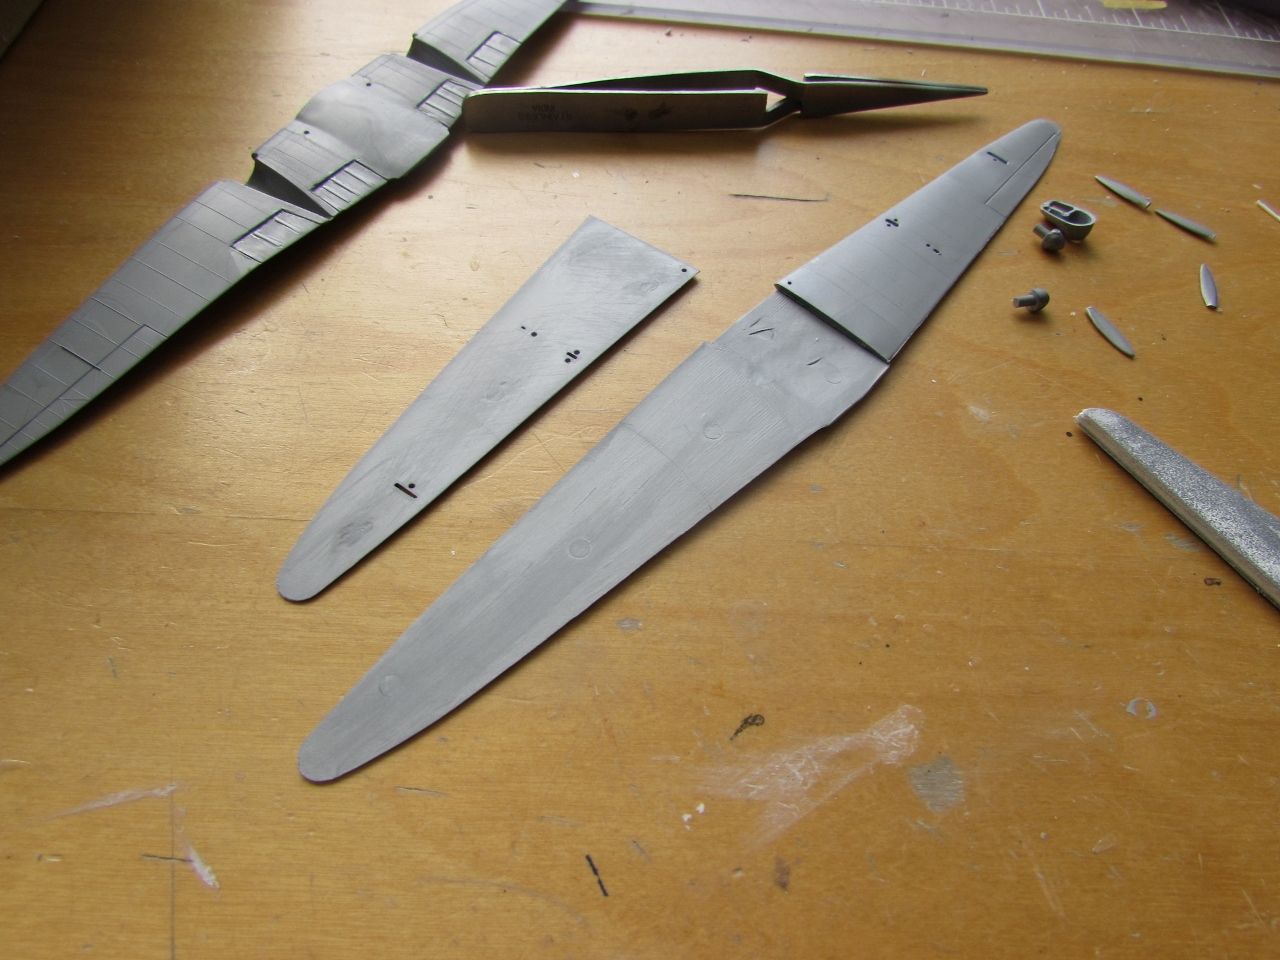
The
horizontal stabilizer is sanded down to erase the rib relief, that is
angled incorrectly. New "ribs" are engraved. The angle of the root rib
is changed to better fit the fuselage sides, avoiding the swept-back
angle that the kit renders otherwise.
The front knob, that was removed to alter said angle, is drilled and replaced with rod.
Now ready for priming:

Base color applied to airframes and ancillary parts:

Exhausts painted for both DH89s:


Part of the canopy is masked using the Arctic Decals set. This Argentinian machine had the roof of the canopy painted over. White areas are masked, aluminum color sprayed, and red color goes on some of the ancillary parts:


Masking of the aluminium color begins:


Next step is to remove windows and canopy masks:

Rest of the masks removed, stuffed tissue removed from door opening and nose:


Nose light, stabilizer and rudder are added:


Trimmed exhausts added. The flap bays will be given a subtle wash before adding the flaps:

The flaps' inner faces and bays are painted a neutral color:


Wheels, rudder control leads and tail rigging in place:

Rigging, props, navigation lights, flaps, door; all added:


Another source of masks, for those interested, in black vinyl (I have another DH89 kit):

Small circles are punched to be used as fuel caps and such:


Pitot, Venturi, aileron actuators added. Decals will be next:

The custom decal set arrived from Arctic Decals, hurray!:

For the completed model see link at the header.