
For the completed model please go here:
http://wingsofintent.blogspot.com/2016/02/dujin-resin-172nd-scale-breda-33-series.html
Where to begin...
I am not easily scared by a kit. Any kit. That's not the
same as to say that I like a bad kit. I don't.
I never had a tête-à-tête encounter with a Dujin kit before.
I knew about them, I knew that Monsieur Dujin passed away some time ago, and I
have seen some built models of the kits on the Net. Nothing that I saw enticed
me, in the least, to go and get one. And now I know, by own experience, why.
A dear friend and fellow modeler and artist from Yorkshire, Fogland, Andrew Nickeas, had a very kind
gesture and bestowed upon me a number of kits, that happened to arrive for my
birthday. Very nice kits, mind you, but (hidden) amongst them was a Dujin Breda
33.
Oh, the horror.
How, for heaven's sake, can anyone build these kits? even if
you are French...there are limits! :-)
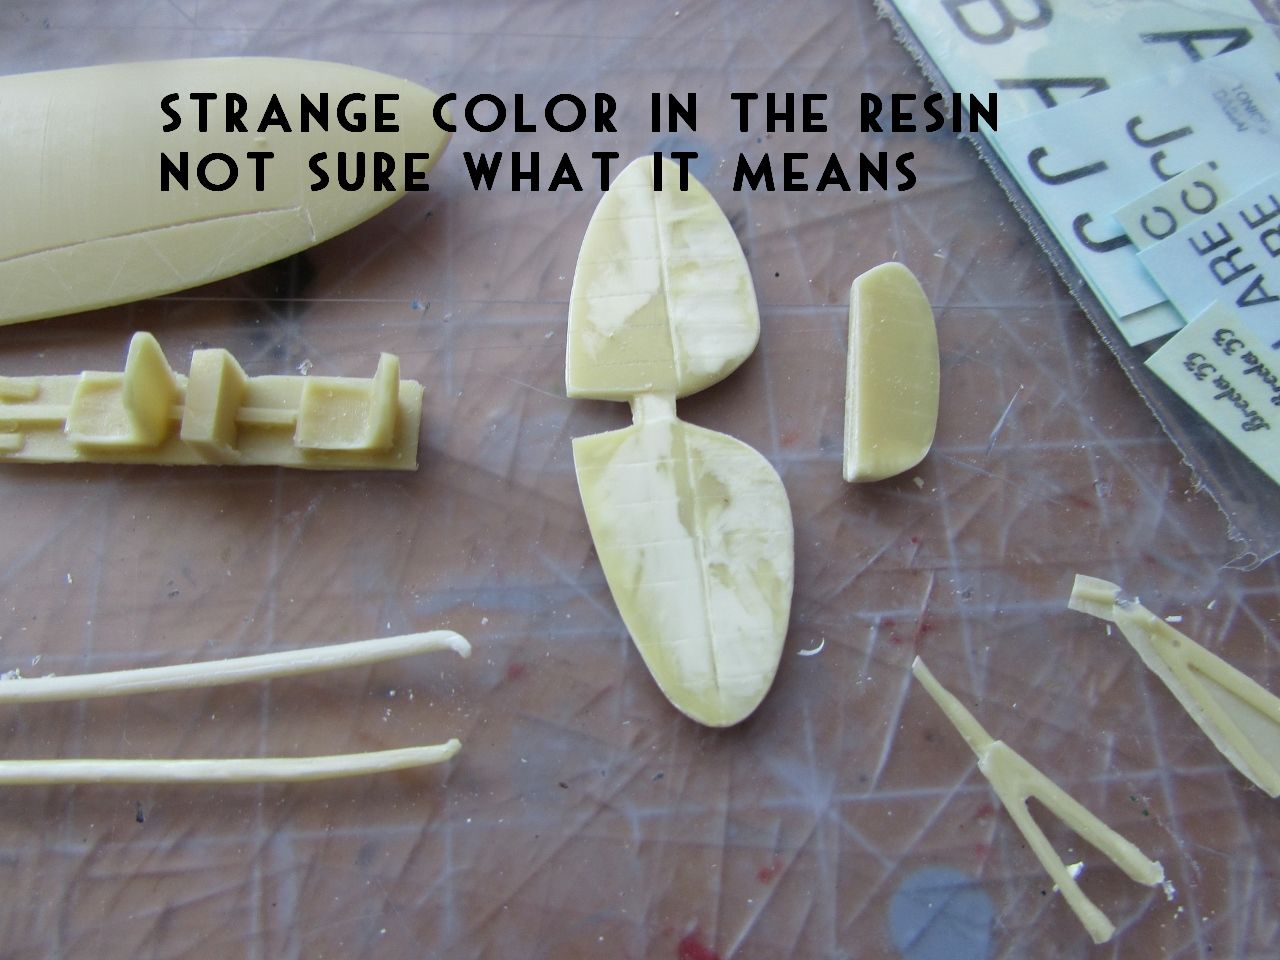
This is one kit that would definitely not be a pleasure to build. And most emphatically one of the least good looking castings I had the (dis)pleasure of seeing first hand. I captioned the images to
provide an idea of what you have to deal with.
Now, is it just this
kit? a failed copy that somehow made it to the market? for what I can see
online, this is pretty much the norm. Again, oh, the horror...
The list of things going wrong is large, I will just point out some. A main concern is
the wing, which in this model did not have a straight trailing edge, but a
slightly curved planform more akin to the wing of a dragonfly. I have included
a photo from Les Ailes to show the point. Thus the wing trailing edge edge will
have to be re-contoured.
Caveat emptor!
But again, Dujin (and other not so good enterprises) release
kits of appealing subjects that are not taken care of by mainstream
manufacturers. So, if you want let's say a Breda 33...you will pay the price. Buying it
and building it. Sigh.
The thing is that if you have built a Choroszy, or an SBS
kit, or any other good resin kit, the Dujin kit is not quite there.
But I got ahead of myself...what is this plane? Prima facie an elegant Italian design from the 30s, that belonged to an interesting line of planes like the Breda 39 and 42. Look them up: machines with graceful lines that participated in a great number of sports events and had attractive color schemes. This specific design, the 33, had numerous changes throughout its life, so beware when you look at photos because they had different engines, wings, canopies and other features.
There is 1/72 Choroszy Breda 39 in a couple versions, a different model of course (although similar), so -heavens be praised- if you like to build a machine of the sports Breda family you won't have to deal with a Dujin kit.

The wing should be like in this "Les Ailes" photo:

Ugly casting method, with thick casting webs and misalignments:


The wing (even with the wrong trailing edge) is the only part that is a near perfect casting:


Hey! one good thing: the kit has TWO canopies! one is pitted, but can be used for fitting practice:


Better that way, resin has very low mechanical resistance in thin sections. You will have to make a new one at some point:


Some interior painting:


Copious amounts of putty are needed to hide the joints:


First sanding of the putty, my guess is that a few other layers will have to be applied and spots dealt with. The "V" struts at the bottom of the image are better replaced with airfoiled stock, they are not good:

Metal control horn glued to the rudder:

A metal air scoop is added aft the right cheek of the nose. Metal control horns are inserted in the ailerons. In drilling the nose -as I was afraid it will happen for the presence of many air bubbles- the resin crumbled. As a cure I inserted a metal tube:

The tailskid is fabricated:


Fotos of the real planes show that the space behind the aft occupant was closed, therefore a bulkhead is fashioned and added:

The canopy is glued in place:


As said before the struts for the wing are the wrong shape, size and angle, so new ones were fashioned of metal airfoiled material and a piece of styrene:

One of the
candidates I am studying for the decoration is I-LARE, which participated in the Giro Aereo
D'Italia of 1931, finishing first. I-LARE had a light under the
fuselage, so I proceeded to scratch one.
A sprue rod tip is shaped like a cone:


After correcting some blemishes a second coat of primer is applied. Parts of other models take advantage of the session:

Gloss white enamel is airbrushed in preparation for the Alclad coat:

And now Alclad is airbrushed:

Oh, the joys of poorly-produced resin kits. Somehow I missed a myriad of pinholes under one of the wings:


The wing is repainted:

Patterns are drawn and cut to make the masks for the application of the red color:

A set of masks for the wings and stabs (up and down) and for the wheels pants and fin -plus half of the fuselage design- is cut from Tamiya masking sheets. The prop is given two tiny manufacturer decals as per photos:


www.arcticdecals.com:


http://wingsofintent.blogspot.com/2016/02/dujin-resin-172nd-scale-breda-33-series.html