
http://wingsofintent.blogspot.com/2013/02/planet-models-172-focke-wulf-a16.html
If you look carefully at it, you may notice that regarding its configuration, the FW A.16 has similarities with the bird-like, much earlier Etrich/Rumpler Taubes. The “V”-shaped tail and especially the “feathered” wings –in the “zanonia” seed style- were common to many designs of the time.
That planes attempt to resemble birds should not surprise
anybody. The A.16 is a chubby, stubby, stumpy particular kind of bird though.
It could carry three passengers and provided a reliable service during its
career.
Planet Models used to be mostly known for its Luftwaffe 46
models, but lately, in a very fortunate and welcome change of direction, has
been releasing interesting kits of civil German subjects of the Golden Age of
Aviation. I congratulate Planet models on these recent subject choices (that
include the Focke Wulf Fw19 Ente, Lockheed Air Express, Messerschmitt M.20, and
many other beautiful planes).
This particular kit has been already reviewed and built many
times and you can easily find articles posted on the Net, so I won't be too
exhaustive here regarding its presentation.
I owe the pleasure of having and building this kit to the
generosity and kindness of Jim Schubert, an Irregular Pugetian that breeds
Furry Dwarf Black Mutant Seals on the shores of the Sound, near Boingland. The
kit came without transparencies or decals (which were donated to a dangerous
character of the Modeling Underworld named Tim Nelson so he could complete his
own model) but Jim kindly added a better, more accurate pair of white metal
wheels from Aeroclub, plus a more accurate prop plus weight placard decals.
For all that I thank Jim, forgive him and grant him indulgence for all his
modeling sins.
At it:
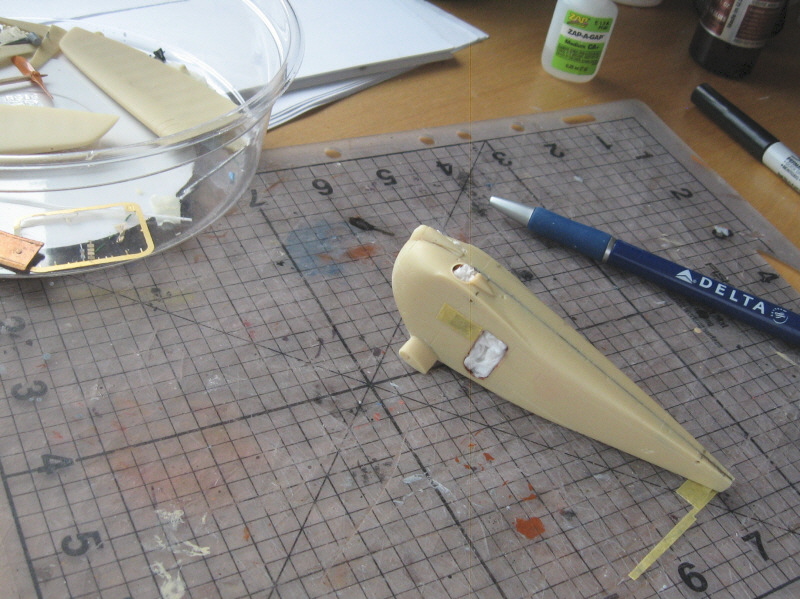
It took some time to remove the pouring blocks from the wing
halves, and especially from the fuselage sides, where the lugs were strangely
located and did not facilitate their removal at all. Planet kits are generally
good, and this was also the case. Tim Nelson mentions in his review that he got
a wing root thicker than the other, and some misalignment in the fuselage. Not
the case for my own sample, fortunately. As you know resin kits are produced in
a sort of artisan way, so samples tend to vary. My kit could not escape,
though, the occasional bubble and pinhole. Some of those were located in my
sample in the rudder bar and pedals (which crumbled-down on me) and beneath a
control horn that popped off too. Beware that some tiny holes on the wings close
to the ailerons and not pinholes, but the exit points for the control cables. The casting web that holds the smaller parts
was thick and not very easy to remove, but some areas of it were thinner and the
parts separated more easily. As you can see in the photos I did not bother with
the seats’ legs for which I can use styrene or metal rod instead of struggling
to clean up those minute items. Beware that there are very tiny parts on that
casting web, look for them and be careful separating them, especially some
minute steps that are very easily overlooked.
There were thick mold lines underneath the fuselage halves
and a couple other parts that had to be removed and smoothed out.
As it is always the case with resin kits, you should use a dust mask to avoid -while sanding and cleaning- the resin particles which are harmful.
As it is always the case with resin kits, you should use a dust mask to avoid -while sanding and cleaning- the resin particles which are harmful.
The instructions are indifferent and have the usual couple
of dark/confusing spots; nothing you could not overcome paying a little
attention, though. The decals –again, I did not get those since there were
given to other modeler- cover one subject, a Lufthansa machine.
If you feel tempted, like me, to branch out and do something
different than all what the other modelers already built, beware that there were 4 subsequent
variants of the A.16, and the kit caters for only one (“a”). The variants (a, b
, c and d) had different noses, engines, lengths, fin/rudder and even different
span in one case (the first machine). So be careful and check you references.
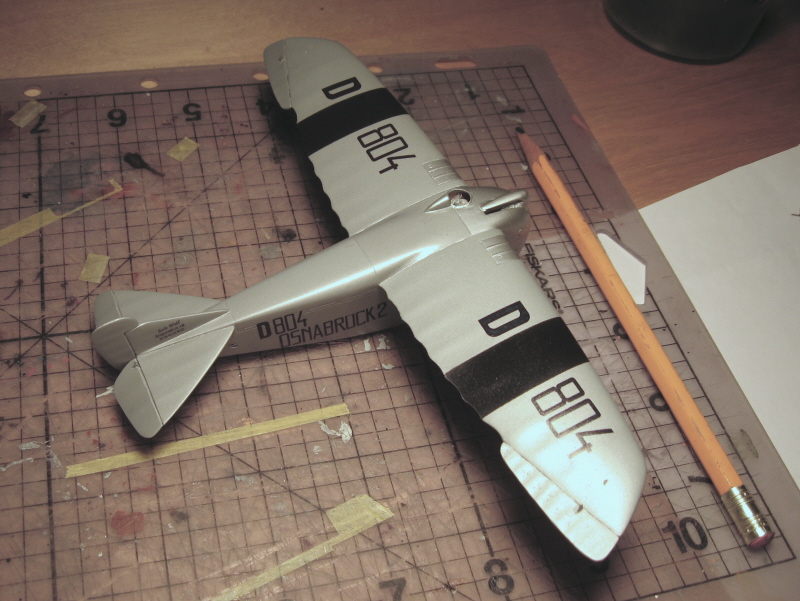
I used home-made decals and did some research regarding the
colors. I ended up using my own recipe for “Silbergrau”, in two tones: one for
the general plane and a slightly darker hue –as per photos- for the cabin
exterior, which in the original had wood panels; I employed black for the wing
stripes and aluminum for the nose and wing tanks.
My main reference is the Jet&Prop publication on the type. You may also read John Stroud's more generic article in Aeroplane Monthly of Jan 1987.
Much help was provided by the above-mentioned Jim Schubert, the Volkano Evil Genius
Soenke Schulz and other equally-kind colleagues and fellow modelers.


The fuselage cabin and cockpit parts have been glued and sanded to fit inside the fuselage
(beware that the cabin floor has on one side a swept-upwards finish. That side goes to the back):

The cabin ensemble has been sanded in some areas and supplemented in others in order to fit


The original plane had a flower vase. The kit provides a little platform. I decided to scratch a better vase and made the "flowers" with mushroomed stretched sprue that I later painted:

The first vase was too big, so I made another:


The interior being furnished and positioned:


A general view of the components. The prop, which as said was also provided by Jim, has the correct diameter. The kit's is shorter and slightly wrongly shaped.
The home-made decals can be also seen. I selected "Osnabruck 2" as my subject.

Fuselage halves have been joined with epoxy. Metal rod spars were used to attach and tail feathers:


Front end and engine top fairing glued:
A two-layer decal (white and blue) was printed for the prop, since I do not have an ALPS, I used white stock for the first layer and a dot of white paint for the star background (the camera unfortunately focused on the clothespin):


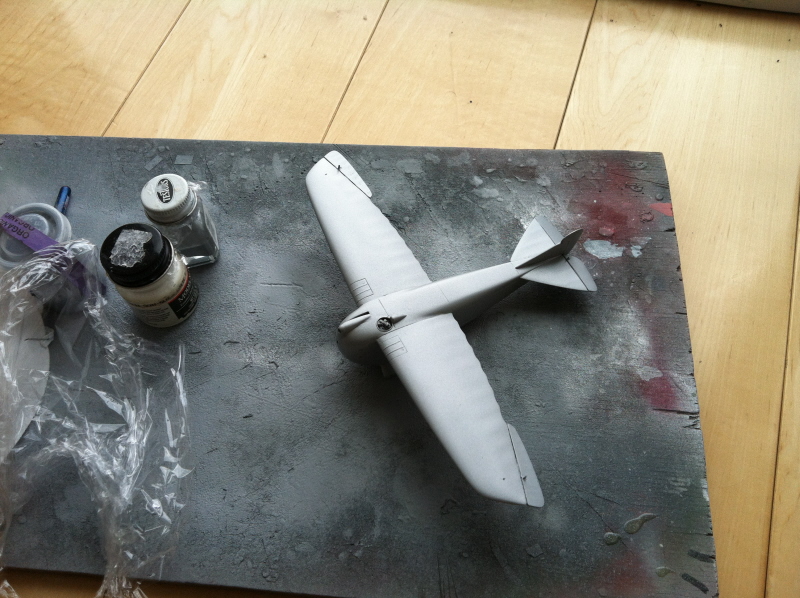
As model builders know, even when the model starts to look complete, it is far from it. Details need to be worked out and pace turns slower, as any boo-boos at this stage could be costly.


The search for the elusive silbergrau hue rendered convincing results after some brewing and concocting:
(the ulterior application of hue will subdue a tiny tad the metal shine)


I used home-made decals and did some research regarding the
colors. I ended up using my own recipe for “Silbergrau”, in two tones: one for
the general plane and a slightly darker hue –as per photos- for the cabin
exterior, which in the original had wood panels; I employed black for the wing
stripes and aluminum for the nose and wing tanks:

Very nice model. First time I've seen the FW that was not a 3-view dwg so the charm of the design really becomes clear. Glad to know Planet has changed its marketing to create REAL, historically relevant subjects too! Thanks Claudio.
ReplyDeletehere we go again, although a bit disappointed with the cabin curtais.
ReplyDeleteno self respectin hausfrau would accept
a flight with out nettin to kep out the
gaze of passing strangers at what ever
altitude. thanks for the skill/talent
demonstration once again. must look up
Plant models now they are growing up.
thanks again. Andrew
Hey Claudio:
ReplyDeleteWithout a doubt the stars in this build are the flower pot, the flowers, the curtains, the prop painting and the glass making details. Those nice details give the kit a true sense of art and craftsmanship. Thank you very much for those nice stories about modeling you depict here.
Luis Alfonso