
http://wingsofintent.blogspot.com/2013/06/172-scale-scracthbuilt-gwinn-aircar.html
Unjustly ridiculed, mercilessly laughed at, the chubby Gwinn Aircar seems to be puffed in turn with justified pride.
The Aircar flew flawlessly and accomplished the goals and
hopes of its designer in every possible way, participating in numerous
demonstrations, airshows, air meetings and other public events. In spite of
that, the only fact normally known about this remarkable plane is that famous
pilot Frank Hawks was killed while flying it. Even that fact is only partially
known, since it is hardly ever mentioned that the plane itself was not to
blame, but Hawks, taking off in a demo flight with a passenger from a Polo
field, squeezed between two tall tress only to encounter high voltage lines he
could not avoid.
There were two Aircars, another fact not vastly known, and
the surviving one faded in the mid-forties without leaving a trace, its final
fate unknown.
There is enough about it on the Net so I won’t tell you
more, but the Gwinn Aircar incorporated many innovations, was a pleasure to
fly, extremely safe, and was designed and marketed as an aerial-car of sorts,
proposing to bring the simplicity, low maintenance and low cost of the car to
the aviation field. Unfortunately it did not succeed, but surely not as a
result of its own fault.
The plane was small, and so of course consequently is the
model.
In the photos you can see it compared to a “normal”
monoplane to give an idea of its relative size, with a span of only 24 feet (7.31
meters). Nevertheless it could carry its pilot and a passenger, even if only
propelled by the smallish 90hp Pobjoy (later replaced for an 110hp model of the
same brand).
The engineering approach I took to model it can be seen in
the photos, and I think needs no further explanation.
Sources:
Skyways Magazine # 33, Jan 1995
Critical Past clips:
http://www.criticalpast.com/video/65675038359_auto-plane_taking-off_running-on-road_biplane
Golden Pylons newsletter, Mar-Apr 2013
My thanks to James Schubert-Boing, Helga, the Malabamba Unbuilders, Zoenke Evil Enterprises, Wasilla Styrene Mines & Co, and the many friends, colleagues, fellow enthusiasts, relatives, etc.


 Not much of this will be seen, but it is there anyway. As you may have noticed, I am making parts for a second model as I go. This little tadpole is taking a lot of time and effort.

 The interior was painted and detailed:


 So is the upper wing panels one:
 The three spars (horizontal tail, lower and upper wings) are tweaked until aligned vertically and horizontally, The strut locations on the wings are drilled too:


 The clear section is re-masked, this time with the windows' masks:

 What looks like a Sputnik is actually the model with its first general coat of primer. The toothpicks are there to plug the various holes for the accessories:

 The main LG legs are cut at the proper angle and anchoring pins are put in place:
 The nose leg is given the looks of sliding parts:


 The minuscule size of the fuselage, the large transparencies and the many holes prevented the use of a paint stripper, so out with the sanding pads and patience (the latter somehow dwindling):
 All the affected parts now sanded smooth, ready for the application of new paint coat:


 The engine cowl covers and painted decal paper can be see. The decal paper will be used to cut canopy frames, make "access panels", etc.

 Then applied to the model (the backing paper showing too the black line):
 The window frames and white lettering decal applied. The white rub-on characters were applied one by one on clear stock, twice (for both sides):


 Upper wings in place:


Sources:
Skyways Magazine # 33, Jan 1995
Critical Past clips:
http://www.criticalpast.com/video/65675038359_auto-plane_taking-off_running-on-road_biplane
Golden Pylons newsletter, Mar-Apr 2013
My thanks to James Schubert-Boing, Helga, the Malabamba Unbuilders, Zoenke Evil Enterprises, Wasilla Styrene Mines & Co, and the many friends, colleagues, fellow enthusiasts, relatives, etc.


Decals printed, the small ones are prop logos for this and other projects:


The second nose is a good fit, but I'll make a third one as a plug for vacuforming

As foreseen, the fuselage shells and the nose are taking some time. In the interim and while I wait for glue to set and the like, I finished the M.S.225 and am working now in parallel with a Gee Bee Ascender.
Here the vacuformed pants for the landing gear, an extra wheel, a successful "clear" canopy (and three discards) and an unsuccessful nose cone.
The quest goes on.

Another failed attempt this time with the original Mattel plastic, and a good one (no wrinkles) with modern clear stock:

And why, you may ask yourself, would I want an empty nose if I already have a solid one?
Well, to install the white metal Pobjoy engine:


Also molded spare wheel pants:

White decals are the nemesis of the scratchbuilders, since they can't be printed on conventional printers.
Here I am trying Woodland Scenics dry transfers. Since it is very inconvenient and sometimes impossible to apply them on the model, I am transferring the lettering to a clear decal sheet, later to be applied on the model itself.
The font is a tiny 1 millimeter tall (that's about 1/24th of an inch, for you people that are determined to remain in the dark ages). A blue-backed clear decal paper would have been ideal (I have none) since it is very difficult to see what you are doing when applying white on white.


Some progress with the landing gear. Extra parts for it and the nose were made:


The styrene for the Mattel Psychedelic Time Machine arrived, so I attempted lower (opaque) and upper (clear) shells, which did not work as well as in other models. I guess the way to go will be the usual left and right opaque halves and clear top.


The styrene sheets for the Mattel have arrived, so right and left halves were made of the fuselage.
Some interior parts can be seen in the following images as well as the firewall. The idea now is to join the fuselage sides, cut out a section and insert to clear part after working on the interior:


As with any vacuformed model tabs need to be glued to help with alignment and augmenting gluing surface.
This is especially true when the vac shells are thin -like with this model-. The tabs can be glued to one side (as here) or -alternating their position- to both halves:


The two fuselage halves are now firmly glued. The "top of the head" will later be removed and replaced with the clear part molded before:

Little needs to be done to smooth the joint, since the upper and lower fins run on it and as said part of this molding will be replaced with a clear part. The only section needing tiding is the lower front one:

The cut out for the clear canopy is marked and made:


The firewal has being put in place:

Flanges in the form of thin strips are placed on the inner side of the cockpit area to serve as rests for the clear canopy. The proper fitting of the clear part had to be insured by careful trimming, sanding and dry trials. Sure it took its time:

The minute size of the fuselage does not lend itself to an abundance of building comfort:

The clear section is finally mated to the rest of the fuselage. The interior will be finished and perhaps the upper wing spar will be located before securing it:


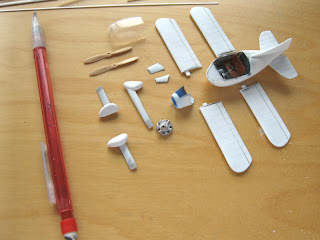
The interior parts being made:


An instrument panel was printed from a photo of the real one. Blobs of clear were laid over the faces:


The upper and lower fin have been glued. The recesses for the landing lights have been drilled.
At this stage it looks a lot like the Jetsons' "space car", doesn't it?:

The horizontal tail is temporarily in place to help alignment:

The lower wing panels spar is provisionally in position:


At this time the stirrups locations are drilled too. All this is done at this stage to avoid burrs and debris to be lodged inside the cockpit area, since they can be cleaned up before attaching the clear section.

The clear part is now glued to the fuselage, masking and blending will follow:

With the clear section now masked Tamiya white putty is used to hide the seam and build-up body on the fuselage/fins join:

The mask is lifted. The fins and the clear section are now blended into the general contours:


Some surface defects are again treated with Mr. Surfacer:


A little bit more of tiding up:


Yet more noses are vacuformed due to mishaps. The total by now must be ten or so.
The time invested only in the nose area now equals the many hours spent to build the whole fuselage, interior and clear part included.
And why? because I want to show that engine and tank inside it.


Nose with engine and tank glued now to the fuselage:

Painting stage begins:


By now I feel as if I could have built the pyramids in the time that this model is taking.
As it happens some times, when it rains it pours, and the application of the blue color went wrong for some unknown reason, creating a delightful (although completely out of place) puffer-fish effect:


Re-priming:

Re-painting:


The "doors" have been cut from the matching-painted decal stock. They are then run edge-wise against a black Sharpie, to draw a line:


Engine mount mounting members in place, stirrups prepared:

Tail feathers in place and boxfish in its tank:


Lower wing cantilever spar and wing panels:

No comments:
Post a Comment