(The completed model is here:)
http://wingsofintent.blogspot.com/2013/10/boeing-100-paul-mantz-completed.html
Your modeling subject horizon can be greatly expanded if you
contemplate the wide array of kits that can be converted to their civil
counterparts with no -or little- effort.
The previously-modeled Boeing 281 (from the AZ Model P-26
kit) is another example of many that you will find in this same blog.
RarePlane Rarebits was a line of products issued by the
mythical Gordon Stevens to complement his excellent RarePlane kit range with
conversions. Rarebits had the parts needed to alter an existing kit to obtain a
version otherwise unavailable at the time.
I had expressed my deep respect and admiration here and
elsewhere for the pioneering work of Gordon Stevens, whose high standards are
on par with any kit of the present day, and many times are better than them.
Gordon obtained this quality and made a plethora of subjects possible and
available even decades ago, with the limited knowledge, materials and tools of
the time. Gordon is some sort of Modeling Superhero to me. He developed or
created techniques used later on by other brands.
I am terribly sad that many of his creations are no longer
available or are very hard to find, since later versions by other manufacturers
of the same models or conversions are well bellow his’.
PugetMeister Jim Schubert was the generous donor of the
oldie but goldie Monogram kit AND the Rarebits conversion. Thanks Jim, and I
hope the model does justice to your ever-present kindness.
After gathering some references, photos and opinions (the
latter abundant), work with the Rarebits vacuformed fuselage began. The steps
are described in the accompanying images.
A few civil models can be made with this conversion: the Boeing School of Aeronautics plane, the Paul Mantz livery variation of it (it was the same airframe, NC873H) and some other configurations of NC873H that have only the Boeing logo, and a couple more that are painted differently. For that you will need to change the ailerons and landing gear. Some versions had the P&W Wasp Jr.
I have chosen the Paul Mantz machine, which went through several detail changes in its life: nav light on top of rudder and wing tips or not, short and long skywriting pipe exhaust, with and without Townend ring, with tailwheel or tailskid (a few different versions of the latter), different engine front shields, prominent or almost no headrest fairing, and so forth. Look at your photos, and take notes.
I’ll be commenting as I go
The rarebits bits:
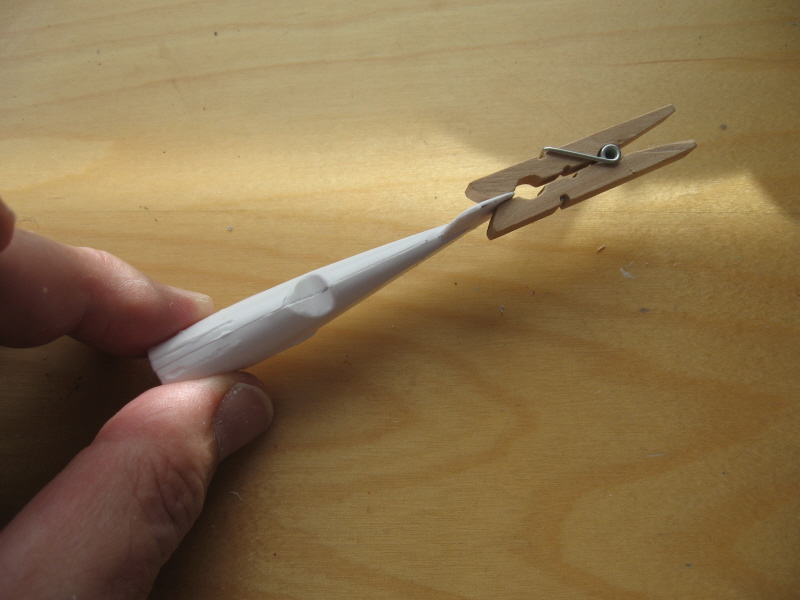
Fine Sharpie used to mark the contour, then lightly scored twice with Xacto, and snapped off.
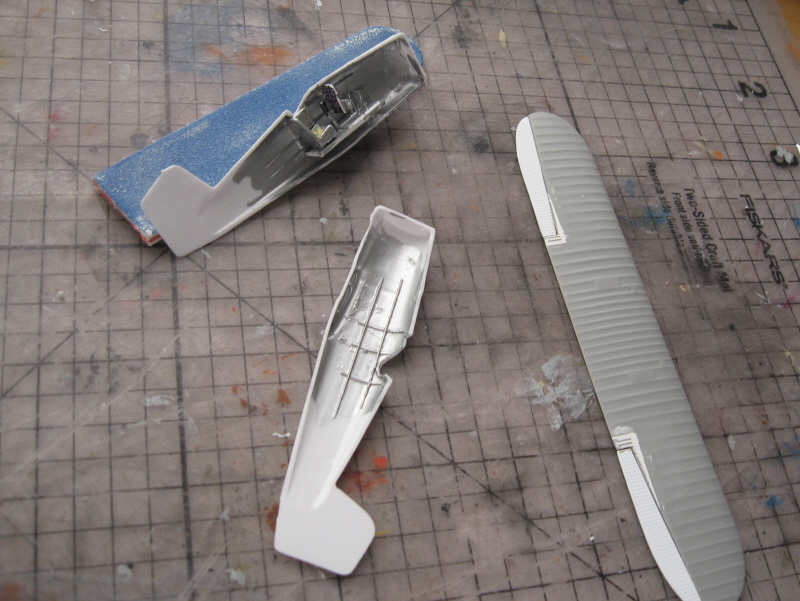
One side sanded, the other still as it was to see the difference:
Same as above:
"T" bar sander used to work with the fuselage side
Now both sides sanded:
And no banana fuselages if you are careful, apply even pressure, check frequently and don't become frantic and wanting to do it right now:
Same for the other side
The Monogram kit with its still good moldings and clever strut array:
The venerable instructions:
The cockpit is opened using a Dremel bit (the sides are not yet glued):
The little blemish on the left fin was corrected by lightly sanding and re-scribing:
New ailerons marked in the kit's wing:
Sections removed:
New ailerons -lower and upper halves- made of "corrugated" styrene sheet:
The remains of the ailerons' position on the wings are filled and sanded:
Same for the other side:
The aileron halves are sanded in a triangular cross-section (trailing edge thin, leading edge broad):
Then the aileron halves are glued and presented to the wing for final adjustment:
The lower wings of the F4B-4 are separated of the "bulge" to be later glued to the vacuformed fuselage:
A new P&W Wasp Jr. engine would be needed if you go for the Paul Mantz version:
Some interior detail is built:
An instrument panel is created:
The ailerons are completed (but not glued) and the fuselage halves ready to close:
Some clamping power is invoked:
Rarebits fuselage ready:
The parts at this point in time. The upper front fuselage has been demarcated with masking tape and given a layer of putty to erase the armament. Once sanded it will give the impression of metal sheeting:
The quality of the Monogram molds is evident in this picture. Old kit, mind you, but far better than many nowadays kits:
The struts are very carefully removed to be added to the Rarebits fuselage:
Task accomplished:
Other kit parts that are going to be used to the right, discards to the left:
A sight I'll preserve for my grandchildren. Otherwise they won't believe that the USA was once a country that had a powerful manufacturing industry, sunk by the despicable financial greedy geniuses. Isn't it interesting that as I build these two Boeing models, Boeing just announced the closing of its California plant?:
The horizontal stab slots are cut and the halves slightly re-shaped to fit the version:
End caps are prepared for the lower wing roots on the fuselage:
The bottom is also tidied, since there is a step for the former purpose of the conversion:
The locating holes for the aileron rods are drilled (wrongly done in the photo since I followed the kit's location, which is incorrect, having the hole way offset; so
measure and drill looking at photos. This is true for any model built
from this kit, conversion or not). Once I realized the mistake I re-drilled new locating holes -not visible in this photo-:
Dry-fitting of the lower wing halves and tail feathers:
The wing panels are aligned by a metal pin:
The wing panels, false ribs and rod:
The bottom of the fuselage gets further touch-ups with putty:
The wing struts needed some supplementing in their locating cavities to seat flush with the surface:
Glued in place
Landing gear legs were a bit different and longer on the Boeing 100, so new ones were made:
At this point the decals were crafted and printed (sharing the sheet with the parallel project, the Boeing 281):
A white metal accessory and a tiny rod make for the tailwheel:
Landing gear legs are given axles and new aftermarket wheels are prepared:
A tiny headrest seen in photos of this particular machine at that period in time is added, made from an ex-bomb half. Don't you love it when you can redeem something like that for a better function?:
Rigging holes are drilled into the fuselage and wing:
The navigation lights are crafted, I posted this many times before, but here they go again. Shape an end of the styrene rod. Drill and insert a thin metal pin.
Cut and paint:
Deposit a drop or two of clear window maker, a tad on the heavy side (it will shrink). Let to dry with the drop pointing down (so it'll "pull" by gravity instead of flatten):
The landing gear trimmed and with locating pins:
Landing gear in place:
Diagonal braces added:
The cylindrical gizmo -part of the smoke generator- is made and glued in position in a nook of the landing gear as per photos:
The general view of the sub-assemblies:
The exhaust pipe of the smoke-generating apparatus:
Trimming and dry-run of it:
The some-generating apparatus prominent exhaust tube was chuck on the Dremel and scored to imitate the asbestos wrapping and the different sections that composed it. At this point a couple of rods that attached it to the fuselage were pinned:
The flying surfaces are given a coat of white primer, in preparation for the white paint:
The fuselage is given a coat of silver, to spot blemishes, the flying surfaces are lightly sanded:
Everything is given a coat of white paint (the props were painted silver before with the fuselage):
The props logos' decals are trimmed (since they are home-made on all-carrier film) and applied:
The wing decals are now cut to fit their positions according to photos:
The fuselage in turn is masked (the rudder should remain white) and painted red:
The smoke generator pipe is weathered:
Tail scallops and registration decals in place:
Sub-assemblies and detail parts:
Lower wings in place:
Struts in place:
Decals in place on top:
And bottom:
More details are added, this time the tail feathers rigging:
And stab struts underneath:
The aileron rods are added (see note Re. this in the photo that shows, at the beginning, the scratch-built ailerons):
And the white pinstripes on the fuselage:
All wing rigging is done with thin wire. The windshield is glued and the engine is given an exhaust ring:
Engine and wheels in place. Now just a few other details, like nav lights, prop, smoke pipe and it will be completed:


I agreee with you, old friend Gordon Stevens, Mr. RAREPLANES, was way ahead of his time and a real master to many of us. Armando Gil.
ReplyDeleteBoth of you Gentlemen, Gabriel and Armando are most kind in your comments about me. I never realised that I was appreciated that much! I must tell my wife I have fans. You, Armando, were one of my first customers with an exotic address in South America. Gabriel is also exotic and I look over his shoulder, constantly fascinated by his creations. - G
ReplyDeleteI have to thank you for this piece. No idea how it passed me by as I have devoured almost everything on this site, but I found I have this same Rarebit sheet tucked up with other forgotten treasures in an old ice cream carton box (ice cream is long gone).
ReplyDeleteAlthough written eight years a priori, this piece is exactly timely.
Thank you Claudio once again!
;-)
Delete