
http://wingsofintent.blogspot.com/2015/10/scratchbuilt-albatros-l72a-newspaper.html
The unforgettable image of John Cleese in the movie theater howling: "-Albatross!!!! Albatross!".
And this model belongs to the same species!
I think that one of the modelers' Grails is a plane that
he/she likes, that has pleasant lines, attractive colors, and can be built
without having to enter a religious order or a mental institution.
Such plane is for me this month the Albatros L.72. Used as a
newspaper delivery plane (dropped the stack of newspapers in flight on the
possibly unsuspected occasional pedestrians) in three different versions
(predictably "a", "b" and "c") of which this is
just the first built ("a").
Its angular, polygonal but graceful lines add to the
cleanness of the design creating a remarkable shape of classy demeanor. The
design featured advanced aerodynamic devices, like slats and flaps (and this is
1926) and although not completely innovative, put to good use technical tricks
incorporating them in a very sharp and streamlined treatment of the cellule,
exemplified in the careful shrouding of the BMW IV engine.
Just compare this design (tongue-in-cheek here) to those not so rare examples of ungainly, homely, and
sometimes frankly awful French and British contemporary products that seem to chose to
ignore that air is a fluid that produces drag, as if ignoring it -in true
British fashion and French flippant attitude- will make that quality (and the laws of physics) feel ashamed
and disappear. And I won't have it any other way, since I have built a large number of them, and I truly love those ugly ducklings -Farman Jabiru in mind- as anyone who knows me and my models will testify.
In researching this plane I became aware of this strange
trend of "newspaper planes". Several aircraft firms sold to
newspapers machines that were adapted to this specific function. As famous as
the Albatros L.72 are the Heinkels HD39 and 40, and a very little known Junkers
F.13, in the list of my candidates for the future projects.
This model is mostly based on the excellent article posted
by Günter Frost und Günther Ott at the Arbeitsgemeinschaft Deutsche
Luftfahrthistorik site:
http://adl-luftfahrthistorik.de/deutsch/adl_start.htm
To them my gratitude for their great work on lesser-known types. My thanks also to Alain Bourret and Sönke Schulz, suffered co-researchers. Whatever mistakes are committed here, is of course their bloody fault.
http://adl-luftfahrthistorik.de/deutsch/adl_start.htm
To them my gratitude for their great work on lesser-known types. My thanks also to Alain Bourret and Sönke Schulz, suffered co-researchers. Whatever mistakes are committed here, is of course their bloody fault.
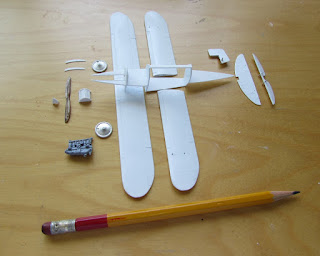
Once the plan is printed, search commenced on those little boxes that tend to lie around, happily finding suitable wheels, three potential candidates for the engine, and an ex-wing fuel tank that was kissed by a frog and became a spinner:


The wings "closed":
 The lower wing panels are detached:
 Scratchbuilt Lamblin radiator:
 The wings with the ailerons, slats and flaps engraved:
 With all the flying surfaces mostly solved, attention turns to the complex octagonal fuselage. I am here trying to devise a system in modules that will allow me to put the interior bits before closing, and at the same time serve as alignment for the fuselage external "slab" sides:
 The assembly proceeds by adding section and the occasional reinforcement member:

 General view:
 Size comparison -so most of you will think this is very difficult-:
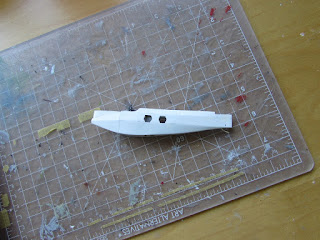
 The process continues, under the dubious premise "what an engineer would do?" which of course renders the most ridiculously complicated approach. At this point the fuselage scarily resembles Nemo's Nautilus:


 The newspaper trapdoor is cut out, as well as some of the cockpit floor. The newspaper rack is built, together with the seat. The control column is a spare:
 Two more fuselage sides are added. Part of the cockpit is already included:
 Windows and door are cut out:
 Color is applied:
 Elements already inside:
 Planking of the fuselage advances in stages:

 Only one more section and the skinning of the fuselage will be almost complete, with only the nose panels and the cockpit hood remaining:
 Planking of the aft fuselage complete:
 Breathe. Take a pause. Forget the model for a little while:
 In spite of all the parts and convoluted engineering, things kept quite aligned:


 Breathe. Take a pause. Forget the model for a little while:


 The cockpit coaming is prepared and glued in place:
 A very loose dry-fit to see how it looks:
 More cowling panels are added:

 The locations for the flap linkages are drilled:
 The top panel of the cowling is being prepared:
 Here are the panel, the engine it will let through, and the shroud that will eventually wrap the exposed cylinders:
 A very loose dry-fit of the parts to give an idea of their position:
 Breathe. Make a pause, forget the model for a little while:
 The dry-fitting revealed that one of the prepared parts was superfluous, and the shroud could,actually seat on the side panels perfectly. A top cover is going to be fabricated:
 I would like to remove a section of the shroud (one side) later on to show the engine:
 A wood master is carved for that cover:
 A vac copy is made:
 Trimmed to fit:

 And a general view of the components. Fortunately from now on is cleaning and refining, plus of course all those little metal struts for the landing gear, wings, stab, rigging, and the many details (like windshield, aileron tabs, tank stiffeners, etc, not to mention priming, painting, decaling....:
 The fuselage is tidied-up:

 And another general view. Notice the aileron servo tabs behind the lower wing halves:
 The landing gear in place:

 The Lamblin radiator is temporarily placed to check fit:
 The cabane supports are made from sheet aluminum and glued in place:
 As well as the door stirrup:
 Spars are inserted through the fuselage for the lower wing halves:
 The necessary amount of dihedral is built-in the spars (dry-run):
 Dry run of the wings:
 White primer is applied in preparation for painting without forgetting smaller parts like the door, spinner and such:
 Servo tabs for the ailerons are glued in place:
 The stab and lower wings are glued in position:
 The upper wing dry-run just to check things a bit. Notice that the flanges that form the wing tank edges are glued in place:
 The chrome yellow is airbrushed to all parts:
 Still many things to do, but looking promising:


 Decal stock is airbrushed black to later cut the chevrons for the fuselage sides. Vertical stabilizer is masked and also painted black:
 Mask is removed to leave the yellow color as per photos of the original plane:
 The chevrons are measured, penciled and cut from that decal stock and started to be applied:
 The door and engine cover are being prepped too:
 The BZ decals are added. The engine is in too:

 The upper wing, tail parts, some details:


 The wing struts, LG rigging, exhaust stacks and control cables are added:

 A tiny newspaper cover is printed, and will later on be glued to the bottom of the simulated newspaper stack visible through the opening on the fuselage floor:
 Flap actuators and radiator are glued in place:
 The windshield and some metal part at its angle are added:
 Many other details are dealt with: metal guard on the prop LE, a pipe on the nose of the engine cover, and so on and so forth:
 Look above for the link to the completed model post


Lower sides are added:


The addition of panels continues and the engine is dry-fitted:


No comments:
Post a Comment