.jpg)
(This is the construction article, for the completed model please go here:
https://wingsofintent.blogspot.com/2019/09/junkers-ju-52-ibate-airliner-aeroposta.html
Long ago, my older son, also a modeler (and a very good one, not that I
am his father) built an Aeroposta Argentina civil passenger plane based
on the Italeri kit and dedicated the build to me when he posted it on a
known modeling site. Now it's time for me to build another and dedicate
it to him!
I have been always fascinated by the role of Aeropostale and Aeroposta
in Argentinean aviation, where the names of Saint-Exupery, Guillaumet,
and Mermoz , together with local heroes, stand prominently.
One of the machines used by Aeroposta, most noticeably in the southern
routes to and from frigid Patagonia, is the civil version of the Junkers
Ju/52m (mainly "ge" machines). I always steer clear of the nauseating
nazi symbols, so this is a good opportunity to redeem this machine with a
much better meaning and story.
Some photographic references exist covering 5 machines:
Tierra del Fuego
Ibaté
Pampa
Quichua
Patagonia.
I base my conversion on the Italeri civil issue of this kit. Whilst
others exist (Heller, Airfix, Revell re-issue) all have their particular
quirks.
The Italeri civil version kit, if lacking in some areas, at least had
the aft fuselage gun position deleted and the pants, plus a full civil
interior.
Looking at photos it's evident that the different machines listed above
changed a bit during their lives, and differed among themselves in some
details. I did not want to have to deal with too many changes, so I
leaned towards the machines that do not need new cowls, props, or
engines (some received at some point P&W or Wright engines,
three-blade props, and different cowls).
Other details to consider are:
-number of oil cooler "tubes", grouped under each engine either in twos or threes, and some times mixed installations.
-wheel pant decoration, which varied (and pants sometimes were removed).
-Presence of a door on the nose, right fuselage side, immediately after the cockpit, absent in the kit.
-deletion of big cargo door on the right fuselage side, present in the kit.
-possible addition of two barely visible hatches after the cabin, both
sides (one is marked on the kit from inside, the right hand-side one.
At some point, to my immense joy, I realized something very interesting
that I have never seen in any artwork, or plans: since these planes
operated in bad weather and an awful number of times in snow or snowed
territory, some paint schemes include a high-vis color on top of wings
and stabs. I deem that color orange, as per well known practices. Only
few photos show this scheme, but they do it very clearly.
All planes had the rudder painted with the Argentinean flag colors, but
many times the rest was left on bare metal (besides company marks and
registration). Some photos show a machine with the typical "curvy and
pointy" ex-Lufthansa black nose and engines.
I was elated as said with that discovery, and as photographic evidence
started to confirm it, I ordered as said the Italeri kit.
Upon getting the kit It was immediately obvious that, if some efforts
were done to produce this "civil" version, said efforts were a bit lazy,
half-hearted and ill-informed.
The list is long, so do your own research looking at photos (NOT only
at drawings, side views and the like, many times inaccurate) and compare
your kit with the desired machine, as I did.
Italeri provides in the sprues two alternate parts for the cargo area,
one of which would be pertinent (the two-window one) IF the corrugations
would match those of the fuselage. What a blunder, so much for a
seamless transition.
Now, as we all know, replicating corrugations is not easy but certainly
can be done, but I don't want to spend the time, so I just ordered
another kit to cut a piece of the fuselage and splice it to the first
one, plus need more cannibalized surface to make the front door to the
right, shamelessly absent form the kit and present in all civil versions
I have photos of. Failed on homework, Italeri! But both kits were
inexpensive, being old issues an second hand.
There is small hatch (molded from inside in the kit) that you could cut
open. In one photo that hatch can be seen removed (which I may
replicate). Photos show a second hatch to the left, absent from the kit,
but present in company's drawings.
So, changes needed for ALL five AEROPOSTA machines:
-Delete large cargo door on right fus. fixing the inaccurate corrugations on kit part.
-Need to add the front fuselage door on the right side, right behind the cockpit.
The passenger door is as per the kit, no problem here.
Tierra del Fuego, Patagonia and Pampa had the Argentinean flag along fin and rudder
Quichua and Ibaté on ly on the rudder
And individually
Tierra del Fuego:
Scheme a)
Engines and cowls as per kit, 3-3-3 oil coolers, plain aluminium.
Scheme b)
Painted on high-vis: 2-3-2 oil coolers, new PW engines and cowls, no
wheel spats, new Hamilton Std. three-blade prop with spinner,
Quichua:
High-vis, 2-2-2, double line pants, need to change the 3 cowls to Townend rings.
Patagonia:
1) cowls/props as per kit, 3-3-3, inverted light color single triangle
on spats, curvy and pointy black (Lufthansa style) decoration on nose
and engines,
2) No colors on fuselage, double line spat.
Pampa:
1) cowls/props as per kit , 3-3-3 oil coolers, no decoration (plain aluminium).
2) high-vis decor, double line spats.
Ibaté:
1) High-vis, 2-2-2 oil coolers, double-line spats, same scheme with and without engine shields.
Of these the one that I may be modeling is Ibaté, which had a crippling
emergency landing on very bad weather and snow. The passengers,
fortunately only a bit shaken (but including women and children) had to
wait four days to be rescued by a walking party, and walk many
kilometers on thick snow to get horses, and then ride some more, while
another plane (Quichua) dropped some supplies. The story is long and
fascinating.
May be I will translate it if I have the time.
Do not blindly trust the side views or 3 views you may see of the
planes cited above. If no doubt well-meant and the work of love of
someone that cared, most contain inaccuracies. Look at photos, as much
as you can find, of the machine you intend to replicate, and start to
take notes.
Argentina had of course other Junkers Ju-52 used by LADE (Líneas Aéreas
del Estado) and for other purposes, among them cropdusting by the
Ministry of Agriculture (and Silly Walks). Many other Latin American
countries (Brazil, Bolivia, Uruguay, etc.) had a number too.
The kit's fuselage sides, with the problems explained above:

Different corrugation pattern, inaccurate for these Junkers:
Front door inexplicably absent from kit:
Look, mom, no gun position!:
But instead a sink mark!:
Caused by Italeri leaving the gun position paraphernalia inside:
Parts for the seats provided:
This hatch may me opened:
Two cabin floors, in this case of course the one with the seat recesses
is the one to use. Now, some civil Junkers had the seats pointing
slightly inwards, so which is the case with Aeroposta?
Don't miss the next episode!:
And other nice details (aft bulkhead with folded seat, a bit different on the planes listed above). I will open that door that leads...yes! to the restroom. Toilet, here we come!:
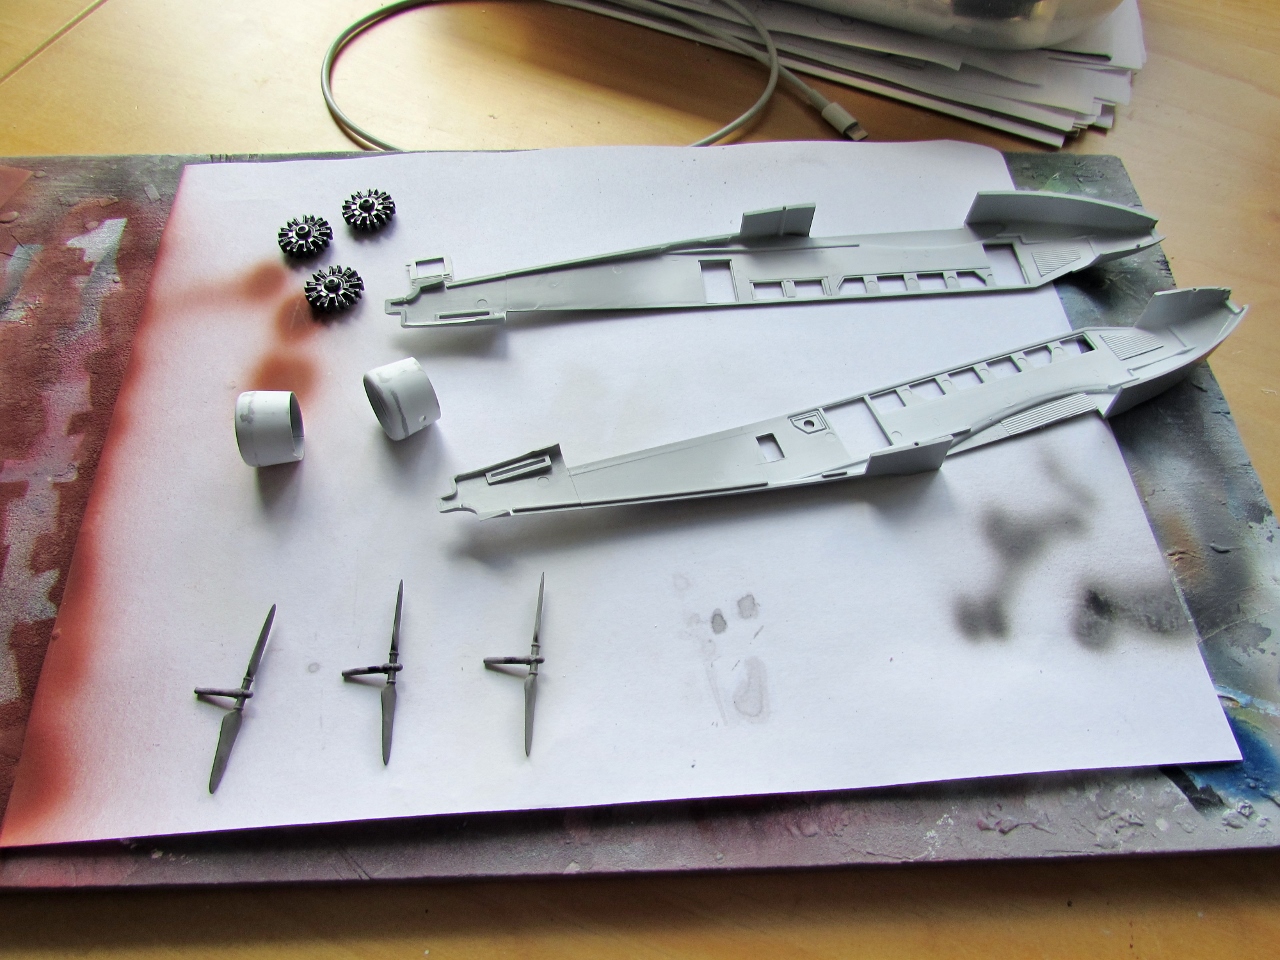
Naturally, with "used" kits, you run some risks, and some times you get missing parts, or broken ones, as in this case:
Gluing this one:
Fortune smiled and some bits were still in the box, loose without a plastic sleeve, and miraculously there:
But others I had to fabricate:
Four aileron/flap supports were missing from the wing, all were
eventually found and glued in place, with high magnification to find out
which one belonged where. Very entertaining I can assure you.
Two rudder supports and a few parts completed the casualties, all restored.
A few parts repaired, and the rest separated from the sprues and cleaned up, leaving the minute ones still attached:
Some pesky ejector pin marks are puttied:
The control wheel is repaired. First a coil is made:
The a brace added and a section of the coil glued:
The hatch that goes to a cargo hold is removed:
The door is removed from the aft bulkhead and it's glued in place:
The bathroom and cargo separations are made and glued:
These need removal:
Better there:
The fin in the real plane had a visible offset, so it´s removed:
It will later be re-glued in place at the right angle:
Now it's time to separate and clean the seat structures:
And assemble them:
I am starting to believe that producing a good set of kit
instructions is a superhuman endeavor, judging from the number of invariably
messed-up sets that populate the kit industry.
The instructions tell you to put the corrugated side of the cargo door towards the inside, and don't advise you to drill locating holes where needed.
Elbows made on sprue rod:
Cut at an angle:
Refine the parts:
Once glued in place a locating hole can be drilled. A more accurate and firm anchoring, don't you think?
I am so used to work with deficient kits that I am pleasantly surprised: the fit of this kit is excellent, and only minimum cleanup is needed. It's actually a pleasure to work with. It feels refined and light, the parts are well defined and with almost no blemishes.
Wings halves glued, be careful not to knock off those flaps and aileron holders:
Some other parts are glued too:
It has quite a size:
More good news: Master modeler, dear friend and kit maker Matías Hagen from Argentina provided information on the particular interior of the Aeroposta machines, which had, as I suspected, the seats a bit skewed towards the hallway, and a very spartan interior, plus a radio station on the first seat to the right, with prominent radio equipment and a particular type of cabin/cockpit door that I had seen in only a few Junkers.
This is wonderful and right on time, since I was about to finish the interior in a generic way.
Therefore a new floor is made, and after very lightly emboss it with the position of the seats, it's glued on:
One of the cowls did not have the exhaust holes opened, therefore they were drilled:
The cowls can be assembled, since the engines can be dropped in from the front. The exhausts can be added later from the back, juggling them a bit (inserting diagonally and locating the exit stubs first).
Watch out, every engine, cowl part and exhaust has its side and proper position, they won't go well otherwise, so don't start to chop things up to force them in:
The Aeroposta planes had a different nose engine exhaust than the kit's. Here are two exhaust shrouds that I found on the spares bin and go very well (just trying, better glue them after the seam is deleted once the fuselage sides are glued together) The exhausts actually went in inside the nose immediately after the engine, and exited through these:
:
Here is the exhaust and a heating soldering iron:
The exhaust is positioned very close to the hot tip and then bent to requirement (don't try this if you are not proficient with the soldering iron, hot things or modeling in general):
The differences between the kit's cabin configuration and the Aeroposta planes is addressed with some modifications, adding new doors, radios, passenger comforts, etc.:
The netted racks over the passenger seats are made:
And the indispensable item of airliners.
More so now that all airlines are treating their "beloved" (but so just in their marketing material) passengers like their
best enemies, and flights, due to the absolutely crazy sardinization are becoming a nightmare with one bathroom per 100 passengers, so this device is cherished more than ever. Funny that this relatively small Junkers had more bathroom space than any jet I have flown in the last 5 years or so.
That's how the future looks: more revenue for the very top, less comfort* for the mere mortals.
*Well, "less comfort" falls absolutely short of the mark, let's say it properly: a lot of discomfort, from chaotic boardings, to miserable seat "space" (what "space" are they talking about?), to more seats crammed in the same space and then some more, to less reclining, to less padding, to less bathrooms, to same price or higher. Jet cattle.
Dry run:
And here one way to fix the difference in corrugations between the alternate part needed the correct the civil fuselage (very poor job, Italeri, another right fuselage without the hatch and with the fore door would have been the right thing to do here). So: corrugations can be replicated using aluminium kitchen foil very carefully pressed on the right corrugations on the fuselage:
Then glued with cyano or expoy to a part that will replace the inaccurate corrugations on the kit's "plug":
Done with care will not mar the aluminium:
So the windows can be cut and glued to the new corrugations:
That need a slight overlap on each side (and perhaps at the bottom):
To make for the kit's corrugations not making it all the way to the edge:
The overlapping corrugations can be then carefully pressed on with perhaps watchmaker cement (a very thin but nice adhesive) or thin cyano glue, being very careful not leave a too prominent edge:
I will splice as said a portion of another fuselage, but just wanted to provide some alternative methods, and grease those joints in case I need something like this for the parallel build of the HP42, another corrugated beast.
There was a little hatch that gave access to an area destined apparently form small items, so that's marked:
And then opened up, also creating the internal space with "corrugated" styrene:
Well, research paid big time.
Today I found a couple more of precious photos of the specific plane I want to model (Ibaté), and a written account of the orange/red color of the junkers serving the southern routes, on a page designed to honor the witness:
"Rememorar al Peña aviador, el que siendo chico viera aterrizar, en El Calafate, a los Junkers: “fuselaje de chapa acanalada -o parecido- y alas de color naranja, o rojiza*. Tres tremendos motores, y recuerdo sus nombres, porque en aquellos tiempos (1940) de la Aeroposta Argentina eran cuatro los Junkers que surcaban estos cielos territoriales: Tierra del Fuego, Pampa, Ibaté y Ona."
The highlighted "Ona" is because the name
was native indian, but actually "Quechua" instead of "Ona".
*"...and wings of orange color or reddish"
Yeepeee!!!!!!!
The interior is airbrushed with a primer to detect blemishes and provide a base for the color together with parts from the HP42:
I got a set of Eduard paper masks, which I prefer to vinyl ones, but Eduard, unlike for example Montex, does not provide internal masks, needed to paint the interior when it will be exposed, so I had to trace and cut my own interior masks on masking paper, using the kit as a pattern:
Now it's time to cut that front door open, inexplicably missed by Italeri and present in all Junkers airliners:
It is not just a matter of using the cut part as a door, since it was different, having a different window and smaller corrugations:
So a new door is made using styrene and the method described above to replicate corrugations ("copied" from a suitable part of the kit):
As explained, just to engrave the door on the fuselage won't do, since the corrugations and window size changed. It has to go for the airliners, besides will give visual access to the interior.
If you are not comfortable with the aluminium corrugations, you can use parts of the kits to build that door. This is the removed section:
Use the smooth bottom of the removed section and add a correctly measured and cut small corrugation panel from one of the redundant parts of the kit (big cargo door):
Glue them together and prepare the upper section with the window from another discarded redundant part (the 3-windowed section):
Once you have glued that upper section in place, let it dry, and later sand the edges straight and squared. Now add a perimeter with very fine styrene strip:
The other side:
The Junkers had a series of small spaces between the cabin floor and the belly skin, and those were used for small packages.
Two are opened:
But now of course the internal area exposed needs dressing, so the commercial corrugated sheet that I could not use somewhere else because was not a match, can now be utilized:
Other little areas that will be visible are covered, and the pan given some appearance of structure:
Labor continues detailing the interior.
I can't go faster because I am still waiting for the arrival of the second (donor) kit to patch Italeri's mistaken big cargo door:
And speaking of bathrooms, what use are they for without this humble item:
Ceiling, doors, bulkheads are painted a very light blue-grey, the cargo compartments as well as the chairs' structure are painted aluminium:
Chairs and door now ready:
And being set in position:
All in place:
The location holes for the antenna mast and loop are drilled. In this particular version that's their position, but was different in other versions:
A portion of fuselage skin was excised from the donor kit and applied to reconstitute the proper size corrugations omitted by Italeri in its "civil" version (that is nothing more than a hastily half-adapted cosmetic work with many important and inexplicable inaccuracies):
Another little stumbling block if you are doing this: in spite of being
in the same area, the "constant" corrugations on the fuselage are not
really constant, and start to diverge elsewhere, a fact I realized after cutting two sections that wouldn't really properly match the corrugations in the area that needed correction. The third time is the charm, as it's said....Sigh...
Now the windows have to be separated from the Mickey Mouse kit "patch" to be later added:
My son (that builds in the heretic scale of 1/48, in spite of impeccable upbringing) showed me images of the civil version by Revel, that, as far as I can tell, properly addressed all the issues that Italeri blatantly ignored.
Once the excised window frame is added, the area is ready to prime and refine. It is possible that a very faint imperfection remains somewhere, but it will be much better and accurate in any case that the totally bogus solution posited by Italeri:
My evil plan of using the donor kit for a second model using this time the home-made corrugations to fix the issues (and the hole left by the donation) went south, due to the necessity of having end up cutting three sections to find one with matching corrugations, and in the process chopping up entirely the fuselage side. I still may find a "rescue" kit that lost the transparencies or other important part but has the two fuselage sides.
The net racks are added to the top fuselage:
I thought these were bubbles, defects, but they are also on the transparencies of the second kit, and they look suspiciously like devices to allow a gun to fire through, and if that's true, corresponding again to the military version this kit is supposed
not to represent:
A few areas that require filling and sanding are treated accordingly:
Now is about detail painting, fixing blemishes and preparing parts for further assembly:
I was able to "cut and paste" and shuffle some windows around to eliminate those that had the gun port, given that the kit provides a few alternate windows:
Windows are glued in position:
And the interior is made ready to be kindly embraced by the fuselage sides:
The section that received the transplant from the donor kit looks rather well:
One of the planes I wanted to model with a second kit is a CAUSA Uruguayan Junkers on floats, either CX-ABA or CX-ABB.
BUT: the floats on the kit are useless for the great majority of civil float-planes I have on file or I can see on the net, being the kit's floats' noses too droopy, whilst the real thing is straight:
Found these on the Net:
The fuselage halves are united, and the two-part floor is installed:
The fuselage top is glued on:
For those curious about how the corrugated patch made of aluminium foil would work, here is a trial on a left over part of the donor kit:
Primed:
As you can see it works quite well, but it would be even better if a few panel lines following photos of a real plane were scribed on a few sections of the fuselage to match that line effect.
A pattern for the bare section underneath the fuselage is cut from paper and adjusted against the model:
The aluminium part is cut and again measured against the model:
Once satisfied, it is glued with thick superglue (not for the faint of heart):
While I am out with the airbrush for other projects, I try to ready some miscellaneous parts to get the out of the way and not be a concern at last moment:
Masks on. The masks were precise and relatively easy to apply. It was very difficult to "see" the individual masks against the background, though, making localizing the ones you needed a challenge:
The unusual engineering for the wings' anchoring left a gap, that had to filled with a slim insert:
This is so far the only instance where I found a bad fit, the rest goes together really well. Not sure why Italeri did not employ the tried method of tongue and wing matting roots:
The wing joint will still need some light filling:
Some details on the belly belonging to this particular plane are added:
The fin that was removed is re-cemented at the proper offset angle (that had the function of counteracting torque, since the three engines rotated to the same side):
The stabilizers are now glued in place:
The landing gear is added:
The openings are occluded:
Primer on:
This is going to be a somewhat demanding painting schedule. First I will apply gloss white as a better base for the red. Then red over the white areas (top of wings and horizontal tail, upper section of three cowls plus engine louvers -the round shield), then the light blue bands on the rudder. And then, masking the red, the aluminium tone. The wheel pants have their own requirement, being a black design on aluminium, so gloss black is going first, then masked, then the aluminium:
A pattern is drawn and cut to produce the design on the wheel pants:
A proof of concept trial is successfully run:
Most parts are given a gloss white base:
The white is masked on the rudder and the light blue airbrushed. The pants are given their gloss black base (the masks to be later applied can be seen nearby) and small hatches made of corrugated aluminium are primed:
The red color is airbrushed:
Also on the smaller parts that need it:
The rudder is unmasked:
Red masked to apply the aluminium color (model and parts), pants also masked:
Color applied and model and parts unmasked:
A clear acrylic coat is airbrushed and then the masks are removed:
As I am dealing now with the assembly of engines, wheels and its ancillaries, it's worth to note that there are some vagaries and sequence conundrums in both areas, plus the usual instructions-induced head-scratching. Too long to explain and detail here, but you are warned, pay attention, and also check the fit before committing.
A number of small parts are now being painted or masked to apply other colors, among them cowls, props and exhausts:
Engine sub-assemblies, rudder and other details are added:
While the decals arrive, I am working on the many details that still need to be added:
Photos show two instrument faces on each cowl facing the cockpit, so two alu disks are punched and glued, and the the instrument decals prepared. The kit's engine fuel gauges are inaccurate thus two are scratched. Another pin-like detail is added right in form of the windshield:
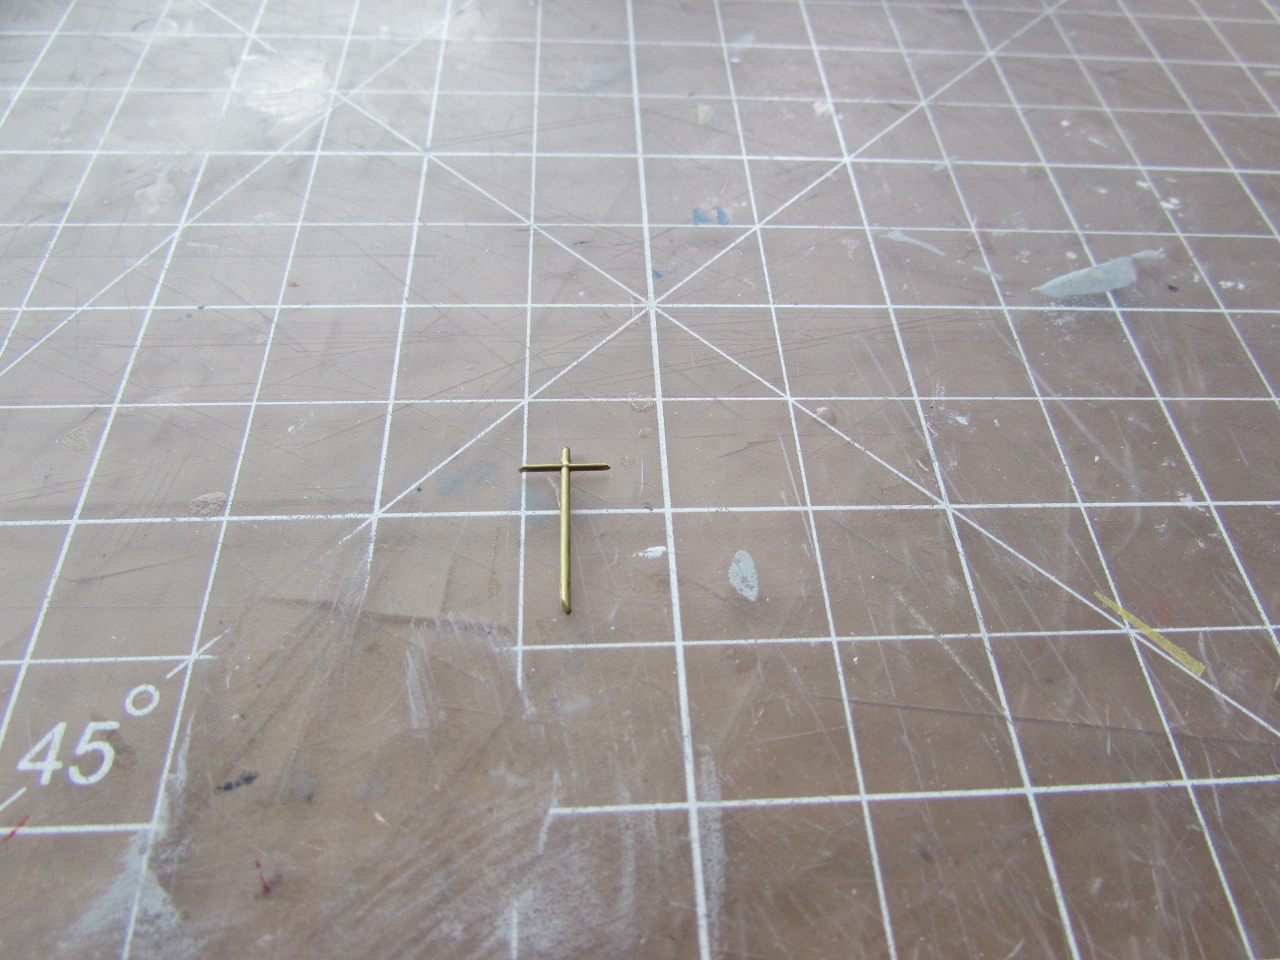
This particular plane had a "T" antenna mast, so it fashioned from brass Strutz, drilling the mast and inserting the horizontal short length:
The kit-s antenna is too large for this specific plane, so new one (double loop) is fashioned:
Today I had to rescue the model from the jaws of the carpet monster! The Junkers went for a stroll and it was almost caught! that'll teach it to go wandering out of its box!:
The very nice set arrived from Arctic Decals:
So decaling can now begin:
Decals go on the bottom of the wing, and the two hatches I made are added at this point:
Anyone applying decals on a corrugated model (in this case fine corrugations in 1/72nd) knows that things can often go wrong. The decals may not conform to the corrugations, silvering happens, etc.
Arctic Decals set, which is printed in a good thin carrier, worked best removing
all carrier from the letters (that's for the fuselage and wing regs), including the bits inside the letters (as inside the little triangle on the A) and trimming all exterior to the very edge of the image, applying to the area on the model plenty of Micro Set, applying the decal, letting the decal rest for a few hours, apply Micro Sol, and
gently pressing the decals into the grooves,
(rolling, not sliding or dragging, as with a rolling pin) a Q-tip along the grooves, several times. May require more application the next day of solution if not completely conformed. This needs fine tuning, and patience, hence my first mishap.
While I waited I added the navigation lights from the CMK set, and the wire antennas from that stretchy material that again made me use harsh language. It worked at the end.
You may notice that the font employed in Ibaté was for some reason not the standard one, having extra horizontal bits on the apexes of the Vs and As.
If all goes well, tomorrow will be props, doors, hatches and photos. Fingers crossed:
A few additions and it will be ready:
The completed model is here:
https://wingsofintent.blogspot.com/2019/09/junkers-ju-52-ibate-airliner-aeroposta.html

.jpg)


MUY INTERESANTE EL METODO PARA DUPLICAR LAS COARRUGACIONES. SALUDOS. ARMANDO GIL.
ReplyDeleteGracias caballero Armando, es laborioso pero funciona para ciertas cosas.
DeleteSaludos cordiales
Excellent! a most inforamtive and intersting build.
ReplyDeleteGlad it was of interest.
DeleteCheers
Dale dale!
ReplyDelete:-)))))
Delete