https://wingsofintent.blogspot.com/2020/03/lee-richards-annular-wing-modified-avis.html
The strangest thing happened.
A knock at the door that was more like a knocking-down the
door preceded the appearance of this... tin can? walking kettle? who proceeded
to state -in a rather metallic voice:
"Greetings from my Master in Mars. He sends you this
present. It represents the flying saucer into which he made his first solo
flight (he is very old, when he was young, eons ago, our technology wasn't as
developed). If you don't build it soon we will come back and administer cruel
punishment and brutal and merciless retribution."
I pleaded: "Oh barbaric entity at the service of Mars'
low ends, does your master know that I scratched -if in a rather clumsy way with
my limited skills then- this very noble vehicle at an early age, 14 years ago?:
But the red glow in the eyes of the mechanical spawn told me
that appeasing words were useless, thence encouraged by the effective stimulus
or unavoidable chastising, I immediately opened the box to show my compliance.
A resounding round of applause to Avis for venturing where
no one has gone before (besides me) and regale us this wonderful, unusual,
whimsical kit, in line with their latest welcome civil releases that have
provided many of us with hours of solace and fun.
In revising the kit the first thing noticed is that the area
on the fuselage bottom immediately below the rotary engine should have a cut
out (the original plane did, as photos prove) of one bay, to help with cooling,
and there is no engine. The prop looks a bit wonky compared to photos. As with my scratch, I immediately thought
about showing the rotary engine inside the fuselage (it had an extension to
drive the prop), for which I raided my supplies and found a suitable Aeroclub
one, but I also ordered the proper Small Stuff engine in case I wanted to go
bananas. Three laminated wood props were carved to chose the best among them.
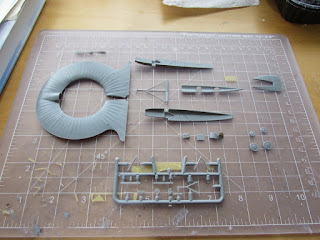
The sprues:
Nice surface detail:The top deck, cleverly, is presented as one piece instead of being part of the split fuselage sides. It's much easier to tidy a seam at the bottom thatn at the top.
Interior wall detail, nice:
Small bits with a little flash here and there, nothing annoying, though:
Subtle and well executed rendition of the wood/canvas fuselage bays:
The instructions sheet:
The cuts under the fuselage for the rotary engine are made:
Here the Aeroclub items you may use and my props. The original prop seems to have been a Chauviere. I believe I have a logo for it somewhere:
Separation of parts and clean-up. I like the engineering approach, we'll see how it works in reality.
Be thorough cleaning the parts. The top and sides are beveled, so take care that no little bumps are there to ensure a neat contact:
The mismatch of some parts is annoying:Here they are cleaned, and those struts that are a pain in the underworld to clean, replaced with stock airfoiled material:
Be warned: the marks for where the landing gear legs are extremely faint. If you have joined the fuselage and tidied-up the seam, you would have lost them.
After taking the photo I marked them more clearly:
There are some marks inside the fuselage that may have been for the other seat that was there (perhaps eliminated from the kit in the production process). There are also on the instructions:Using a very fine drill bit (er... more like three, I broke two) I drilled all the way through the rigging wire locations around the wing:
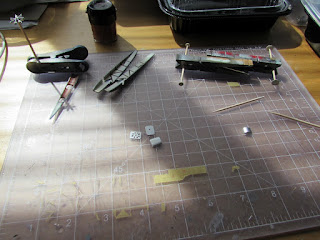
Basic tones are airbrushed to the different parts that are needed for the sub-assemblies:
The Small Stuff engine arrived. This is the proper one in case you want to add it. They are little jewels, but sometimes my quickly fading eyesight doesn't allow me to build them, we'll see.
I think that if I leave open only the bottom as it is now, I may do the Aeroclub one, but if I decide to "open" the top fuselage cover I may do this one. The inclusion of the engine mandates that the side fuselage fairings be thinned down, or even be removed and vac thin parts from them.
We live in hope:
I reiterate that the kit's prop doesn't conform well (to put it mildly) to the shape of the actual one on the plane:
That looks like this Aeroclub one, or the ones I carved:
Bear in mind that the different successive versions of the annular wing had different proppelers.
The two metal bulkheads that are ahead and behind the engine are scratched, as well as the fuel tank (the smaller one provided in the kit that goes ahead the pilot is the oil tanks):
The front wheels were not, as described in the kit, a smaller version of the bigger ones, instead they were wood wheels most likely shod with a metal band. Thus the front wheels are painted differently:
Some of the elements already glued to one side of the fuselage. An instrument panel is made to be attached to the top cover:
The fuselage halves are joined:
The tail had a skid, absent in the kit and instructions, so that it is added:
The inst. pan. is added:
The wing has two pips, also present in the drawings in the instructions. My guess is that those were meant originally as locating devices, but no corresponding holes are marked on the fuselage side, leaving you with the task of looking at references to figure out where the aft portion of the wing should be situated (not difficult, by the way):
All the scratched elements are now added to the fuselage front area:
And the lid is closed (the fit is perfect). The engine will be slightly trimmed and inserted from above between the two "metal" bulkheads before adding the wing:
The vertical tail is glued, requiring a bit of shaving so slide into position. Check alignment once it is on:
The teardrop-shaped fairings for the width of the rotary engine on the fuselage sides are treated in the kit as if there was a feature at the front. I almost carved it, assuming it should have been an air intake to help cooling of the engine, but in checking photos, none whatsoever show an intake there or an altered volume, just the perfect front of the teardrop.
I am thinking of restoring the shape there:
The Aeroclub engine is slid inside (dry run). Only a lowest, downward-pointing cylinder is mostly visible:
Assembly of the four-wheel landing gear commences. The rendition of the external "M" legs is not really accurate, but I made a little effort to improve things by adding a short section of Contrail aerofoil in the guise of the bungee cord housings present in the real thing (the "flap" depicted in the kit's legs is actually a sort of fork):
Found some bits on the spares bin that completed the inaccurate fairing:
As discussed above the representation of the shock-absorbing leg of the landing gear bears only a very vague resemblance with reality, and I tried to add some detail.
But I came to think that it's better to replace the section altogether with a home-made part. The beginnings can be seen here:
The new shock-absorbing legs:
The new legs are in position, and the added front of the engine fairings is blended in:
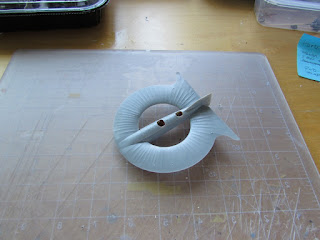
The wing goes on.
I pointed out above that in spite of the back of the wing having locking pips, there are no marks/holes on the fuselage sides as to where they should go, a miss by Avis. So I let the wing "seat" as it will, and looking also at photos anchored the aft section with a brushing of liquid cement:
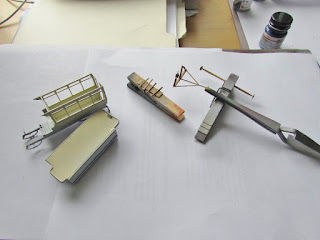
The manufacturer missed a wind-driven pump seen in photos, therefore one is scratched. It was mounted on a triangular support in the middle of the main LG legs:
It had a four-blade small prop, thus my ebil plan was to cross two of these P.E. items, but I only found one in my supplies:
Therefore a had to use little scraps and make a couple to chose the best:
Holes for other features are drilled at this point:
The front wheels are re-shaped, a little hub added, and will be repainted:
Managed to do a very quick -and well protected- session with the airbrush. The first coat of primer is applied:
I had already managed a home-made wind-driven fuel pump (photos as said show one under the fuselage), but finally got a P.E. set that also has them, besides other common elements useful for my scratch/enhancing endeavors:
The plastic part that represents the rigging mast is discarded and substituted for a brass-cum-photoetched array:
Six photo-etched control horns are added:
A quick and well-protected session with the airbrush (parts to the left unrelated):
The main body:
The undercarriage is touched-up with some notes, the front LG struts are ready to be placed, as well as the refurbished front wheels:
The main landing gear assembly is glued to the fuselage, taking care of the proper angles. Unfortunately the engineering here is lacking a bit, since there is no practical way to add the front legs at the same time, being those not properly queued or even shaped (as it was pointed out somewhere up in the thread). Thus once the main frame is secured, the front legs/struts will be trimmed to fit and applied, one side at the time, taking care of not forcing the centerline of the assembly in any unwanted direction. You can see the slot for the engine (absent in the kit) and the lowest cylinder peeping out:
After some drawer hunting, I finally found my Chauviere propeller decals. I have commented before that the kit's prop is not really well shaped, and I made a laminated wood one. But looking at photos the prop looks very monochrome, so I am going to use instead that Aeroclub one that I presented before, after priming and painting:
The front landing gear struts are added. These are replacement airfoiled sections (Contrail), with metal pins inserted to lock them in the fuselage floor:
The four wheels are added, as well as the four-blade photo-etched prop for the wind-driven fuel pump:
The front fuselage part is added, and the small pulleys above and below the wing are painted, as well as the fuel and oil caps.
As you can see the model is sitting on its tail, as it appears in some photos. If you would like it to seat on its four wheels, there is plenty of space in the nose to add weight, but it will need quite a bit, and that landing gear is made of... well, plastic:
The Aeroclub prop is painted. It will be varnished, the Chauviere logos applied, and the boss painted:
The process of rigging commences. I am using lengths of ceramic fiber in general and stretchy fine EZ line for the elevon controls (since I do not sponsor by buying them similar products with nazi name and iconography allusions).
This task requires patience, needless to say.
At some point the model slid from my hand and banged on the table, breaking a couple things, that were repaired among sighs.
Steady...steady...:
Top-side now, starting with the stretchy bits that come from the fuselage sides:
Work goes on, little by little:
The model is now complete. A few images as a teaser, until tomorrow when I can do a proper photo session:
I just realized that I had these resin propellers made by Matías Hagen of Argentina (the creator of the "Boyero" resin kit used on the build that I recently posted) which could substitute with great benefit the kit's not so good effort:
To be continued...


Nice progress, I look forward to more.
ReplyDeleteThanks!
DeleteNicely done, congrats !!!
ReplyDeleteThanks, we'll see how it goes from now on...
Delete