

https://wingsofintent.blogspot.com/2021/09/laird-super-solution-racer-172nd-dekno.html
If it would be only the case of form following function, how to explain the superlative aesthetics of racers, machines designed under the strictest premises of utter practicality. Aesthetic inspiration has to be part of the equation too.
The Laird LC-DW-500 Super Solution is yet another example of a beautiful object with a clear purpose that admirably accomplished its function, validating once more the original Bauhaus statement alluded to at the beginning.
The LC-DW-500 "Super Solution" (NR12048) was an
evolution of the LC-DW-300 "Solution" (also sold by Dekno as a kit), a similar plane with a less powerful engine. It was
built in Chicago
in 1931 and modified several times during its life. Mods included the tail
feathers, interplane struts, engine/prop, landing gear, cockpit layout,
instrumentation, and various other things. Doolittle won the Bendix Trophy
and established a transcontinental speed record flying from Burbank
(Los Angeles) to Newark
(New Jersey). Another famous feat was a "three capitals flight", from Ottawa, Canada, landing at Washington DC and ending in Mexico City.
Interesting readings are "Laird Airplanes, a legacy of speed", by Edward H. Philips, and "The Golden Age of Air Racing" by Schmid and Weaver.
Here is a contemporary article by Aero Digest:


This is the second Dekno kit that I build, and the
impressions of the first (B.A. Eagle II) somehow echo here: a very appealing
subject, a fair general treatment, an engineering that does not get too much in the way of the build, a reasonable level of
detail, good instructions, sturdy box, small items protected with tabs and parts bagged separately, and two sets of vacuformed transparencies for those among us with
an unsteady hand and a proclivity to stress. At the same time, a few
nitpickings: some deformation of the main resin parts (easily corrected
with a bit of hot water and careful manipulation), rib detail perhaps a bit
overstated, some minor issues with a couple of surfaces, fuselage halves
that once united will need extra care at the seams, and most strangely an
involuntarily-induced (I speculate)- arrow angle of about 2 degrees on both
wings, whilst all plans (even the one in the instructions) and photos show very
straight leading edges. Another minor nitpicking is that whilst many parts have locating devices, the two horizontal tail halves are butt joints
that will need to be pinned. The blue resin has a slight waxy feeling to it, being kind of soft. As you can see below, some parts are molded in light blue resin, whilst others are provided as grey 3D prints. The fit of the blue parts leaves much to be desired, being vague, imprecise, and requiring adjustments, alignment and trimming if one is to obtain a neat seam. Putty and sanding will be a must (or at least was in my sample):
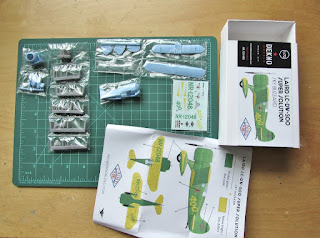
Box contents:


One rudder pedal came broken, the broken bit was not found in the pouch. It was repaired with a little bent thin wire (not that they will be really visible):


There seem to be some issues with the decals. Firstly, nowhere I could find in the instructions that these are "full carrier" decals, and that you must cut and carefully trim each subject before application. The top wing reg should be on the right upper wing panel, not on the left as shown in the instructions. The "two birds" image was not mirrored in the original plane as printed in the decals, both fuselage sides had the birds flying to their right -as in the image on the right in the decal sheet- (the old 1/32 Williams Bros kit got it right, the beaks always aim to the right, the flying replica plane also got it right). The decal sheet does not provide the Hamilton Standard prop logos, which I will get from my Arctic Decals prop logo sheet:

Problems with carbon monoxide on the previous "Solution" led to the installation of two small air intakes on the leading edge and pipes routed to the cockpit to provide fresh air (their exits being on the upper section of the inst. pan.). I had obliterated the kit's detail on them -as I had to tidy the leading edge from the casting block- and instead added two short lengths of very fine tube:

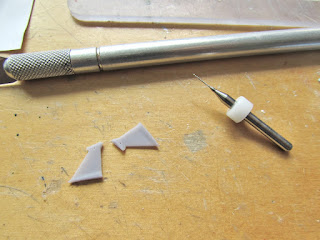
The kit offers a lunate shape for the headrest, but photos seem to show a more roundish shape:

So a new one is made:


The kit, as mentioned before, provides two sets of transparencies (may Styrene, the Greek Muse of Modeling, bless the manufacturers that do that). There are three parts to it, one spans the distance from wing to headrest above the cockpit, and two are inserts for the foldable side access "doors". I prepared the former, but I think I may use "window maker" for the latter, as it may prove a more practical approach:

First airbrushing session:

The fit of the interior pan wasn't good, and needed a lot of shaving to allow the fus. halves to close. Same goes for the lower wing: you have to work gradually shaving material to obtain a reasonable fit. And then quite a bit of putty and sanding at the seams. These are all operations we are used to, and are in minor or greater way part of modeling, but I hoped for a better fit and less deformation of the blue parts, given the price:

As explained before, the horizontal tail halves have no locating devices, thus they need metal pinning. Holes are drilled in the parts and the fuselage tail, taking care of alignment:

Tail feathers, landing gear legs and tailskid are glued to the fuselage, and a first coat of primer is airbrushed in order to spot blemishes. The little holes on the "I" wing struts became useful to hold them as paint is applied, since they are green, and not yellow like the wings:

I deliberated a bit before adding the wheel pants, as I am not sure if I will use the kit's decals or create masks for the yellow bands. I finally decided to add them, which I think is a good call. The female hollows on the pants needed enlarging for the legs to insert in properly. It is not easy to add the pants and get them aligned to fuselage and to each other. Beware the pants are sided, do a dry run to find out which goes where (the locating slot is angled). I used a somewhat thick cyano glue; hesitant modelers may like a smidgen of well-mixed epoxy to allow for corrections while it is setting:

Gloss white coat in preparation for the yellow:

Yellow is applied. This in turn will be masked to apply the green color:

As mentioned, instead of using the kit's decals for the pants, I made my own masks:

After masking the yellow, the green color is applied:

Masks off:

Some rigging, headrest in place:

The green enamel is drying very slowly, something I had experienced before a few times with this color, not sure why, as I use the same thinner, dilution and airbrush. Will have to wait perhaps a couple more days to proceed with the build.
There is a slight misplacement of another decal in the instructions, the number 400 under the lower wing. It should be moved inwards to align more or less with the strut:

The decal carrier is very thin, which is a good thing but requires careful handling and plenty of water to avoid folding-overs or tears (and thus the modeler's eyes tears). Once set and with a minimum of decal solution all is well. I added recessed nav. lights on upper wing and tail as seen in some plans. The plane would have needed them for its long-distance flights. In order to obtain a second flamingo image looking to the right (the kit has this image inaccurately mirrored), I had to make a copy of the decal sheet. My laser printer version is of course not white-backed, so it's a bit less vivid, but since it is on the other side of the model can't be compared. Better that than an inaccurate mark. I would advise modelers to cut out and play a bit with the "Dekno" logo also printed on the carrier, to get a sense of the behavior before dealing with the images you will need for the model:

The engine and cowl are on. Their fit again needs adjustment, as like with other parts; the cavities are smaller than they should be or the volumes inserting in them bigger than they should be:

I have added now the "doors" which had again to be sanded down a bit to improve their fit, and I am trying at the moment to glue the struts and upper wing. All these need to be adjusted in some way to fit properly. It's not very complicated, and within the scope of modeling endeavors, but had I hoped for a better fit from the start:

My first attempt with the vacuformed transparency didn't fit really well, so I used the spare (thanks for providing one!):


Cute little thing:

Resin tailskids are fragile, we all know that. Thi8s one looked a bit heftier than most, but I ended up braking it three times as I moved the model around. It would be better replaced with a metal one.
When the weather improves, I will be doing the photo session. Meanwhile, a teaser:

No comments:
Post a Comment