
.jpg)
Il mostro è qui
(The monster is here)
How to describe a Delta 2 kit...A kit belonging to the Modeling Horror genre? The Kit That Came From Outer Space? Is this a flying boat, as the hull(s) provide flotation, or a seaplane, as it has two "pontoons"? In any case, a plane apt for taking off and alighting in water, so maybe it came from The Black Lagoon, and its legendary monster is perhaps the pilot.
My dear friend and fellow modeler Sönke, object in many of my building accounts of equal doses of praise and (affectionate) scorn, sent long ago a kit of this...spawn of the industry. As it was partially build and not complete, I patiently lurked long in the darkest alleys of the Internet, until the opportunity arose to buy an untouched kit for a very reasonable price, that is, I was (almost) paid to take this away from the hands of the previous owner, now in a psychiatric asylum (Azkaban?).
Instead of explaining what is wrong with this kit, let's do the opposite, as it will take far less time: what is right with this kit? Answer: nothing. Almost.
On the other hand, Dora Wings relatively recently released a new S.55, but what did they do? of course, they released the military version, as if there is not enough murdering going around in the world, instead of the very many exceptionally beautiful civil variants (that are quite different from the military version). They half-redeemed themselves by releasing a famous Brazilian civil machine ("Yahú") using the same molds.
Tired of waiting for the (half-hinted) releases by Dora of other versions (that may be converted to civil machines) I bit the bullet and paid the stiff price of this kit (although the cheapest available online, saving quite a bit from the normal asking price). Needless to say, this modern kit is universes apart from the crude, abhorrent, ill-fitting Delta 2 vermin.
So an idea crossed my mind: could I combine parts of the two, to widen the horizon of civil possibilities? Will I end up ruining the two kits, or even unintentionally produce some hateful progeny? A Rosemary's Baby of kits? Or, against all odds and all hope- be successful?
Or could it be that this endeavor requires a less troublesome approach, building each kit to the extent of its own possibilities, one for the sake of nostalgia (and no small amount of self-flagellation) and the other hopefully as the harbinger of better civil things to come?
Food for thought.
Meanwhile, as with many of the items bought on evilbay, I realized, after careful scrutiny, that the clear plastic display stand was broken -and some splinters of it missing- hence hindering re-building it to putty and paint it over. A repair will be attempted nonetheless, or the beaching trolleys used instead.
The kit is misleading as it doesn't include all the decals needed to build I-BALB as per box art: no big regs, neither the big decorative motifs. One window was missing too (no biggie, as all the windows are unusable) and of course there is thick flash here and there.
.jpg)
After many hours of what is considered modeling hard labor, most of the parts are separated from the sprues and cleaned up. The sprue gates are thick, invasive, undefined, and located at inconvenient places. Removing them is a challenge, as it is sometimes hard to tell were they end and the part begins. No doubt some styrene packing, sanding and puttying will be in order to restore shape in some places:
.jpg)
.jpg)
.jpg)
Result of grinding and sanding:
.jpg)
.jpg)
.jpg)
According to this drawing, and in case of representing one of the planes that came to Chicago, the noses should have this:

And photos from the Net to illustrate the radio on the left pontoon:


From this site also other important information, regarding the colors of the planes:

Now, regarding choices. Any one of the participants of this Crociera del Decennale to Chicago, preferable a plane from a crew not so enthusiastic about fascism or the pathetic clown mussolini (lower case intentional, a la Julio Cortázar). Other alternatives are a Russian machine (modifying the kit extensively), but nowadays not very keen on Russian stuff (with apologies to the Russian people that doesn't support the clown putin). So far I have not discovered another civil plane that doesn't require deep mods of the kit, but I keep looking.
In order to add that interior I have to paint separately floor and upper hull and add detail, and then glue the parts together. First task is cleaning the base (note the marred plastic that rendered the sunk area on the other side):
.jpg)
The itsy-bitsy bits are separated from their sprue. "Crude" is a compliment. Some will be replaced:
.jpg)
.jpg)
.jpg)
.jpg)
.jpg)
.jpg)
.jpg)
The wind-driven generator will be replaced with a home-made item. Here some I made and discarded for other projects. A directional finder loop is scrounged from the spared bin, but also easy to make if necessary. P.E. parts will replace the control wheels. I may replace the yoke too:
.jpg)
Dealing with the ejector pin marks (parts belong to the beaching trolleys, but they are portrayed differently in some photos. The ones in the kit seem to be associated with earlier variants):
.jpg)
Stills from an online newsreel show many details, allowing to modify the kit and produce a more accurate model.
The nose hatches were not hinged, but removable and stored inside the pontoon:


The portholes on the center section need thinning too from inside, in order to later apply the window maker liquid:
.jpg)
.jpg)
Those unsightly holes on the wing are plugged. Later on proper location and size for the radio masts and accessories will be established and drilled with more finesse:
.jpg)
The trolleys in the kit are individual, for each hull, but photos (below) also show a single trolley that embraced both hulls and had extensions with cartwheels. I found one photo with the kit's trolleys, so I will use those:

I embarked on a longer journey, deciding to do away with the badly molded and ill-shaped hinges/control horns and their deformed receptacles, and packed them with styrene to be later sanded down to shape; new horns will be made at some point. Working also in providing the cockpit with some idea of structure and equipment (hardly to be seen once the model is completed). I also de-glued the spinners from their badly-shaped and not matching bases, and am trying a couple of things to make better props. You can also see the part for the engine front/radiators (two, upper and lower, serving both engines), pitiful poor thing, and a smaller similar part I made for another project and later discarded in favor of a better one. I will try to use a similar approach to achieve a better radiator:
.jpg)
.jpg)
.jpg)
As usual with this "leaves-much-to-be-desired" kits, it's one step forward, two backward, as you can't live what what is presented to you, and feel the need to improve things a little.
The spinners are reworked. The blades will be cut from the props and added:
.jpg)
.jpg)
.jpg)
.jpg)
.jpg)
The new home-made wind-driven generator is completed. The prop blade came from a can of soda:
.jpg)
I was curious about the "white" squadron of the Decennale flight, until I came across this image on the Net, which seems to indicate that the decoration and registration were painted white against the aluminum finish of the plane (note again the "extended" trolley that embraced both hulls):

Modelers should be wary of Internet drawings and those on publications -even prestigious ones- as I am finding among them some inaccuracies regarding marks, colors, etc., not to mention shapes.
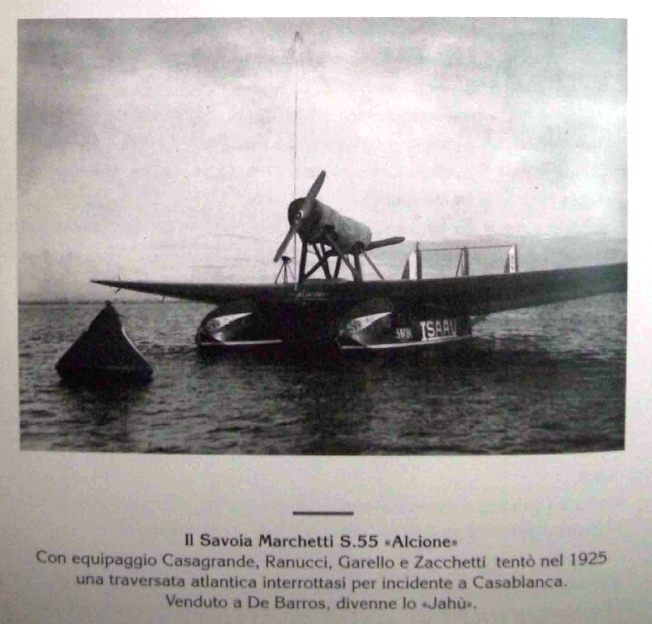
Since we did mention shapes: The Dora Wings kit also includes registrations for I-SAAV(besides I-BAUQ), but the former plane had hulls shaped differently...
(from the Net)

...with more volume and rounded at the hulls' nose, a bit like the Delta kit, whilst the Dora hulls are very different, so not sure why Dora included those marks there? Is someone coming up with a mod for the hulls (fingers crossed)?
Yet another tidbit for the Dora Wings kit: Jahú did not have that round tank amidst the engines, but seemed to have an earlier arrangement of a rectangular tank positioned lower.
This graphic is from the Net (Wikipedia I think), showing the serious nature of the challenge:

Many posters commemorated the flight. Also from the Net:


The kit has the wrong position for the elevator control horns. They should be where the arrows are:
.jpg)
.jpg)
.jpg)
One of the hulls is assembled, gluing the base took some convincing:
.jpg)
.jpg)
A note: the kit has many "domed" windows indicated to go on the center wing section. Actually, just two of them were domed, in front of the canopy, the others were common round windows. The domed ones were not really round as in the kit, but had a teardrop shape. They are small, so I will leave them alone.
The rudder pedals were made with a section of tube capped with a styrene disk, and a wire inserted later to be bent to shape:
.jpg)
.jpg)
Getting closer to being able to glue the upper sections of the center wing. Hulls are closed, some interior detail yet to be added. Trolleys ready:
.jpg)
This one will be continued in parallel with another big model that I put in the back burner more than a year ago, a Fairchild C-119 fire bomber:
.jpg)
Note to self: if planning to take a long break from a project, write on a piece of paper -to store with it- whatever the heck you were trying to do (I had prepared parts for several possible planes, but forgot which one I had decided to represent in the end):
https://wingsofintent.blogspot.com/2022/04/fairchild-c-119-steward-davis-jetpack.html
.jpg)
Aluminium airbrushed. The difference is more clear in the unmasked clamshell doors. If I feel like, I will mask some panels and try a few different hues:
.jpg)
The S.55 continues when possible:
The instrument panel and the domed transparencies are added:
.jpg)
.jpg)
.jpg)
The center section is glued (but the joint with the exterior panels is left alone for the moment, as the dihedral has to be pushed a bit up to close the gap, and this will be done later):
.jpg)
Now the external panels are pressed against the center section via a tape strip and glued, running thin cement in the seam. Contrary to the vast majority of builders/reviewers that I saw online, here I had only minimum fit issues and not prominent steps anywhere, and had only to push a bit with the vises to align the surfaces. Of course, I did my homework, checked repeatedly, and with scalpel and emery board made the parts fit the best I could, which paid off:
.jpg)
Now we have two of the four main elements (the other two being the hulls). The two structural members (aka "sticks") provided for the tail assemble are pitiful and inaccurate. They will replaced by airfoiled material: Again, the kit is undoubtedly poor, but working on the parts to improve their fit provides a more secure anchoring, and makes for a better experience -and less filler:
.jpg)
The recovered stand with a stone treatment:
.jpg)
.jpg)
The replacement struts are added to tail unit:
.jpg)
.jpg)
.jpg)
And now, for those of you that enjoy reading, here are some contemporary publications:


The hulls are glued, after some adjusting to get the best fit possible given the "circumstances". This approach reduces filling and sanding to a reasonable degree:
.jpg)
Getting closer:
.jpg)
I started now to build the one that my friend sent long time ago. As explained, several parts were glued that had to be pried apart, and there are several missing parts. This will be built out of the box, in a very simpler manner, no additions, so as to spare it the trash can. Here all the windows and portholes have been removed, and as with the model above, their seats thinned from inside. A few missing parts are being replaced by items from the spares bin. All the parts are separated from the sprues and cleaned up. Some sink holes are puttied and sanded, the props assembled. The engine (not in the photo) has already received a gloss black coat in preparation for the metal paint:
.jpg)
The sub-assemblies are joined. The fit again being vague and unhelpful. The task took a bit of fiddling. Now it's prepared for a first coat of primer. As it will surely be a lot to be refined, the canopy is not for the moment glued:
.jpg)
The primer as expected revealed some spots that need attention. The second S.55 is seen in the background:
.jpg)
The second model is also coming along:
.jpg)
Many modelers have found a solution regarding the building of the Delta 2 kit: Not to build it at all. But if you commit, you have to basically sculpt, chisel a model out of this kit: After doing so, your sanding muscles will grant you the admiration of others as you proudly walk in the next club meeting/convention/model show.
Ancillaries for both models are being readied in the interim:
.jpg)
.jpg)
The control horns on this plane were bigger than usual, and not covered on my aftermarket P.E. sheets, thus they are made folding aluminium from a soda can, cutting the horns and inserting a metal pin. Bear in mind that of their indicated positions in the kit are inaccurate, so look at photos to correctly situate them:
.jpg)
.jpg)
.jpg)
.jpg)
The two canopies are masked and added. A few more details will follow and then basic painting can begin:
.jpg)
This Delta kit deserves, without a shadow a doubt, a place of honor among the worst kits ever, with a special commendation for the most horrible and inaccurate fit:
.jpg)
Both models are airbrushed in gloss black as a base for the dull aluminium color. Perhaps some motifs that are painted in black on the plane will be masked to avoid creating decals for them.
As mentioned the kit is a let down as it lacks all the decals needed even for one version. What a fiasco of a kit:
.jpg)
One of the models has the black section of its floats masked, and aluminium color is applied. Photos show a dull hue. This will be the model that will have red decorations (belonging to one of the 4 groups composed of six planes each). For the second model, that will have black decoration, masks hopefully can be created, as the painted areas are large and not very practical for decals:
.jpg)
.jpg)
To be continued...
Este dinosaurio me encanta, siempre leo cualquier actualuzacion que posteas por aqui, esperando a verlo terminado.
ReplyDeleteSaludos.
Yo estoy con mi primera conversion de algo civil un Martin Mariner de los cargeros que operaba Pam Am para la Us navy usando el viejo kit de revell.
Estos son trabajos muy duros, los dejo de lado de vez en cuando. Suerte con la conversión!
Delete