Styrene

Styrene

Thursday, July 5, 2012

1/72 Airfix Bristol F2B converted to Tourer/Coupe


 (the completed model is here:
What does one do when in England? yes, one buys an old Airfix kit.
How old? look at the photos, 1957 vintage! a mold 55 years old to this date.
Man those Airfix -and successive re-incarnations- squeezed the pennies out of that mold.
What I want to do with it? you betcha. Convert it to a civil machine, likely some variation of the Bristol Tourer/Coupe.
History: At some point after the war it was realized that transporting people was much, much nicer than bombing then. This very painfully-obtained knowledge was not, however, kept in mind for a long time. The Bristol Tourer/Coupe was a direct derivative of the Bristol F2B. In that regard, many countries, like Japan, France and Germany were doing the same: hastily converting war leftovers for the incipient civil market, many times with the procedure of producing a “hunch” to protect the weary passengers against the elements.
I may refer you to two of my models:
-Hawa F.3 (in this very blog, and old post):

 -Hansa Brandenburg W.29 J-BCAL:
You could model a civil machine without modifying a single part of the Bristol Airfix kit, though. There were a couple of Canadian machines (G-CYBC / DP and at least one Spanish that flew the plane as it is represented in the kit (minus armament, of course).
Beware, since some of the other civil versions had different engines, cowls, radiators, rudder, passengers’ compartment covers, supplementary fuel tanks on the top wing, and minor details. Look at your photos, not even at drawings: photos.
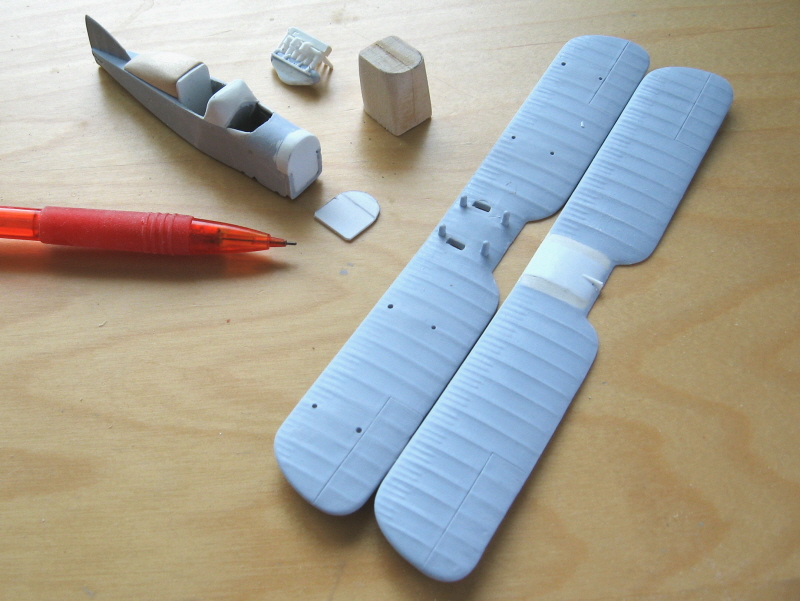
Since I was looking more and more at some G-AUD_ civil versions I did some preliminary chopping, cleaning, filing, filling and sanding as per images. All the stitching was eliminated at this point, later to be replaced by other devices.
You can see in the building photos that some areas have been removed and the section corresponding to the passenger cabin altered to represent the increase in fuselage width that was incorporated in the real plane in order to accommodate the side-by-side seating arrangement. Not all Coupes/Tourers had this increase in width; again, check your photos. Some formers were cut, and the usual interior paraphernalia prepared for the cockpit and passenger cabin. Some external elements (augment rudder, different nose, hunch, top wing tanks, etc.) had to be scratched too.
As you can see in the images the major work was concentrated in two areas: the passenger cabin elements and the nose. The former is a complex area that need careful observation of the photos and accurate execution. Of special note is the transition from the former back of the pilot (which has a sort or triangular shape at the top) to the first passenger cabin former, which is quadrangular with round corners at the top, and leans forward.
The second area of effort as said was the nose. A wood master was prepared in order to vacuform the cowling. Engine, radiator and ancillary parts (like the oil tank) were scratched. The engine alone insumed about fifty individual parts. Again, attention needs to be paid to the sections’ transition, from firewall to radiator. At the firewall the top is rounded and the bottom straight, and that reverses at the radiator’s cross section.
Home-made decals were prepared: a bundle of “stitches’ strips” and black regs on white decal paper stock. More details related to the upper wing, control surfaces, ancillary parts, etc. were made; paint ensued with a home-made custom color of all sub-assemblies.


The fuselage bottom was cut out to allow for the curvature of this section

More chopping and some assembling, including a new, larger rudder adopted by some of the G-AUD_ versions

 The modified top wing with a dry run of the added tanks


Monday, May 21, 2012

Monocoupe 90A

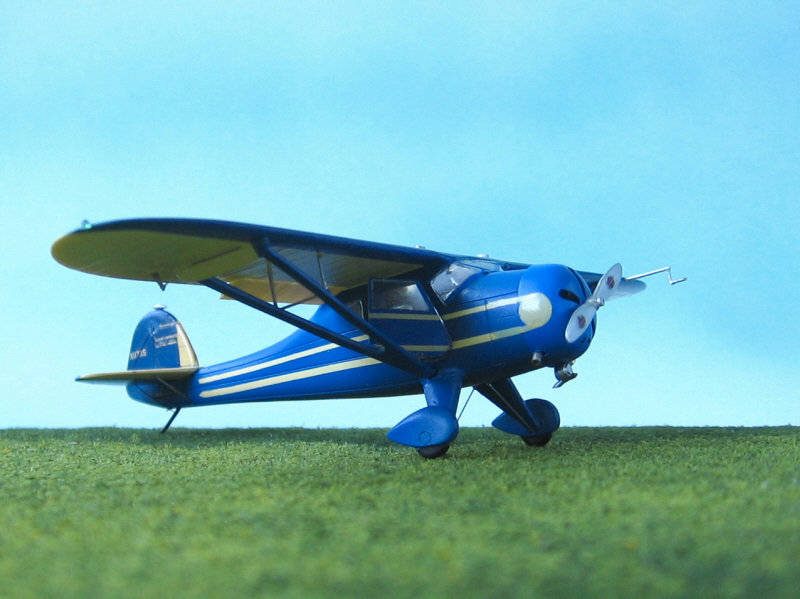
1/72 Planet Models resin Monocoupe 90

More and more kit manufacturers venture into the realm of civil planes, not only commercial jets, but private planes, planes from the golden age of aviation, planes from the pioneer period, racers, passenger planes form the 20’s, et cetera.
Finally our longing for something that does not mean glorifying killing is answered. Plainly said: the intentionality behind a bomber plane is not the same as the one behind a touring plane or a record plane, a racer, and so forth. Finally we can build a model airplane with our kids and tell them about adventures, challenges and glamour, and not about cracking the heads open of fellow human beings.
Praised be Planet Models for the launching of several of these beauties (including the Focke Wulf A-16 passenger plane, the Havilland DH85 Leopard Moth, the Bugatti 100P, the Hughes H-1 racer –the last three in 1/48-) and may it ease the karma of their previous subject choices, mostly Nazi stuff.
I am not naive; I know that war sells more than peace, which, alone, says a lot of whom -as a species- we are. But evolution and awareness may be even reaching our war machine-plagued modeling universe. Granted, Planet covered their behinds (marketing-wise) with a version that caters for the Spanish Civil war, but at least it allows us to build a civil model out of it too!.
There is another resin kit out there of the same subject, released by LF Models.
As I was saying, thanks, Planet Models! Now, that said...yes, some little issues.
The kit has a clean and sharp molding, almost no pinholes, easily-removable casting blocks, no warps or partially-molded parts whatsoever. Great so far. Nevertheless, you have to cut open the roof window on both fuselage sides. Well, no big deal (it seemed), although why, why, we rhetorically scream? So out with the JLC saw that Steve gifted us a few years ago. Two across-the-fuselage cuts went well, but you can’t saw the line that goes parallel to the fuselage, so I started carefully to score it with a new Xacto. Several times. And then, very, very carefully tried to pry it loose. To no avail. More scoring, no results. You can’t exert too much pressure, because the fuselage side may break at the weak window dividers, and we don’t want that, precious. More and more scoring and then the section came off cleanly. What was hindering the cut was that the fuselage sides are thick enough to get in the way of the cutting line, so later on you have to carve it from inside too. Planet, what the...?. Then it is the nose, just a solid block. Granted, with some recesses depicting the cutouts in the front, but no engine. Hum. I know some modelers would be grateful for that (one less step towards completion, pal!) but that’s not my case. I like my engines there, even if not much of them is visible. Wheel streamlined pants again are fused solid with their wheels. I know, it’s a small model, and it facilitates building, but surely not detail painting.
Nothing of this is insurmountable, and I rather deal with that instead of with pinholes, resin blobs, sticky parts or dubious shapes.
Be careful with the smaller parts (joysticks, Pitot, etc) as you cut them loose from the backing web. Wash all parts to eliminate mold-release residue (again, watch-out for the small bits) and sand to refine the parts using a mask. Toxic resin dust is no joke.
The vacuformed transparent bits come in a small sheet. They are crisply molded, but their transparency leaves a lot to be desired. In the photo you can see how it looks, and, by the way, that’s after washing and drying it. What looks like droplets or humidity or release agent or oil, are actually blemishes, solidly transferred on the sheet. In that sheet you will find two parts not accounted for in the instructions. They are doors, I assume in case you want to file open the ones delineated in the fuselage and pose the model to show, to better effect, the excellent interior provided. The instructions are good. They depict a few parts, with their measures, that you have to get or make yourself. All easy to deal with. The decals, which I didn’t plan to use, are from Propagteam, usually of a good standard as previous experiences with them indicate.
And so it began, by vacuforming a new cowl to replace the resin solid one and making a vague resemblance of an engine to put inside it. Since almost nothing can be seen through the cowl slots, no more is needed.

One of the doors was removed and the fuselage sides reduced in thickness from inside. Even so, the interior assembly, as it is almost invariably the case with resin kits, had to be sanded down in order for it to fit. The instructions -again in the tradition of most resin kits- are vague, to say the least, regarding where to position certain parts, in this case the instrument panel which should be closer to the pilot and not in the area at which the instructions generally aim, therefore leaving a gap where the coaming should be. Oi, again, Planet.

The fuselage was finally closed, the tail feathers added (not before drilling the holes for the ulterior rigging) and the landing gear glued at this point. Wings were given pins and matching holes drilled on the fuselage stub wings. And here another question: since the Mono has 0 dihedral and a one piece wing that seats atop the fuselage, wouldn’t have been more effective to engineer the kit likewise? This and other questions may have asked the Sphinx to Oedipus...
As you can see in the accompanying images aileron horns (not provided) were installed, then the model was primed, checked for blemishes, re-touched, primed again, sanded smooth and airbrushed with the lighter color of the scheme. Decals meanwhile were printed. The scratched door and minor parts were prepped  too. The windshield was separated from the clear vacuformed sheet, and to my surprise it was a good fit.
All the other clear bits were home-made.
Masking and painting ensued, decals and details, and this little bumble-bee was ready for departure to its destination at Glen Ellyn airstrip.


Friday, May 18, 2012

Mix Hummer of 1924

It's a fly!...no, it's a louse!...no, it's the education budget!..no, it's the Mix Hummer of 1924!
A 24 hours-long project.
Teeny Tiny, tinnier than my previously made Caproni-Pensutti:

 or my Gurney Grice Mosquito:

 or my Pou-du-Ciel:

the build was enticed by Tom Polapink of Skyways, who sent a link to the Aerofiles file on this one.
Here a link to the built version (there were at least two):


"Dear..I shrunk the Budget"