
http://wingsofintent.blogspot.com/2017/06/hawker-hart-racer-completed-arctic.html
There is no better function for a plane than a peaceful one. And so, like with the Hawker Hurricane I recently built:
http://wingsofintent.blogspot.com/2016/11/hawker-hurricane-racer-completed.html
I gave this other Hawker a better destiny. This Hart, as all harts, loved to race.
The opportunity came in
the form of a set of high-quality decals produced by Mika Jernfors of Arctic
Decals.
The Hawker Hart from Amodel is typical of their range:
reasonably-priced, lots of parts, good detail in their masters, but in general a somewhat indifferent molding creating a bit flash and occasionally dubious fit, forcing you to a thorough cleanup session before starting. But you will get a good model if
you do your homework. I have built a number of Amodel kits, showing that ultimately
it's a fair deal, as long as you spend some time to get the parts sharp and clean and refine them up for a good fit.
Small grumbling aside, you will need of course to de-militarize
your Hart. A whole sprue of bombs and similar crap will go the scratchbuilding
recycling department to become something better. Then a few external features
will have to be modified.
There are photos on the Net showing this racer with and
without a faired cover for the aft position, so it's up to you. Surely it
didn't race with a guy on the back of the pilot, though, so I'll be
scratching a cover.
Arctic Decals set and the Amodel kit (there are other 1/72 kits of the Hart, by Airfix, Aeroclub and Kora, and the latter has also resin sets for it):
Arctic Decals set and the Amodel kit (there are other 1/72 kits of the Hart, by Airfix, Aeroclub and Kora, and the latter has also resin sets for it):


Parts off the sprue. A large number of them won't be needed. As with all Amodel and similar kits, the sprue cutter will not be used much, due to the density and thickness of the sprue attachments. Parts have to be carefully excised with an Xacto or similar.
Discard all boinga-boinga parts in the interior, plus camera, radio, etc. A certain amount of cleaning will be needed to prepare the parts for construction. Many items are a multi-part affair (like the radiator):
 The hard points under the wings for the discarded boinga-boinga stuff should not be erased, they can be seen in photos of the racer:
 These details should be filled-up/deleted:
 The aft position appears in photos more often than not faired-over on the racer:
 You need the center section with one tank, discard the other:
 This boinga-boinga-related furrow should also be filled:
 There were no wing nav. lights on the racer, delete them:
 I can't see the handles on the racer photos, they should perhaps be filled-up:
 A little assembly begins with the pilot's position:
 Filling commences, first on the nose:
 Then the little window:
 Then the area with the wind-driven generator is masked:
 Putty is applied
 Like in similarly produced kits, there are many butt-joints here. You may have to provide your own locating devices:
 The detail on the parts is nice, credible, and extensive:


 The upper wing parts are glued together. The dihedral is 0.
(By the way, nowhere in the instructions does Amodel show the dihedral of upper and lower wings, or any rigging, which I think is quite a let down on their part. Dihedral on the lower wing: wing tips should raise about 5mm each from the horizontal):
 Since I am tempted to add a RR Kestrel aftermarket engine from Engine & Things, I am taking provisions; a firewall is made and installed. The instrument panel is glued to the cockpit cover. Some boinga-boinga-related detail has been erased from the fuselage inside. A part of the fuselage floor has been glued to one half:
 The engine could look good with a side panel removed:
 Since I am cutting a part of the nose to allow a partial view of the engine, I glued a little reinforcement to the firewall to better hold the floor of the nose:
 The side panel on the nose is cut away:
 The top nose cover will be in place once the fuselage sides are glued together. This will create a non-disruptive view of the engine, which will have to be further detailed with some bearers and plumbing:
 Color is applied to the interior:
 Details in the interior are painted, the seat is given its harnesses and the fuselage halves united.
The cockpit pan has poor anchoring points on the fuselage sides. The fit of this type of kit is always a bit imprecise and vague, and requires from the modeler some fiddling, but nothing to cause concern. If you have built a short-run kit before, this is no different. The parts brake-down, perhaps driven by the need of squeezing more versions (just an assumption on my part), makes it kind of awkward.
The way the prop and its retainer are engineering is very poor, and a throw back to decades ago. Why are there so many parts for the fuselage and not a three-part bushing/insert for the prop sub-assembly is one of those kit mysteries:
 The cover for the cockpits goes over:

 You will have to fiddle a bit:
 A styrene piece is shaped to act as the cover seen in photos.
But:
You can spare yourself the grief and depict the plane as appears on taxi flights, with the aft cockpit open and a passenger. Your choice:
 The opening is occluded with a styrene disk:
 And the pre-shaped cover goes over, to be refined in situ. Looking at photos of the original, you will see that the ring will still protrude on the sides:
 The engine is given a black base. The opening gets some tubular structure:
 The top cover dry-fit:
 Encouraging view of the parts:
 The opening for the radiator is too big. I glued a strip of styrene to reduce it:
 Now the fit is good:
 The engine is glued in place:
 The panel on top of the engine was thinned-down from inside and glued in place.
The lower wings are glued in place. Mine, as they were, incorrectly angled back a bit, so I had to true the root, for the panels to be perpendicular to the fuselage, which meant to un-glue and re-glue them (fortunately the glue was still fresh when I checked:
 The vertical stabilizer is added. The gap was present in the real plane:
 A coat of primer goes on to reveal blemishes:

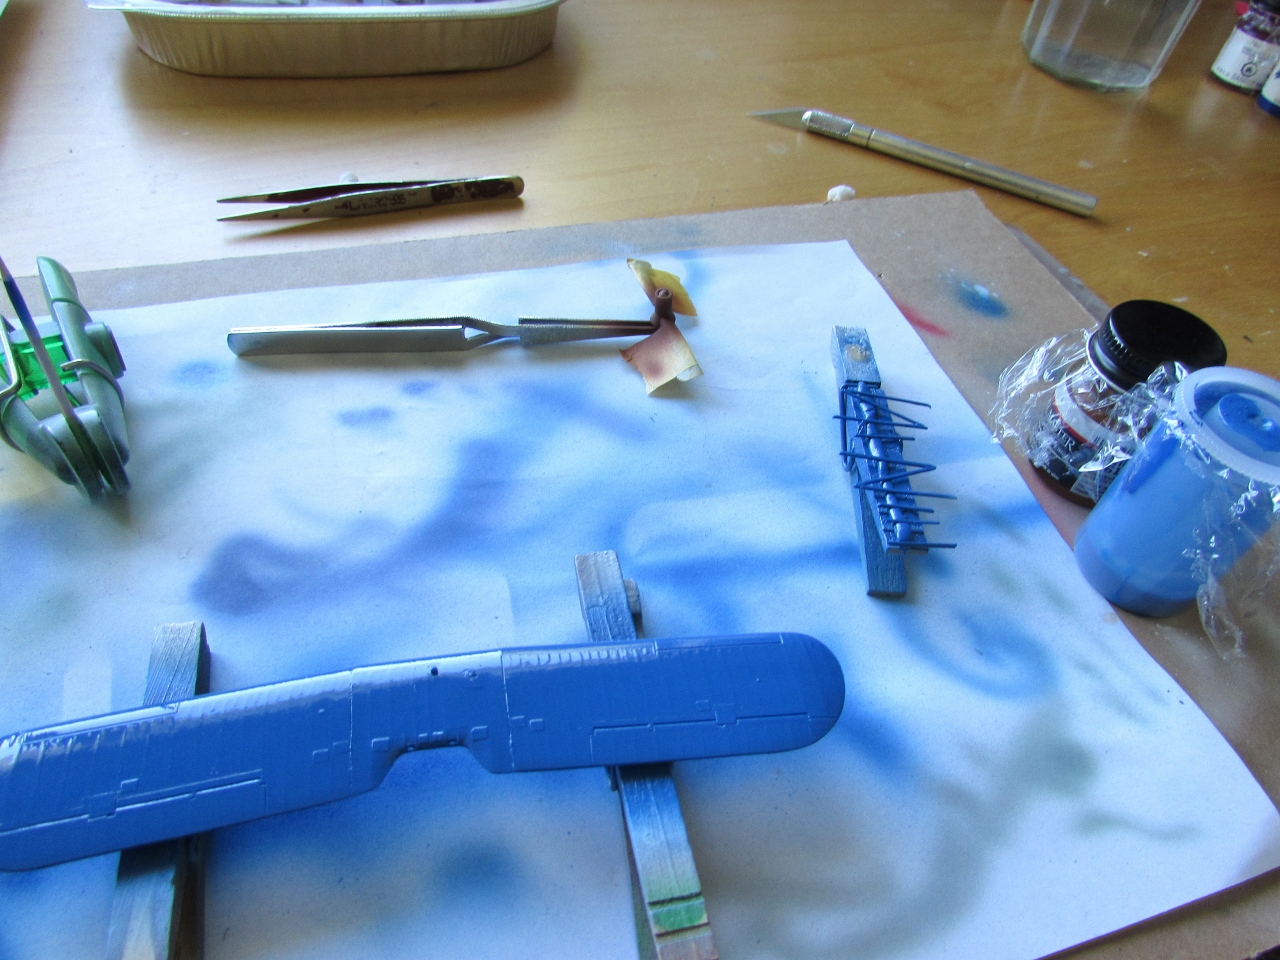
 The propeller needs five colors: the hub is dark brown, the blades are grey, the tips are yellow, and the tip of the spinner is metal, plus there was a metal guard on the blades' leading edge. Here the yellow and metal colors are applied, later to be masked to proceed. The nose panel is used to try the Hawker Blue mix, which I achieved previously for the Hurricane racer, but it's a matter of getting the mix right, since it's by eye. The top wing upper side was also primed at this stage, once the bottom side dried:
 The yellow tips are masked with tape, the metal cone is masked with a tube and Uhu tack:
 The wheels come as separated hub and tires. The hubs needed to be re-drilled for the axle, since they were kind of filled-up in the molds. The fit of those parts is not good, the hubs will need sanding to fit inside the tires. THis, that I assume was done to facilitate painting, could have been accomplished with a circular mask:
 Parts waiting for the painting session in diverse colors:
 Landing gear and stirrup glued in place:
 The tires are painted:
 The masked prop is painted in a sort of linen color, in turn to be masked to apply the hub dark brown color. The Hawker blue color is applied to the rest of the parts:

 The other side of the parts is painted. The prop receives the hub color:
 Prop is unmasked. The only step remaining is the addition of the metal guards on the blades' leading edge:
 Water radiator and oil cooler in place. Notice that the oil cooler is not straight, but skewed. The wheel hubs have been inserted into the tires :
 The N struts are glued in place, checking their angles with the top wing. These struts are to scale (thin) and will not take too much load kindly. Be careful. The adaptation of the aftermarket engine and removed side panel is not visible:
 The Arctic Decals subjects are individually cut, trimmed, and applied. As usual the quality is superb:
 Wire control linkages are glued in place for the ailerons. The cross wires are glued to the landing gear. The top wing is cemented in place. The Venturi probe is glued too. Small slits are made into the decals with a very new and very sharp razor blade, to allow the decal to settle on the hard points on the wing:
 Then the center smaller struts and the wheels are glued:
 The tail has two sets of rigging wires, those are measured, cut and applied, made from very thin wire:

Discard all boinga-boinga parts in the interior, plus camera, radio, etc. A certain amount of cleaning will be needed to prepare the parts for construction. Many items are a multi-part affair (like the radiator):


(By the way, nowhere in the instructions does Amodel show the dihedral of upper and lower wings, or any rigging, which I think is quite a let down on their part. Dihedral on the lower wing: wing tips should raise about 5mm each from the horizontal):


The cockpit pan has poor anchoring points on the fuselage sides. The fit of this type of kit is always a bit imprecise and vague, and requires from the modeler some fiddling, but nothing to cause concern. If you have built a short-run kit before, this is no different. The parts brake-down, perhaps driven by the need of squeezing more versions (just an assumption on my part), makes it kind of awkward.
The way the prop and its retainer are engineering is very poor, and a throw back to decades ago. Why are there so many parts for the fuselage and not a three-part bushing/insert for the prop sub-assembly is one of those kit mysteries:


But:
You can spare yourself the grief and depict the plane as appears on taxi flights, with the aft cockpit open and a passenger. Your choice:


The lower wings are glued in place. Mine, as they were, incorrectly angled back a bit, so I had to true the root, for the panels to be perpendicular to the fuselage, which meant to un-glue and re-glue them (fortunately the glue was still fresh when I checked:


The kit as said omitted rigging and bracing detail. Looking at photos I installed the wing rigging, all control cables for the mobile surfaces, and supporting braces for the radiator.
Verrrrry verrry nice choice - I have already ordered the decals from Mika!
ReplyDeleteNice lines indeed.
Delete