
http://wingsofintent.blogspot.com/2015/04/savoia-marcehtti-s79-corsa-completed.html)
And so it begins:
Having at hand -as said in the previous posting- the
invaluable reference of Paolo Miana's book "Lost Archives: A Pictorial
History of SIAI - Chapter 1: Sorci Verdi",
http://wingsofintent.blogspot.com/2014/09/paolo-mianas-lost-archives-pictorial.html
I started to gather some things to evaluate for this endeavor.
http://wingsofintent.blogspot.com/2014/09/paolo-mianas-lost-archives-pictorial.html
I started to gather some things to evaluate for this endeavor.
First in the list was the Pavla conversion for the Corsa, of
which images are posted bellow. Then Maese Soenke Schulz of Marzipanland kindly
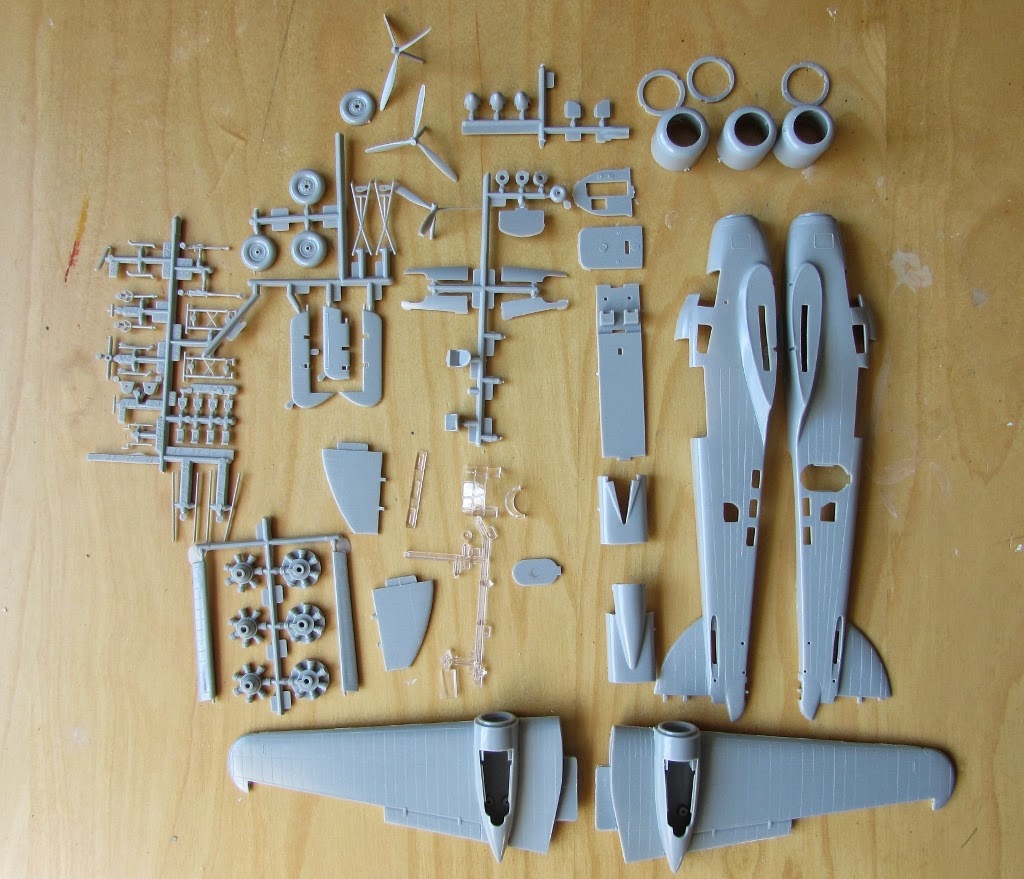
sent a venerable Airfix SM.79 kit. I
also ordered the new-er Italeri kit of the SM.79. Of course the latter is a much
modern kit with more detail and overall perhaps a better option, and it is in this Italeri kit
that I based a previous scratch conversion to the Ala Littoria passenger plane.
Nevertheless, perhaps the Airfix kit may have a place in this adventure, who
knows, so I posted bellow photos of the content of that kit too.
Pavla's conversion set. Resin parts, decals, vacuum-formed canopies and instructions. The resin parts have minor issues, the decals have important problems, very hard to correct easily: the fascia are not convincing, especially in the ax blade; the white trim lines should be silver, the "teardrop" Savoia logo is too flattened. On top of that in the instructions the view from underneath the fuselage shows an incorrect truncated end of the design, it should end in a "V". You are on your own to paint the green color on the fuselage, no masks are provided whatsoever in spite that the (wrong) white trim is provided. At this point you start to really question the bucks you paid for the Pavla conversion set:


We will be discussing some of it as we go:

The Italeri kit is next. The decals are unsurprisingly far better, although irrelevant for this conversion:
 As said the parts are more detailed and refined, perhaps a notch too much regarding surface "effects":
 Transparencies:
 The rest of the parts:
 The real work begins. Guided by Paolo Miana's excellent book and illustrations, and after careful consideration, the modifications are started by eliminating the small part that follows the shape of the hunchback...
 ...and then a major cut to separate the front and aft fuselages that is first marked...
 ...and then executed:
 The Corsa
(racer) version had a slightly longer fuselage as it was a modification
of the original plane. This is overlooked by all conversions that have
been so far obtained either from the Airfix or Italeri kits. It is only
about 4mm in 1/72nd scale, so it does not render all models made so far inaccurate and
obsolete necessarily, but it is good to know:
The Corsa
(racer) version had a slightly longer fuselage as it was a modification
of the original plane. This is overlooked by all conversions that have
been so far obtained either from the Airfix or Italeri kits. It is only
about 4mm in 1/72nd scale, so it does not render all models made so far inaccurate and
obsolete necessarily, but it is good to know:
 The addition of parts to fill the gap ensues:
 Some reinforcements are put in place, as well as the transparencies and door, all to be hidden and leveled with the external surface of the fuselage:
 A dry fit of the fore and aft fuselage parts, some subtle adjustments and careful matching are going to be needed, all eventually done on top of the side view to preserve alignment:
 Some sub-assemblies are dealt with:
 The kit's runway (top) and Pavla's. Why are we paying for something that was already in the kit? well, the first divider/bulkhead -roundish on top- (after the pilots' seats) that comes with kit is not used in the racer so its locating holes are not present in Pavla's rendition (which is correct), but is not at any rate difficult to blank them in the kit's part...:
 ...especially when Pavla's part is 2mm wider than it should at the back end. The second kit's bulkhead -flat on top- (with the "organ pipes") should be used, as it separated the fuel tanks from the cabin :

 Kit's (left) and Pavla's inst. panel. Slightly different, but not a huge improvement. The kit's is not good, because it depicts the bomber version, Pavla's depicts the racer, but not very accurately either. Same for the seats, slightly better (they have belts and some extra detail, and better shape) but kind of rough and lacking sharpness, have seen far better resins:
 The new access door provided by Pavla's upgrade. The fuselage has to be cut to use it:


 The wing underside and the fuselage sides are -as explained before- being blanked and corrected with putty. Here is the first stage, just filling the basic differences in height. A second layer will be applied to subdue the kit's exaggerated stringer relieve on the fuselage:
 Another piece of the kit's first bulkhead is cut off and added to the right fuselage side. The funny thing is that technicians seemed to relocate the units in the same way in the original Corsa. The locating holes of the deleted bulkhead are blanked. The aft bulkhead is already glued in place:
 The right fus. side has a hole for the wind-driven generator, unnecessary in this version, so it is plugged with stretched styrene:
 The excess will be cut off with a Xuron later on when dry:
 I opted out of Pavla's aft floor replacement, and tailored a new part from sheet styrene. I believe this will be easier to glue and sand. Besides, the detail on that resin part is never going to be seen, since that part of the plane was inaccessible due to bulkheads and fuel tanks. You can see Pavla's clear part (one of two, the other a spare) being prepared and loosely tested. The flight engineer seat is now in place:
 The tail wheel must be painted and glued before the fuselage halves are closed. The interior won't be seen as the Corsa had that area closed. The tailwheel assembly is quite detailed in the kit, and the real plane had some some access panels -like airbrakes- that the modeler can cut open if wished (they are marked on the fuselage sides):
 The aft fuselage parts are glued:

 The fuselage front parts are prepared:
 The fuselage front is closed, using the aft bulkhead as an alignment tool. Immediately after and with the glue not totally set, the sub-assembly is glued to the wing (which in turn has been prepared by gluing the wheel wells and then the external wing sections. Now wing+front fuselage are self-aligned:

 The aft fuselage section is presented, the fit is good, you can see the normal gap that appears as the kit's fuselage has been stretched:
 Again, fortunately, good fit and alignment thanks to some thinking and to careful preparations:
 May be I will use one of the kit's part (with that styrene addendum) to further extend the aft fuselage, therefore using less of the vacuformed "extended canopy" that comes in the Pavla conversion:
 Sub-assemblies are joined:

Replacement for the floor, this time accurate in planform:
Some components are airbrushed before their assembly:


You can (I will) angle the blades to "rotate" in the proper direction, but you will have wash-in at the tips (that is for you unwashed the tip will be at a higher angle of incidence than, let's say, the section mid-blade, whilst it should be the opposite). Sturm und Drang, Darn and Drat, Pavla!
So I turned to the kit's prop blades...and guess what: they are flawed in exactly the same way, and the Pavla set seems to have just copied them.
Oi!
Here the props are already assembled, the engines were given a coat of satin black prior to dry-brushing:


Comparison with the Airfix kit in the same stage:
.jpg)


The decals with the swirl pattern to simulate the polishing effect are applied on the cowls:


No comments:
Post a Comment