
http://wingsofintent.blogspot.com/2017/06/kp-172nd-avia-bh-11-boska-completed.html
Who could resist building this coochee-coochee?
Sturdy, well-produced box:

I remember building a couple of KP kits very long ago, but
this is a new game altogether!.
This little cute fella appears to be a super nice kit, and
comes with well-printed instructions in full color on good quality paper.
Bagged separately are two windshields of very good clarity, and a decal sheet
for multiple subjects that looks like very well printed.
The molds are well detailed, the breakdown of parts appears logical,
all looks crisp and nice!
Good for KP! (Kovozávody Prostějov) on many accounts: a
civil offer, a beautiful plane, many decorations, a well-produced kit, and a fair price.
I bought my kit mail-ordering it from West Coast Hobby's in Port Alberni, BC,
Canada, their
service is superb.
I started to gather information on this wonderful little touring plane years ago, so I was elated when I saw that finally KP have made a nice kit of it.
You can download for free an old NACA report here:
https://digital.library.unt.edu/ark:/67531/metadc279438/m2/1/high_res_d/19930090616.pdf
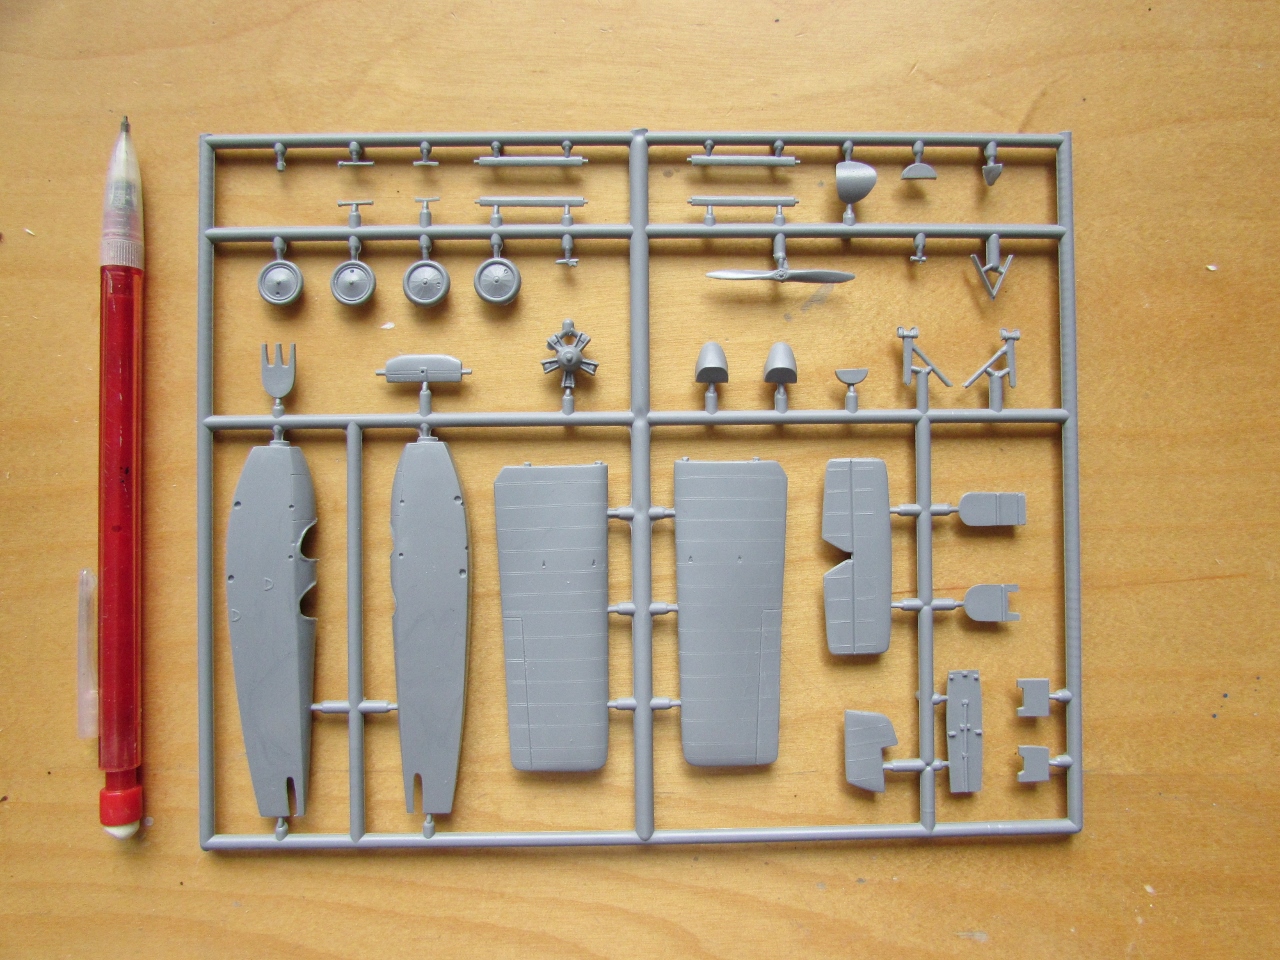
Contents of the box
I started to gather information on this wonderful little touring plane years ago, so I was elated when I saw that finally KP have made a nice kit of it.
You can download for free an old NACA report here:
https://digital.library.unt.edu/ark:/67531/metadc279438/m2/1/high_res_d/19930090616.pdf
Contents of the box


Nice moldings, clean sprue, exciting subject:


Parts are separated from the sprue easily and cleaned up. A few smaller parts are left in a section of sprue:
 The cockpit interior in progress. It is made of a nice number of parts.

Just a note: seat parts #1 and #2 are reversed in the instructions. It's clear if you compare their width to the back support where they should be glued:


The parts as said have nice detail:
 The control lead exits are drilled on the fuselage sides, and a metal control horn is inserted in the rudder, as per photos of the original:
 The elevators are lightly scored and deflected downwards:
 A laminated wood prop is carved and given a photoetched boss. The kit's prop is very good too, it is just that I saw in some photos laminated props and I liked it:
 Wood color is applied to the corresponding parts:
 Some details are added. I opted not to use the kit's seat belts, which were decals:
 My interior, like seemingly all interiors in the modeling universe, had to be trimmed down a bit for it to fit. This is done better before assembly or painting, and not, as I did, once all is painted and detailed:
 The instrument case that goes on the exterior close to the fore cockpit is discarded in favor of a home-made one:
 A sink hole on the headrest is filled and sanded flush:
 A small metal piece seen in photos on top of the headrest is made of a photoetched part:
 The kit's engine is fair, but not particularly detailed. Some additions are made, first the ignition ring:
 And a carburetor with its two intakes is fashioned:
 The fuselage halves are united:
 The engine received the carb:
 The kit's prop is painted (even if I made another one, just for the sake of the review):
 The fuselage seams are treated with Mr. Surfacer:
 Sanded flush carefully:
 The Avia paraphernalia:
 Some variants had a more conventional headrest fairing, so one is made from a section of sprue:
 It looks like this:
 Parts are primed, the engine is painted in a metal hue:
 The engine of the kit as said above is simple and ok, but doesn't have much detail and it's not particularly accurate. Above I added the carb and the ignition ring. I now drilled holes on the cylinder sides to insert exhausts made of solder:

 I also added the intake tubes on the back of the cylinders:
 I little wash and now we have a better engine, looking closer to the real thing:
 The overall color is applied:
 The wings and horizontal tail are painted in aluminium dope color:
 Arctic Decals circular masks (they come in an assortment of sizes) are used for the wheels:

 Masks are made and applied (four for the wings and stab each, two for the rudder, two for the fuselage, etc.) and the next color is airbrushed:
 Masks removed:
 Very small circles for the wheels' centers are punched out of the matching-color sprayed decal sheet:
 They are pierced in the middle to allow the axle of the wheel to go
trough, and cut on the side to allow for the conical shape of the hub:
They are pierced in the middle to allow the axle of the wheel to go
trough, and cut on the side to allow for the conical shape of the hub:
 Very near now, tail in place, next airbrushing an acrylic coat for the upcoming decals; wings and struts will follow, some control cables and then decaling and the remaining bits, like engine, windscreens, prop, gas cap, etc.:
 The scratchbuilt BH Exp. companion that I am making in parallel is almost ready too. The family resemblance is undeniable:
 Wheels on, rudder cables on:
 And now, before proceeding further, some nitpicking:
photos found on the Net show that the same plane had two different windshield configurations, one type with the "Speedwell" advertising and another without it. If you decorate the kit as it comes, as "Speedwell", then the windshields were small and had only a metal strip at their bases. The non-speedwell livery has somewhat bigger screens, and they have all-around metal strips. You can assert that it is the same plane, because in the Registers there is only one BH-11 attached to that particular aeroclub: Zapadocesky Aeroklub/Plzen, OK-AZG. So the unavoidable conclusion is that this plane had a slight change of livery and windscreens during its life. Furthermore, one photo shows that at that some point the wing-fuselage union was smoothed with a curved transition:

 One more change needed is the small Avia logo, which has in the kit most likely the wrong colors. Apparently the bird wasn't yellow, but blue.
The final assembly of wings to fuselage while inserting the struts, proved to be very fiddly. To start with, the wing prongs do not fit snugly or positively into their fuselage sockets. The struts' locations on wings and fuselage all needed to be drilled more. This assembly was uncomfortable, the fit was poor, and the process ended up messing a paint finish that was quite decent. Several tries and fixes were needed.
I would definitely provide the wing-fuselage joint with a more positive locking solution in my next build of this kit. I do like this little kit a lot, but a couple things need attention. In spite of that, I just bought another I plan to do as the Swiss version (that has dubious color calls on the instructions, I think it was all red):


photos found on the Net show that the same plane had two different windshield configurations, one type with the "Speedwell" advertising and another without it. If you decorate the kit as it comes, as "Speedwell", then the windshields were small and had only a metal strip at their bases. The non-speedwell livery has somewhat bigger screens, and they have all-around metal strips. You can assert that it is the same plane, because in the Registers there is only one BH-11 attached to that particular aeroclub: Zapadocesky Aeroklub/Plzen, OK-AZG. So the unavoidable conclusion is that this plane had a slight change of livery and windscreens during its life. Furthermore, one photo shows that at that some point the wing-fuselage union was smoothed with a curved transition:

The non-speedwell decor also has the club logo on the rudder. This logo (Number 17 in the instructions) is not actually printed on them, but strangely enough, the carrier is, all by itself, with no image). On the other hand, the instructions show no "Speedwell" on the right side fuselage, but include both sides as decals (they were on both sides, as photos show). Furthermore: the box illustration shows no leading edge color, but the drawings do (as it should be):

The final assembly of wings to fuselage while inserting the struts, proved to be very fiddly. To start with, the wing prongs do not fit snugly or positively into their fuselage sockets. The struts' locations on wings and fuselage all needed to be drilled more. This assembly was uncomfortable, the fit was poor, and the process ended up messing a paint finish that was quite decent. Several tries and fixes were needed.
I would definitely provide the wing-fuselage joint with a more positive locking solution in my next build of this kit. I do like this little kit a lot, but a couple things need attention. In spite of that, I just bought another I plan to do as the Swiss version (that has dubious color calls on the instructions, I think it was all red):

Decal application begins. They are very good and very thin (which is wonderful), the usual Czech standards. Plenty of water, no fuzzing and fiddling, patience and care are the way to a successful result. Do not fold them, or you will have some entertainment:
 I decided to separate the individual letters to eliminate most of the carrier, but the decals are good and I don't think they will show any carrier:
 You may remember that I had discarded the kit's external instrument part and had made another. Here its face dial is being applied from the kit's decals:
 Retrospectively, it would have been much, much wiser and practical to apply the decals before gluing the wings and struts on:
 This decal folding issue was a constant nagging problem during application. No matter what I did, many of them folded, taking a lot of time to fix, or not be fixed at all, as it happened with two of them:
 To the external instrument the tachometer tripe is attached:
 New, smaller windscreens are made and attached. Since the Avia logo on the decal sheet has inaccurate colors, I repainted the bird blue:


Very good looking set of moldings there- and it looks like the spares box gets a few goodies as well. very nice- which one are you doing?
ReplyDeleteNot sure yet, all are attractive in some way, and there are yet other liveries that could be done making your own decals.
DeleteWill decide after going through the references and evaluate masking complexity and such.
The Gobiet's cousins!! Love the low-winged fly-abouts...vg
ReplyDeleteOh, Vance, the Freely Flieger!
ReplyDeleteAren't they cute as newly-born little chicks?