

(This is the construction article, for the completed model please go here:
https://wingsofintent.blogspot.com/2019/12/focke-wulf-19a-ente-modified-planet.html
In a very welcome turn from its usual choices, some years ago Planet Models released a number of civil kits. I have built (and they are in this blog) their delightful Monocoupe and Focke Wulf A16.
https://wingsofintent.blogspot.com/2019/12/focke-wulf-19a-ente-modified-planet.html
In a very welcome turn from its usual choices, some years ago Planet Models released a number of civil kits. I have built (and they are in this blog) their delightful Monocoupe and Focke Wulf A16.
I have also acquired their Lockheed Air Express, their passenger-carrying
Messerschmitt M.20b-2 and their Focke Wulf F.19 "Ente" (Duck, or "canard"
-French in turn for duck- as the configuration is mostly known), the type that
occupies our attention today.

It makes me smile that many modelers and aviation
enthusiasts find the Ente and similar planes "weird", when the truth
is that the canard formula was prevalent at the beginnings of aviation, and
even today is used with some frequency (Rutan's designs, Saab Viggen, JAS 39
Grippen, XB70 Valkyrie, Dassault Rafale, among many others).
For years I have been gathering reference material on the
F.W. Ente, feeling attracted to its unusual, yet elegant lines.
There were two Entes, 19 and 19a. In the earlier 19 the support
that holds the fore plane was slim and completely faired. In the 19a that support
changed into a complex multi-member exposed cabane structure. The 19a had added
downward-pointing vertical "fins" on the main wing. They had different
propellers and engines (Siemens SH11 the 19 and SH 14 in the 19a), as well as
changes in color in the metal surfaces and in the marks applied.
The 19 flew in 1927, eventually killing its pilot, non other
than Georg Wulf, one of the founders of the firm.
The 19a flew in 1930.
You may find of interest this downloadable NACA pdfs on the
type:
19:
19a:
And here is a link to a newsreel, courtesy of Getty Images,
showing the -predictably- so called "tail first" aircraft:
An excellent reference in the very interesting and
well-informed German ADL site (in German, unfortunately):
There is such an abundance of readily available reference
material and photos on the Net that ignorance while building this kit is
inexcusable.
Kits in 1/72 have been previously released by Lüdemann
(resin) and Airmodel (Vac+resin).
I have not seen them first hand, so I can't comment on their
particularities.
A number of modelers feel certain reluctance to build resin
kits, being that because of the general lack of locking devices, the annoying
pouring blocks and casting webs many parts come with or in, the toxicity of the
dust produced during sanding, the fact that there is little or no adjustment
time if using CA glue, their dislike of the alternative (for certain parts):
epoxy, or just because their price tends to be high due to different
fabrication processes (that is more of the manual type).
I have built a large number of them, as well as vacs, so to
me they are, in a way, the same.
As there are differences between injected plastic kits,
there are also differences between resin kits. Some are despicable blobs full
of blemishes and air bubbles, bent parts and dubious shapes, and some are exquisitely
mastered and cast.
Personally, I find Planet Models kits somewhere in the
middle-upper range. They are not subtle or have delicate detail, they feel -and are- chunky and heavy, but they can
render a nice replica with a bit of care.
Planet Models' Ente is not a new kit, I believe it was
released about 2005, so it has certain things that will need correction, if you
are the type that takes pleasure in provide some fair degree of accuracy to
your models.
The kit has been reviewed in the Flugzeuge-Modell Journal
(3/2007) where the reviewer points out to a few areas that need care, and
builds a magnificent model, but, as usual, read everything, but trust only
photos of the original.
Material is provided for you to cut your own clear parts:


The first thing I do before starting to build a model is
checking the kit against references.
I don't do that in the spirit of trying to find faults or
defects, which I find rather mean, petty, and quite sad, but in the spirit of
finding the truth, of discovery, for the pleasure of research, and the joy of
encountering things that have been not spotted yet, and, if applicable, use
them to make the model more accurate.
In this case, again to my joy, I have found so far three
things:
a) There was a legend ("Focke-Wulf") painted on
the belly of the plane at some point
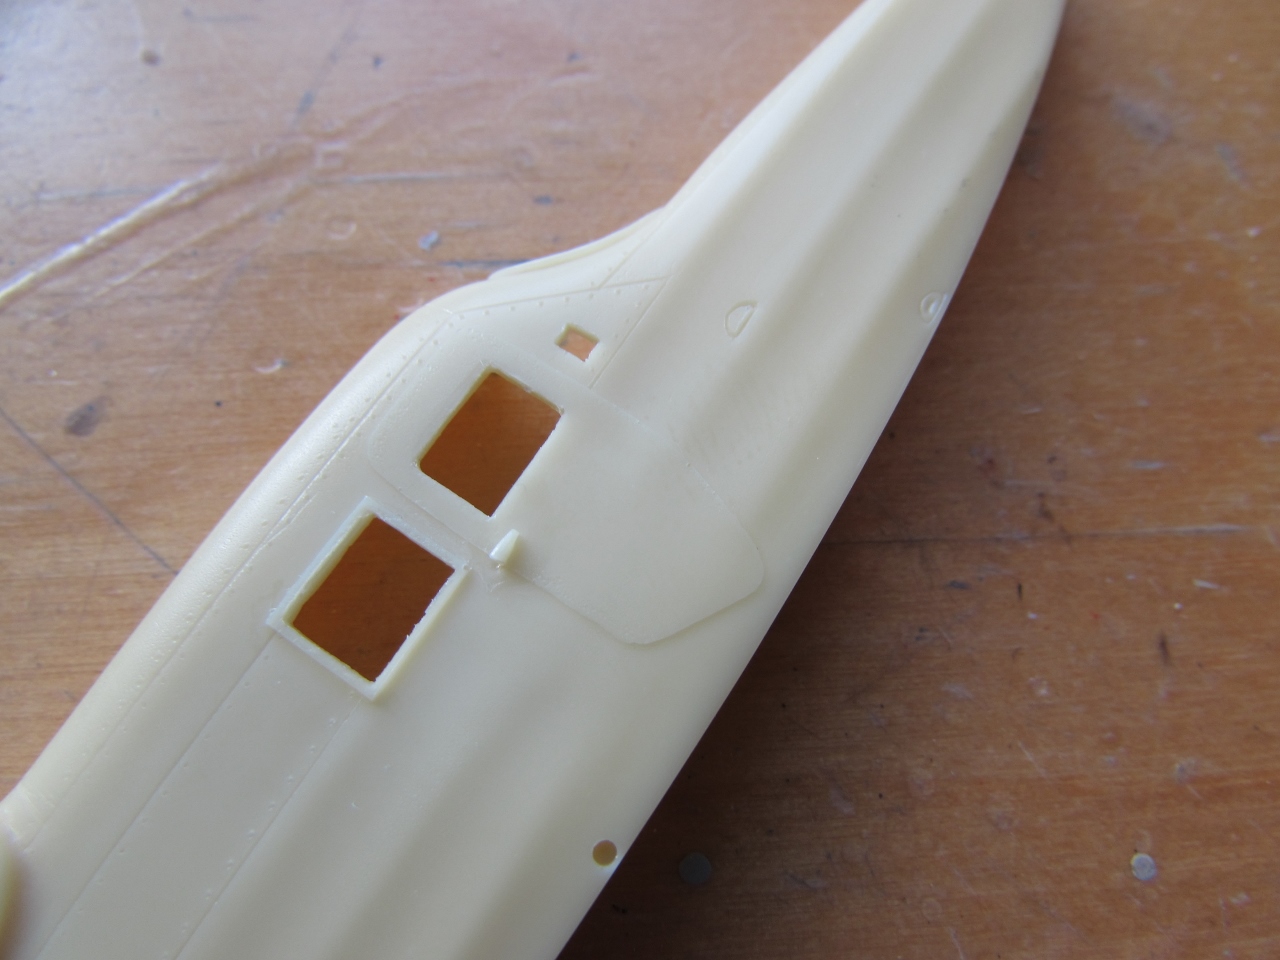
b) The nose wheel well was not the shape described in all
3-views and the kit, but a rather nice complex shape that allowed the wheel to
transit its arch (its movement was linked to the rudder)
c) All renditions that I have seen so far of the details on
the fore wing were not really accurate.
The kit's wheel well box and a drawing of how it should be. The wheel was braced by two forks, not one as in the kit:


The "Focke-Wulf" legend on the belly, that I have never seen described or added to plans anywhere:

The detail on the foreplane:

A thorough wash with mild detergent and lukewarm water. In the past I learned that resin kits have a persistent mold-release agent:


Then glued together and in turn glued to the rudder, where they can be later blended-in much comfortably:

Helping the manufacturers:
Many times, for whatever reasons, manufacturers can't get
all the details, and occasionally make some mistakes.
They can't do everything for us, so we are left with the
task of doing some checking and refining.
Many of us are just content (and nothing is wrong with that)
with building the kit as it comes and just enjoy the assembly. Others like to
go a bit deeper and enjoy research and adding a thing or two.
Do as you please, and have fun, whichever way is your way.
I personally enjoy finding details and correcting things a
bit, when and where it seems appropriate (and fun).
-The wheel caps had two small holes (the kit's wheels have
none)
-The kit is missing what looks like little vertical fairings
covering instruments (mirrors?) for the pilot to see, ahead of the pilot and to
the sides of the windshield
-There were louvers on the engine fairings, absent on the
kit
-The very small clear areas ahead of the pax windows could
use some little enlargement
-There are no indications on the kit for the wing tip nav
lights, seen in photos
-The kit has as surface detail in the fuselage properly
scaled pane lines and small rivets.
But, if it is correct that the areas depicted were aluminium
panels, rivets can be seen in photos only on the nose tip and on the
metal-covered areas behind the engines. Other areas, even in good photos, don't
show any rivet detail that I can see (but may be it was there). So do not
exaggerate that detail! do not apply black washes! subtle is good!
-Apparently there are no photos of the cabin interior, but
it is known that it followed the one on the Focke-Wulf A16 (as did the wings),
that is: three passenger wicker seats in a limousine configuration, i.e.: one
with its back to the front bulkhead leaving room for access through the door,
and two side-to-side in the back, facing forward.
-Planet states black for the fuel tanks, I doubt that. More
likely a dark metal color.
-A Venturi can be seen in photos under the left wing,
between the engine and the vane
-Planet located the fuel caps on the exterior of the wing
fuel tanks, but they are on the interior side (see photo)
-Planet missed the metal panels on the wings above the
engines, which have noticeable access round holes (see photo)
-The exit of the rudder cables is asymmetric (see photo)


My only nitpicking is that the wings could perhaps use a bit more washout, which was pronounced on the Ente.
I struggled to decide if opening the door or not, but at the end sanity prevailed...and I opened the door:

In the case of the left fuselage that small window was entirely misplaced. The pencil mark shows where it should be:


HOUSTON, WE HAVE A PROBLEM...
Planet has the windows not aligned, being the right-side fuselage ones too far ahead:


So, what do we do now....
Both sides are actually a bit displaced, but it's easier to fix the left fuselage side:


The instrument panel is a sort of half-circle, but the area it goes in is oblong:


The vertical stabilizer is ready for priming after the minor surgery:


After making the new nose wheel well box the fuselage can be glued together:


I realized now why the wings have those little inaccuracies!
Remember I wrote that the Ente used the Focke Wulf A16 wings?
Well, so did Planet Models. Thus the wrong position of the fuel tanks filling caps, and the absence of the metal sheeting on the wings in the engine areas.
I mean, good for you if you can recycle a master and make another kit, we all benefit, and we can get a beautiful Ente (wish it had the right windows alignment, though), but may be it would have been wise to spend 10 minutes in the computer looking at photos of the real thing online, and another 30 minutes re-scribing the details, right?
Nothing that can't be corrected in a very short session, though.
Still....
But whilst I out the inaccuracies of the kit, I should as well praise the good things, and it just happened that I looked closely at the seat and it has the detail of a wicker molded in rather nicely, considering the medium and the scale.
By the way, do not be mislead by models on the Net that have two chord/length black bands; photos and newsreels of the real thing show that there was no such bands, only the fuel tanks in that dark hue (not black either).Remember I wrote that the Ente used the Focke Wulf A16 wings?
Well, so did Planet Models. Thus the wrong position of the fuel tanks filling caps, and the absence of the metal sheeting on the wings in the engine areas.
I mean, good for you if you can recycle a master and make another kit, we all benefit, and we can get a beautiful Ente (wish it had the right windows alignment, though), but may be it would have been wise to spend 10 minutes in the computer looking at photos of the real thing online, and another 30 minutes re-scribing the details, right?
Nothing that can't be corrected in a very short session, though.
Still....
But whilst I out the inaccuracies of the kit, I should as well praise the good things, and it just happened that I looked closely at the seat and it has the detail of a wicker molded in rather nicely, considering the medium and the scale.
Once again the sign of someone sleeping at the wheel at Planet Models.
You need six registrations: one for each fuselage side, one under each wing (right and left) and one over each wing (idem).
The hyphen is missing for the tail lettering, and according to the cited kit build in Jet & Prop, the decal are anyway the wrong size.

For the covered engine (the shield is provided) you will need to fabricate a very convoluted exhaust arrangement, not provided or even described in the kit:

The fuselage halves are glued together. The fit is good enough, but not perfect, so a modicum of putty/filler will be needed:

Here that part was added, and the fuselage prepared for the not so amusing puttying/sanding/priming/repeat session:

If I would have to give a single piece of advise to modelers seeking an accurate model, it would be: "Look at photos, as many as you can". Because plans, 3views, drawings, etc. are very welcome and important, but are seldom accurate. I have a few plans/3views of the Ente, and all, invariably, either miss or misconstrue details. Again, I highly value and am grateful for them, but it is wise to go the extra mile and compare them with photos.
Planet helped with the location of some of the rigging items, but missed those related to the extra wing fins (and rudder leads):


The elevators are added to the fore plane, not an easy task, so my hat goes off to those that have done it before:


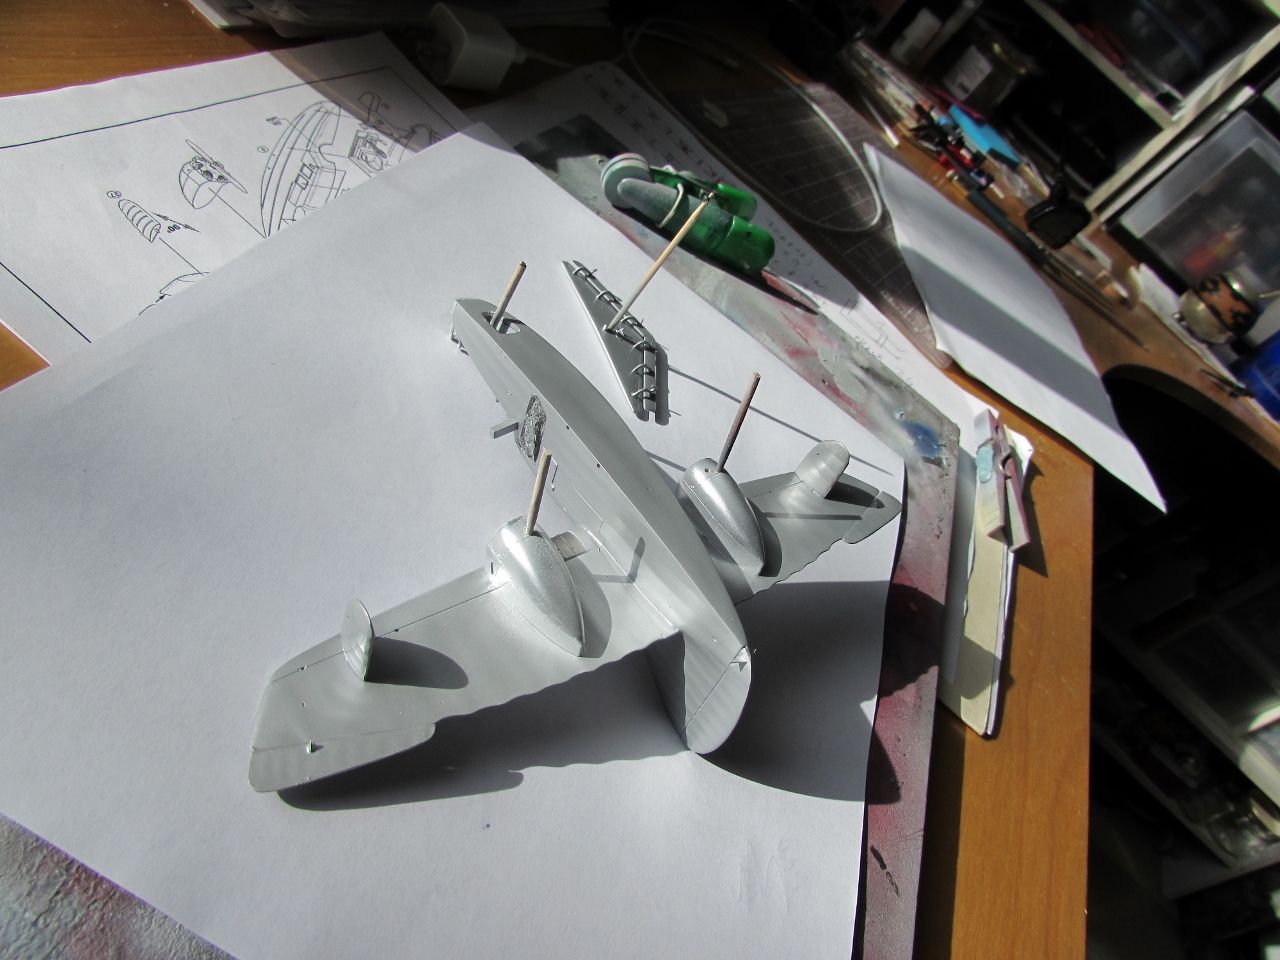

I just added the landing gear. Even knowing that the kit is iffy regarding precision -to say the least-, I didn't check the positions already marked in the fuselage and engine gondolas for the various elements and ended up with something that only vaguely resembles reality. The "V" that attaches to the fuselage should be about 5mm back (if you pay any attention to photos, which the designer did not, apparently) and the "V" is also short in span, making the oleo legs lean-in. So the whole geometry is off, something you realize after painfully gluing everything with superglue (it's resin).
Why, thanks once more, Planet. Yank everything off? nah, will break the parts, mar the finish and force to come up with even more creative expletives.
I mean, as modelers, we know that most kits will need some help here and there to render the model we desire, but to check and modify almost every part is asking a bit too much.
Sigh....


Now we wait for the decals.
The decals arrived!
They are gorgeous! Even the prop logos are included. Now completion of the model can proceed!

Unbeknownst to some modelers (and all manufacturers) there was a lettering present on the belly, associated with the decals presented in kits:


When conditions are right, I will do the usual photo session and post the results as a completed model thread:

To be continued....
Definitely different, some nice touces already, I look forward to more.
ReplyDelete;-)
Delete