

(This is the building article, the completed model is posted here:
https://wingsofintent.blogspot.com/2021/05/friedrichshafen-ff49c-seaplane-civil.html
Hear ye, hear ye, modelers! Abandon a life of reprehensible modeling sloth! Regain your uselessly spent energy while tempering mind and body! Why build despicable kits that fit with no effort, debilitating spirit, muscles, brain and will? Why just put measly, perfectly formed parts together, with the only help of glue, avoiding the joys of a good challenge, and remaining deaf to the call of the wild modeling nature? Wake up, modelers, to a true modeling life!
After many years of cracking their respective skulls, sink their economies, and lose a hefty percentage of their citizens, leaving orphans and widows galore, the WWI belligerent countries apparently came to the unexpected conclusion that perhaps using planes as passenger, mail and goods transports was somehow a better idea. Go figure! Thus, many planes were converted to civil use, with greater or lesser success, many times by the simple expedient of slapping a cabin atop the fuselage to give some protection for the no doubt very impressed, but perhaps a bit startled passengers. I have done and posted here quite a few of them, as there is no better use for a weapon than to be at the service of peace, preferably not killing anyone in the process of performing said service. I had acquired yet another vintage 1/72nd vacuformed kit, this time the Sierra Models Friedrichshafen F.F.49c seaplane. It's in line with standard offerings in the same media, also providing a few well-cast white metal parts, but no strut material, no decals and an interior that even a Spartan would call Spartan.
There are, surprisingly, several options for a civil machine, and I found without much trouble many images on the Net, amongst them:
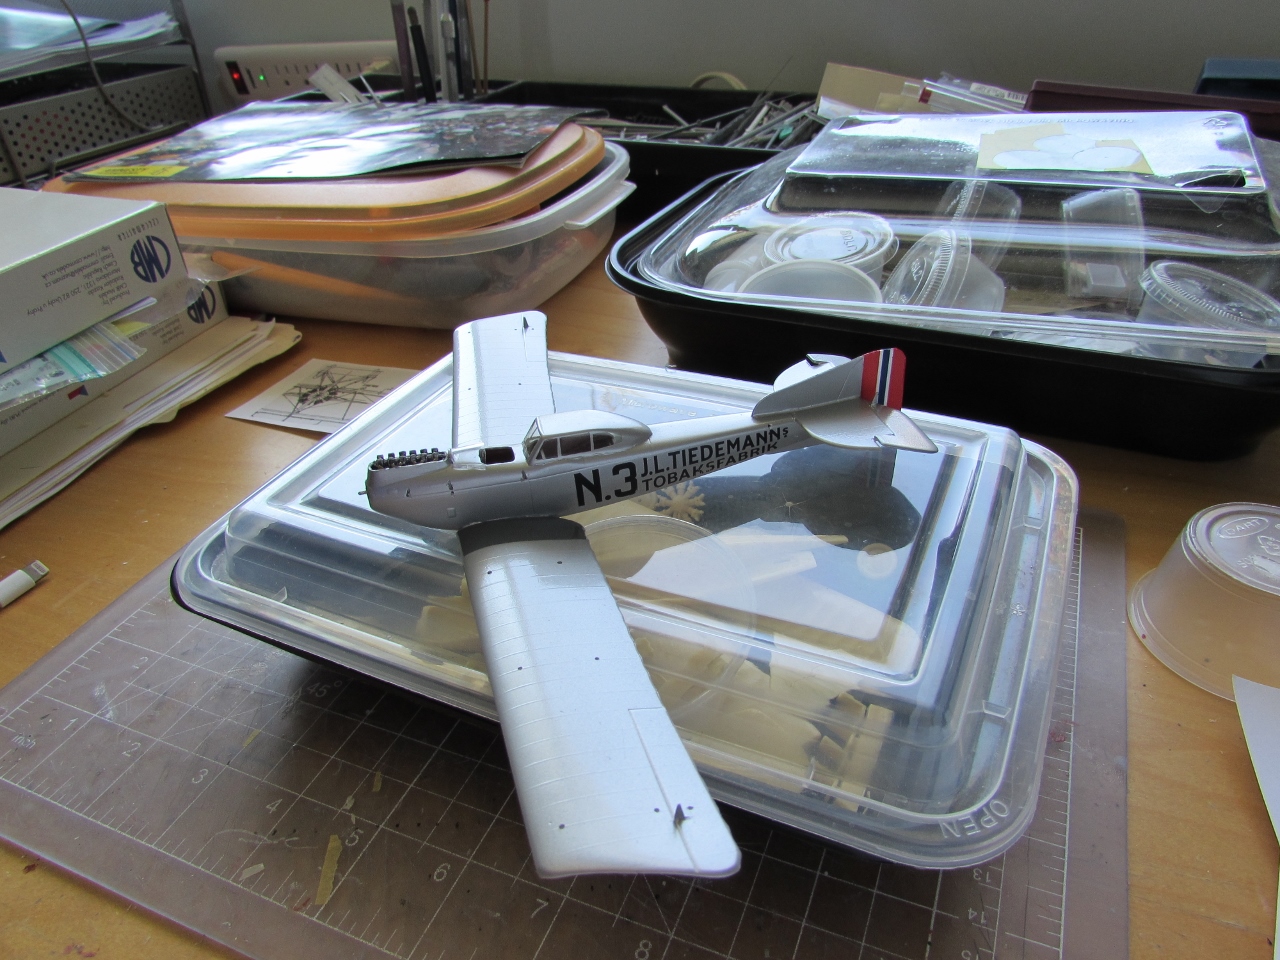
- Tiedemann's N3 (apparently D-222 F.F.49, Jan. 1920) (I have already built another Tidemann's seaplane, a civil conversion of a Hansa W.33:
https://wingsofintent.blogspot.com/2018/08/hansa-w33-civil-tiedemann-flying.html
- T-DABA
- DLR W7
And according to the Air History registers:
D-41 Friedrichshafen FF.49 DLR
D-42 Friedrichshafen FF.49
D-43 Friedrichshafen FF.49
D-44 Friedrichshafen FF.49 DLR Berlin
D-45 Friedrichshafen FF.49 DLR >Deutscher Aero Lloyd , Crashed
D-49 Friedrichshafen FF.49 1365 Deutscher Aero Lloyd >Severa, Canc 11.33
D-71 Friedrichshafen FF.49 v1
D-85 Friedrichshafen FF.49 1368 Lloyd L.V. Sablatnig >Aero Sport Warnemunde >DVS
D-86 Friedrichshafen FF.49 223 Lloyd L.V. Sablatnig >DVS, Destroyed 8.28
D-114 Friedrichshafen FF.49 Sablatnig
D-115 Friedrichshafen FF.49 Sablatnig
D-132 LFG V.1 'Max' Used by Luft-Fahrzeug-Gesellschaft Stralsund as air taxi Rebuilt Friedrichshafen FF 49
D-133 LFG V.2 'Moritz' Used by Luft-Fahrzeug-Gesellschaft Stralsund as air taxi Rebuilt Friedrichshafen FF 49
D-134 LFG V.4 'Witwe Bolte' Used by Luft-Fahrzeug-Gesellschaft Stralsund as air taxi Rebuilt Friedrichshafen FF 49
D-146 Friedrichshafen FF.49 DLR/Berlin >DVS, Canc 07.28
D-377 Friedrichshafen FF.49 DLR (W8) Canc 28.01.20
D-380 Friedrichshafen FF.49 DLR To Denmark 4.20
D-381 Friedrichshafen FF.49 D-381 DLR To Denmark 4.20
With so much to choose from, of course what is available as original photos should be considered, not to mention the task of discerning the colors of the chosen potential subjects.
Now, to the molds:


I must confess that I find buying the kits the easiest part of the hobby, whilst building them is to me the most difficult part.
The usual steps pertaining to vac building are performed; first using a permanent black marker to delineate the outline of the parts, then scoring them a few times with successive careful passes of a new blade, then gently bending back and forth until the parts pop out of the backing sheet:


The unnecessary volumes are cut off:


I have followed similar procedures with many other models, here are four, the Hawa Hannover, the Hansa Brandenburg W.29, the LVG C.VI "kabine" and the Rumpler 5A2 Limousine:


He or she who takes upon the noble path of body and character-building modeling, shall know that sanding is consider one of the bravest deeds.
There are three known enemies of sanding, as follows:
1) Sanding itself
2) Not sanding enough
3) Sanding too much
Sanding, properly performed, will turn those flabby Tamigawa arms into Victorian 10-ton steam presses, when you go to those IPMS modeling shows (possible in 20 years from now given the current covid restrictions), your fellow modelers will stand in awe! Parade in admiration! You will no longer be the weakling being pushed out from the line at the pasties stall, or being scorned at the Pub for asking for a glass of lukewarm mineral water. No sir! You now, thanks to the never enough extolled benefits from Extreme Modeling, will be respected! You will crack those nuts at the Xmas table by just pinching them between two fingers, thanks to the wonders of the Marvels of Sanding!

Sanding proceeds, with the help of powerful aids, in this case the rotary tool used to remove the bridged plastic from the wingitp:


The trailing edges MUST be thinned, gradually and cautiously:

The scalloping is restored:


Some parts have been already glued together, and a few ancillaries readied. The passenger seats will be later adapted to the chosen final layout and modified accordingly:

Here are some of candidates:


Photos show that at least some of the civil planes had a different cutout on the lower wing, marked here with pencil until I determine the specific plane to be modeled:


Because of the nature of the molding process no detail is imprinted on one side of the parts, thus the aileron outlines have to be engraved on that "blind" side, being the wings just one surface, and not upper and lower parts as usual. The position for the aileron connector struts are marked at this stage, and metal control horns added:


The fuselage halves are taped together to be able to work on the pilot and cabin openings. I am going for a 3-pax version, of which seem to be more adaptations than for the 5-pax:


The kit's interior goes through its dry-run trails:


You may call a kit "optimistic" when you are given this....

...to do this:

A bit of primer and base colors are applied:

Starting to dress-up things a little working with oils adding detail:

The interior is almost there:


Of the several different different early engine exhausts I found of the spares bin, guess which one precisely fits this engine and this plane? You guessed: none. So one is fabricated:


The area that covers the cylinders needs thinning its walls from inside, as the plastic is too thick here:


Base colors are airbrushed. The floats will later be given the oil treatment to better simulate wood:

Slowly working with the oils to resemble wood surface:

Painting of the kit's engine (a little jewel, by the way) will allow me to glue it to the fuselage and proceed to join the halves. Pity just the very top will only be seen of it:


After the addition of tabs along the edges of the fuselage sides to increase gluing surface and support, the halves are glued together:

The work on the seams begins:

In many years I have tried many methods of affixing the lower wing to biplanes, today I am trying this. From the center of the lower wing material is carefully removed to leave two "spars", whilst their positions are carved in the floor. The wing is inserted, adjusting checking for alignment. Once in place styrene sticks are used to fill the gap:


Starting with the fabrication of the canopy:


A vac copy is made:


A coat of primer has been applied to the fuselage, revealing areas that need more work. The floats were given a coat with varnish mixed with black and brown enamels to improve the effect of the wooden surface:

The cabin is masked in preparation for its addition to the fuselage:


A recess has to be created to lodge the horizontal tail, the kit doesn't mention this:


The full tail is on, and the control cable locations are drilled, as well as the seat of the horizontal tail struts. I made a second transparency as I was not completely satisfied with the first. The wing and floats strut locations on the fuselage, above and below, are also drilled at this time:

The new canopy is masked, as well as all the areas previously painted white and CDL:


Alclad II Gloss Pale Grey Base is used in preparation for the silver paint:


Alclad II White Aluminium is airbrushed, as photos show a lighter than usual aluminium/silver hue:


Clear coat applied and masks removed:

The Arctic Decals set has arrived, impeccable as usual:

Decals are on, as well as the windscreen in front of the cockpit opening:

The walkway is added:

The tail control cable are added, and the model is prepared to receive the upper wing with the help of a Lego jig. Checking plans, each pair of struts gets 1/2 mm shorter going outwards with the span. Once this is done, the next step should be adding the floats, that have a VERY convoluted strut arrangement, requiring stocking aspirin beforehand:

The struts are added in stages, starting with the four out-most ones. Their sizes very slightly increase as they go inwards:

Once a few struts are added to confer solidity to the model, it is removed form the jig to proceed adding struts:

Once the wing struts are added, the cabane will follow:

The six cabane struts are on, and advancing now with the rigging:

Radiator piping on and more rigging:

Building the jig and preparing the struts for the floats. Installing those many struts angled every possible other way will not be easy:

The first jig did not work well, and I had to abandon the installation of the struts midway.
I removed the struts that were not properly aligned and started all over again, this time with a new jig, and already installed the first four struts without incident. Let's hope this one will work. Finicky little things this seaplane biplanes:

This time it worked, the 16 float struts are in place and all looks right:

Very impressive!
ReplyDeleteThanks!
DeleteI weep for...I don't know, there must be some reason or thing to weep for here. So much effort.
ReplyDeleteRejoice, John!
Delete'Tis the season!
I know what you mean, John. Everytime I see one of Gabriel's models, I contemplate taking up knitting.
DeleteYou guys... :-) :-)
DeleteAs ever, wonderful, genuinely entertaining prose and an exciting subject matter.
ReplyDeleteThat picture though...
Much appreciated, kind sir.
Delete