

The Westland Wessex trimotor passenger carrier of 1930 is
such an attractive machine that caught my attention very early on my modeling
endeavors. I started to gather material to do the usual scratchbuild and had
managed to fill a pretty portly folder, when I saw that Rugrats released it as
a resin kit with accessories.
I understand that Rugrats released several batches, and this
to me seems to be an early one, since the decal sheet carrier had aged possibly
beyond redemption, as you can see in the accompanying images (no, I don't like
to put the decal sheet against the window to get sun to fix it, it doesn't, really and
after you apply it eventually yellows again).
The kit portrays one of the variants the Wessex transport spawned, so bear
that in mind when you look at your references.
This is the completed model:
https://wingsofintent.blogspot.com/2019/03/westland-wessex-airliner-172-rugrats.html
This is the completed model:
https://wingsofintent.blogspot.com/2019/03/westland-wessex-airliner-172-rugrats.html
The contents of the box, plenty of reference material. Many goodies are bestowed, among the most practical for me the spare for the transparencies and the inclusion of the resin master to vac more if anything bad happens:


This may not be ideal for the window frames, for example:


The parts are separated from their pouring blocks. The resin is very, very hard, and you won't need to go to the gym the day you do this:


A little bubble opened up as I was sanding the elevator trailing edge -which was too thick-, so I had to remove a tiny section and superglue a little piece of styrene to restore integrity:


As per instructions and pattern provided, the front bulkhead is scratched:


Speaking of instructions: you get a very long step-by-step description of what you are supposed to do. More than other kit will provide, and surely well meant, but some times the description is confusing and ambiguous. The absence of graphics or any exploded view or images makes the whole business a little bit tricky.
The photos of the real thing in the instructions are of very bad quality, almost useless, so you better go online and look at good ones, fortunately there are plenty.
The engineering of this kit is unusual and sometimes seems awkward, but I won't pass judgement or criticize it until I am immersed in the build.
For reasons that remain obscure to me, while some pinhole issues can be in some kits simply trated with any filler, others reject most of it, and the pores remain open. For those cases the only remedy seems to be superglue, which I am never happy to apply in that guise because it creates bumps that are difficult to level with the rest of the surface:

A blob of resin is removed from the cockpit:


The transparency is trimmed, little by little, very carefully. If you patient and do a good job, the fit is good:
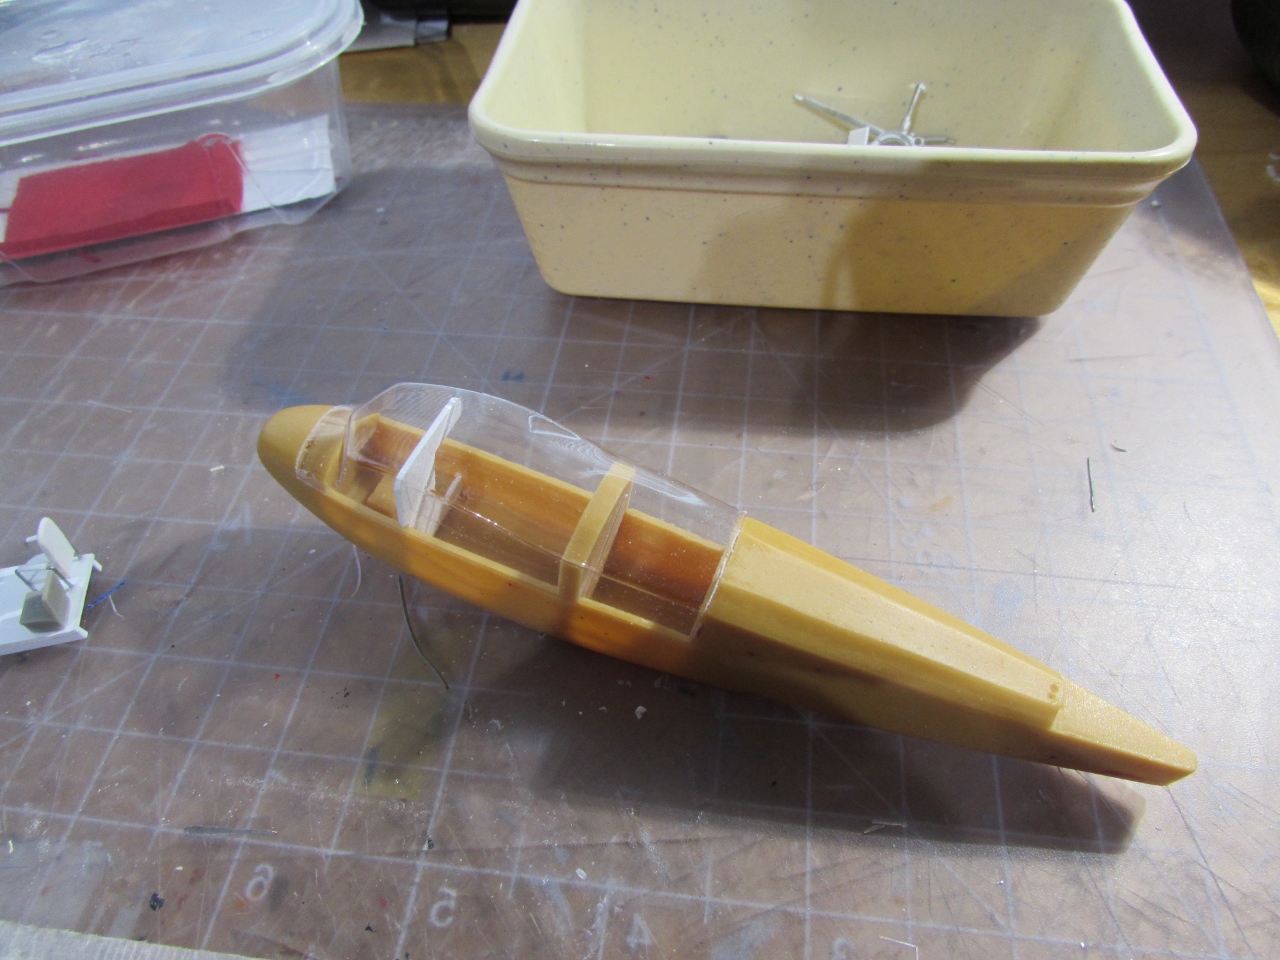
Some interior elements are painted, and the rest of the parts is given a coat of primer to better see what needs refinement:

The white metal parts showed with the primer prominent mold seams that had to be sanded, carefully, as no to bend the parts (the metal is quite soft).
Once that was done I decided to glue the resin engine pods (two parts, front and back) to the corresponding metal array. The fit is not bad, but it is not perfect. In the real plane there is no "ring" (here part of the white metal to greatly facilitate things), and that will be very difficult to hide.
The engineering of all this, again -I believe- aims to help the modelers, but creates other issues too. The strut array is so complex and has in the real plane so many members that to envision a different modeling solution (other than the kit's) for this area is indeed challenging:

Photos show that the aft cone of the engine pods was hollowed, so it is done thus:


Restroom in place:


The slot for the wing is very carefully cut, incrementally and always checking:


The exhaust rings in the kit are inaccurate, being round in section, whilst the real ones were more like flattened tubes, therefore new ones are made of heated and wrapped plastic strut material (thanks, John, and not the last time for sure!):


1) The transparency is clear and well shaped, but it is quite thin (0.2mm), so be careful when trimming and especially when cutting the slots for the wing roots.
2) There is a mistake in the position (reversed) of the aileron control linkage in this view in the instructions:

The exhaust rings of proper section completed:

Priming stage is completed for the flying surfaces. The wings were very good and had almost no blemishes. Engines and props are painted and set aside:

In order for the wing roots to make contact at the center, a small strip of styene had to be glued and then adjusted:

Now is the time for details, and among them more of those pesky darn little pinholes:


New exhausts:

Some Wessexs had flare tubes:


Shape the end of a styrene rod of adequate diameter, then drill the hole for the stem:


At that moment I panicked, because the wings looked as if one was ahead of the other (the position of the wings is mandated by the manufacturer's casting of the tongues), but no, the mistake was...in the wing tanks!
The manufacturer has them unequally mastered, the one on the right wing being about 1,5mm ahead of the one on the other wing. A slight misalignment by design!
What had prevented me for spotting this before applying the glue was
1) Blind trust on the kit -a lesson I learned long ago and should have applied here.
2) The fact that those tongues prevent you for actually getting the wing roots joined and compared.
Such is the life of the modeler.
Solutions:
a) live with it
b) adding a thin strip of styrene to the back of the tank on the right and to the front on the tank of the left, and then mask and blend.
Sigh....


The "G" on the decal sheet has a minor fault, a "spur" that shouldn't be there. Trim that off:


The complex system devised for this kit of resin and various metal parts to solve the outrigger engines and landing gear did not work for me at all.
There was no way I could find to correct the many misalignments created by this or that part, trying to get the locating devices in their positions at the same time. Finally some compromises had to be made for this to work at all. Not to mention the constant buckling of the white metal many struts when you try to press this or that in place.
I can't but honestly say that from my subjective perspective the engineering leaves much to be desired.
May be abler modelers will find less problems or other solutions for the problems. As this build stands for me now, it is not a very satisfying one:


The decals are superb, if, as noted before, the carrier is badly yellowed, and the manufacturer couldn't provide replacements. I cut the carrier around as close to the images as I could, and inside when possible (like inside the triangle the "A" forms in its apex):


Sigh... and not for the last time I think:


To be continued...
Another nice one, I purchased one myself a couple of months ago. I'll be watching this with great interest!
ReplyDeletePeter
Hi Peter
DeleteAn interesting plane, I think this one with a bit of work and patience could come out nice. It is very heavy, though, adding the solid resin to all that white metal parts. Hopefully everything will hold on. I haven't seen a single one built yet.
Cheers
Hello,
ReplyDeleteThis build is really interesting and you achieve a great result.
I plan to buy the DH86 of the same brand (not yet released) and you build will helps me, for sure.
Hi Eric
DeleteThanks.
They are unusual in their engineering, and present a bit of a challenge, but with some perseverance and patience I think they can be turned into nice models. I like their range of subjects very much, but they are a bit expensive, and not easy to build. Still, the only option for those beauties.
Thanks for writing.