What occupies us today is a smallish, yet equally handsome
Beechcraft 18, that was born in the late 30's but saw ample use, service and
production for many long years, on wheels, skis and floats.
(Link to SDASM Flickr photostream):
That I am aware of, three kits exist of it in the only sensible
scale:
An old inject kit, in two versions, by Hobby Craft with a
number of issues, a very nice (and venerable old) vacuform by RarePlanes, and
old substandard injected kit by PM, and a more recent re-pop of the latter by
Encore, with the meritory addition of resin and vacuformed parts that do their
best to freshen up what looks like a potential dead parrot.
I have built in the past some of Gordon Steven's kits, and I
had lots of fun doing it. The builds lead to correspondence, and that to pen
friendship. I miss him, the same way I miss friend and mentor Jim Schubert
(with whom I had a much longer and closer friendship), because both were not
only extraordinary modelers, but also, and more importantly, because both were
extraordinary gentlemen, a scarce commodity nowadays.
Examples of models I
made from Gordon's kits or conversions are posted here as the Boeing 100 and Seversky P-35, and even if I build military planes no longer -but for the
purpose of illustration- here in this blog you will find two other of the models I built from Gordon's kits, the Bell Airacuda and the Grumman Skyrocket.
I didn't buy either of the two Hobby Craft kits, but I have
all the others.
I will -hopefully- build Gordon's and Encore's kits to
compare them, and in the process, as usual, surely learn a thing or two (or
three, or four) about the type.
The first thing to be aware of with this design is, that as
many others, it evolved and changed with time, and was also greatly modified by
users all over the world.
The type flies even today, which says something about its
merits.
I hardly ever go for the kit's decals, because I find boring
that you have to see the model built again and again in the same way with the
same finish, which to me is sad déjà vu.
Therefore upon acquiring a kit I start looking for
candidates, while I submerge myself in the research stage.
RarePlane's kit is actually for the military version (which
of course I will redeem into a civil one) and does not provide decals, but the
strange thing is that the Encore kit provides both, military and civil,
although the civil option, even if interesting and with what looks like nice
decals, applies to a different model of the Beechcraft than the one provided in the kit, that has
in real life longer engine nacelles on the top wing. This precludes its use or forces you to perform
kit surgery to correct this very clumsy mistake and research overlook by the
manufacturer. Furthermore, the target plane had three-blade props (NOT
provided) and spinners (guess what: NOT provided), and the wrong landing gear
doors. Oy vei, sometimes it seems that computers would bite, such is the
reluctance to perform Internet searches by manufacturers.
So I finally decanted for another plane that corresponds to
the version provided with the two kits (short top engine nacelles) for which of
course I will have to commission decals.
I will decide later on what civil scheme will I do with the
second.
One of the Hobby Craft kits provides this longer nacelle
version, so if you are willing to, you can interbreed all these to get what
you want.
However, this is not just a matter of (nacelle) size, as
many other changes can be seen out there, regarding power plant, cowls, wing
tips, nose, props, landing gear doors, interior, vertical stabilizers, antennas
and so on and so forth. Therefore, as you can see, if you want to venture
beyond drab and dull, some delicious
research is in order.
I used not to like research a bit in my younger years,
considering it a waste of time, and (stupidly and blindly) trusting that of
course manufacturers have done their homework. Ah, the naïveté of youth!
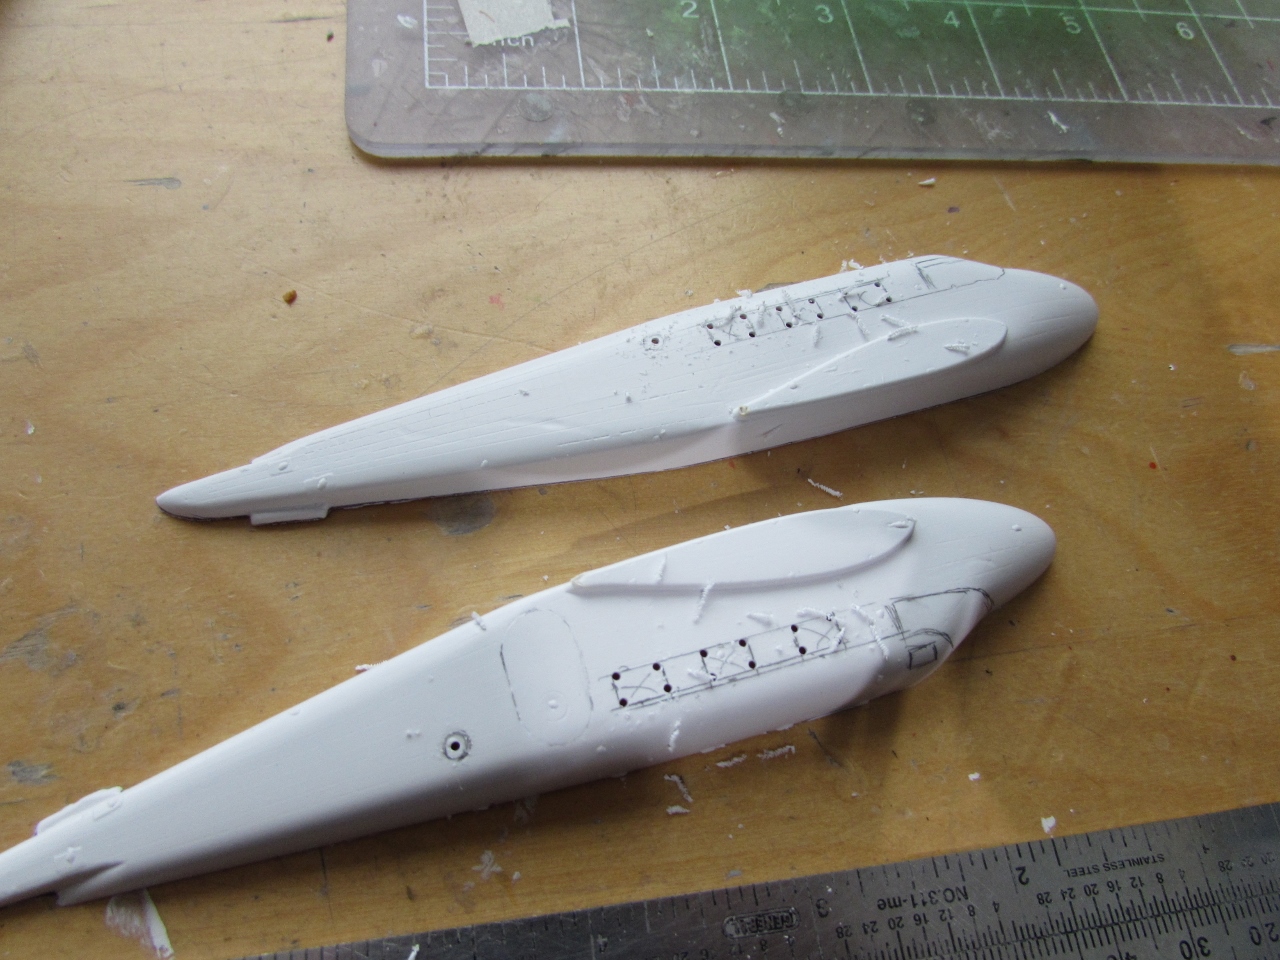
Here some images of the RarePlane vac kit:
As you can see, very unusual surface detail for a vac, due to the use of female molds:
Look at those wheels, much better than many later and even a few contemporary injected "buttons":
The transparencies have yellowed a bit, a common occurrence that is partially remedied with some polishing:
The cardboard cover it came into:
And here is the Encore (boosted PM) kit.
In spite of my nitpicking I applaud the efforts behind the release of this "enhanced" kit, a way to give new life to an old kit, and, to my joy, including a civil version:
Newly-printed instructions in good paper, and what looks like excellent decals:
The dreaded, unfathomable, Mariana Trenches
A bit less daunting on the wings:
The added bits, vac windshield and resin substitute parts:
Some care was obviously put into this:
The engine block has the location for the cylinders keyed, the problem is that somebody forgot to tell that to the person that cast the cylinders, which have no corresponding pegs. Sigh....
New props and exhausts, one came nicked:
Plenty of enhancing resin parts shown in the instructions:
As some of you know, vac building is better started by using a permanent marked to trace the outline of the parts, a good guide for cutting and sanding:
A few careful passes with a new hobby knife blade, some cautious back and forth of the backing sheet, and the parts are free:
I discard parts that do not lend themselves to the medium:
And get them somewhere else, being acquiring them or raiding the spares box. The resin props come from the Khee-Kha Art Products engine/prop sets:
Sanding begins under the tap.
To me this counts as both, modeling gym and water sports:
When you see these sort of filaments, means that you are close:
The first stage of sanding is complete. More refining will be required on trailing edges of all flying surfaces:
More sanding, more carefully this time and always checking that black line reference. Those filaments get thinner:
Compare original sheet thickness with appropriate sanding:
Half an horizontal tail:
Sign that things are progressing correctly, the areas that would have needed carving are automatically sanded away:
In most cases for tail parts the sanding side will eventually become flat:
And now time to stop, when the hinge line becomes visible on the other side:
If you respect your black lines and sand evenly, you get matching fuselage halves (or any halves) with no banana effect (flashback to scene involving the teachings of Master Sandpaper at the Shaolin Temple):
The nacelles resemble the real thing, unlike the original (not enhanced) PM kit:
Horizontal and vertical tail elements are glued together, as well as wheel halves. I view of the interior parts provided in the vac kit, quite good:
The wells are carved out:
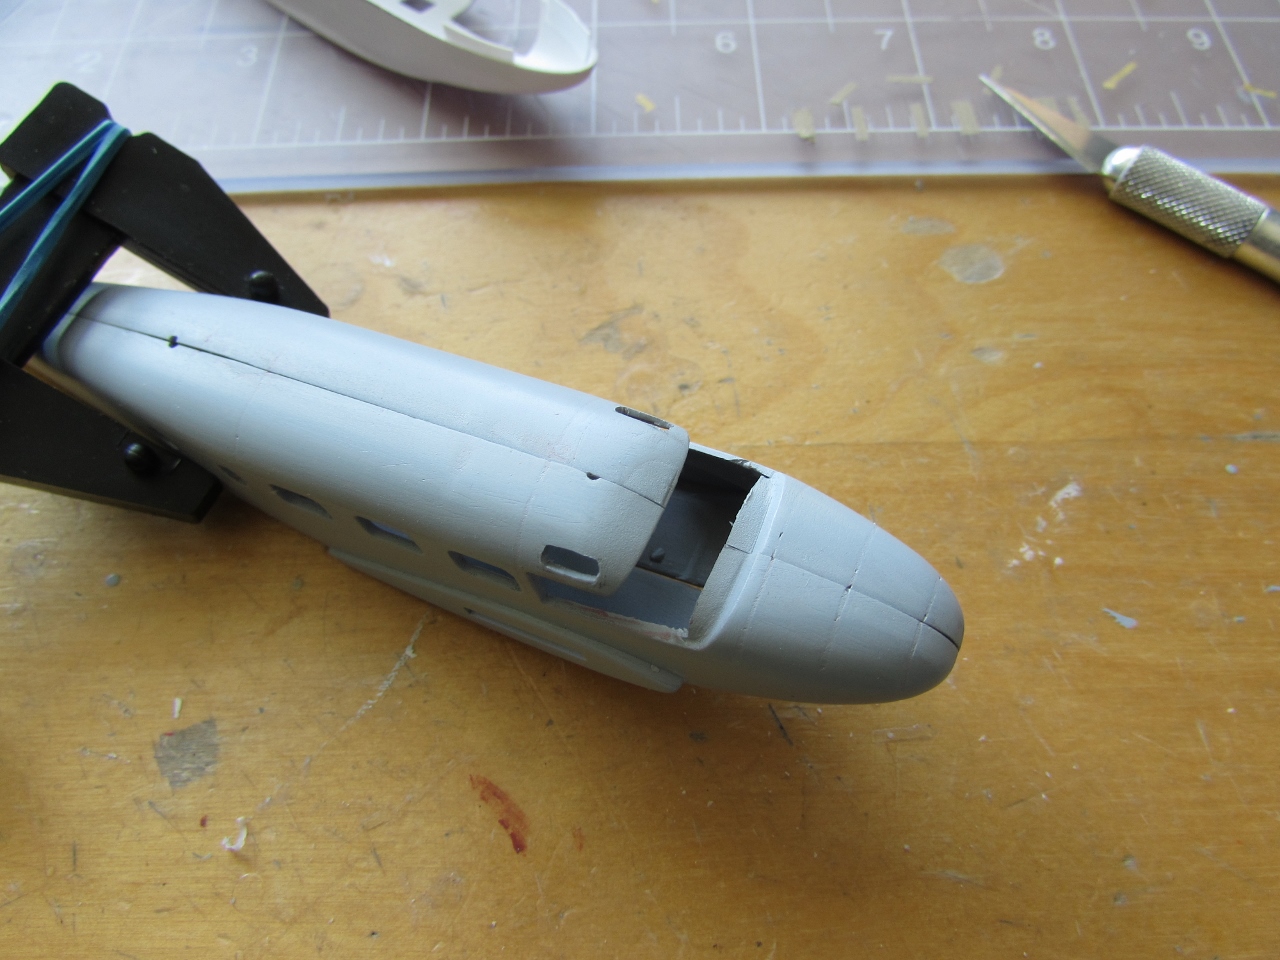
It is very likely that I will cut the cowl halves off, to work on them comfortably, but bear in mind that the kit has the seam exactly where the real upper and lower cowl separation is on the real thing, so don't delete the seam. You can see the "exhaust" volume to the right, that will be excised and replaced with tubing:
Starting now with the Encore/PM kit.
The locating pins will self-misalign an area of the fuselage:
Shall we call these toilet-able seats?:
The resin ailerons, no gain here, don't even bother:
Same for the resin elevator, actually with a thicker TE than the original, and looks the same otherwise:
Errr....same goes for the wheels:
All resin bits separated, many won't be used, since they make no sense, but the other are gladly welcome:
What are we supposed to do with the brick?:
This calls for Neanderthal modeling technology:
And some sanding in the modeling water-sports area, otherwise known as kitchen sink:
The kit's cowls are removed. Surprisingly, the kit has no indication on exactly where you should cut. I guided myself by a line on the lower half of the nacelle and followed the cut on the upper half:
The RarePlane vac bulkhead has the proper door:
So of course I removed it and will pose open:
The Encore kit door (solid) is removed:
The resin substitute goes perfectly in:
Thoughts so far:
I guess "Encore" may have the purpose, which I commend, of rescuing an
old kit to fill a niche in the market, given the absence (so far) of a
good injected Beech 18.
Some of the resin parts look more like a gimmick to add value, since
there is no gain whatsoever in replacing the kit's parts with them.
Other resin parts are welcome, but the silly oversight of not molding a
matching peg on the separate cylinder to go into the notches on the
engine case is...sad.
Nonetheless those engines ARE an improvement over the kit's, and the new cowls a necessity.
The door is nice too.
More will follow on this.
I realized yet another detail overlooked regarding the civil decals for the Encore kit (VH-FIE):
The intended plane had -as said above- long nacelles over the wing, and
not short nacelles as in the kit, as well -as explained too-
three-blade props and spinners (both absent in the kit), but also has
the modified wingtips, squared and with a pronounced wash-out.
You could modify the kit to show all this, but not without some not
small labor, and it would have been nice if the instructions would have
said or showed so, which they don't.
I looked and looked searching for may be an earlier version of this
scheme that coincides with the kit's features, but found none. VH-FIE
seems to have been always already a different model of 18.
Such a waste of good decals by AeroMaster, perfectly printed and in precise register.
As Kurt Vonnegut would have said: So it goes.
A little issue here, may be fixed by painting over part of the transparency:
Another detail (I will most likely be sanding those, and later replacing them in order not to hinder seam treatment):
Work continues on the vac:
The first stage of the TMP (Trench Mitigation Plan) for the Encore kit is accomplished:
The windshield -only part of the RarePlane vac transparencies that will be used- is separated and provisionally trimmed:
The remaining PM kit is extricated from the stash to be cannibalized for parts to be used in the vac (control yokes, landing gear legs, etc.):
The cowls are separated from the wing halves, in order to deal with them more comfortably. I am also contemplating substituting them for parts found in the spares bin:
I am presenting the simultaneous builds as they happen, in a
Joycean "stream of consciousness" manner, alternating segmented
images of the modeling field as it develops, and mixing content related to the
three kits involved.
The result, although -understandably- may be confusing for
some, is nonetheless highly artistic, multifaceted, plurisemic, one may even
say labyrinthine in nature, providing a sort of cubist multi-focal point of
view of the actions; in other words: my intention is to present modeling
reality as it is, chaotic instead of cosmological, Dyonisian instead of
Apollonial, and ultimately entropic.
Here you can see the vac solution for the exhausts. I have scribed the edges and hollowed the exit, so you could do this:
Or remove the section and substitute for a real tube length, which is what I will be doing:
The original, injected windshield of the kit is
much better than the "upgrade". The vac windshield is too thin and therefore way too flimsy, besides being far more undefined and somewhat "undulated". Stay with the injected part, that fits much better, can be polished, and has better defined frames. What a flop are half of these "upgrade" parts:
"upgrade", yeah, right:
Injected part:
"Upgrade"
You could use this "upgrade" with a lot of good will, but my advise is get rid of it:
Ugh:
A light coat of primer revealed as usual a number of places where touch-ups are needed, but overall the surface is already much better than with those trenches, so this was a good deed:
The cockpit glazed area is carefully removed form the RarePlane fuselage, making the cut a bit inside of what should be, just in case:
It seems that we may have a good fit here. The approach of a bigger section that includes part of the fuselage skin helps enormously with the blending of the transparencies, an approach that unfortunately the Encore/PM kit does not have:
And now the fun part!:
And now a brief intermezzo for the seasonal activities, that include among other tortures going to the in-laws.
I hope to see you soon, and meanwhile enjoy whatever is that you celebrate, or, like me, not celebrate.
My younger son visiting London is doing great, and not in trouble with the local constabulary, which is a relief! 😃
Cheers!!!
One more session with the putty and sanding sticks:
A pause for the annual clean-up.
This is the time when I usually find those parts that went to the Twing and Twang dimensions -like the bits on the mat-, hidden in the strangest places:
A full pound of discarded sharp objects:
And I thought I will retire the old mat and gift myself a new one. I humbly think I deserve it, after completing about two-dozen models during the year:
Building of the interior commences. The Encore front bulkhead door is incorrect in shape, so a new part is fabricated, and a door is carved on its back cabin bulkhead that will allow the flying throne to be seen:
The resin engines of the Encore kit are built. You get one spare cylinder per set, which is a good thought on part of the manufacturer:
The ejector marks are hidden below a cushion:
The "upgrade" parts that don't upgrade anything at all are discarded:
Some components are glued together:
The resin props are assembled. To the right what I did first, to drill the blade to insert a metal pin, but (to the left) I decided later to just drill a socket on the cuff and glue the blades in:
No significant difference, but you get two spare props:
The edges of the parts that were glued together are given a coat of liquid putty to hide what may have remained of the seam:
The tail group is sanded and assembled:
I found this nice page in the French Decollage magazine, at the Gallica archives, that shows several interior configurations as a guide:
I have from the spares bin seats for one model, but had to fabricate the ones needed for the other:
A quick visit to the references of the two planes I want to model revealed that one of them used different props, which I proceeded to replicate re-purposing discarded three-blade ones from -iirc- a Fokker F.VII I built time ago :
Blades are cut off and new hubs made of styrene tube and rod:
Finely-stretched sprue is used for the securing bolts, later to be trimmed at the same length:
The new props to match photos of one of my selected planes are almost done:
Some parts are painted, together with other projects:
If you don't want to deal with the kit's engines on any of the two kits, you can get some aftermarket ones, as I did, as a back-up or eventual choice, depending on the results with the native parts:
Both interiors almost there. As explained above, none has a cabin, so seats were scrounged for the Encore kit, and scratched for the RarePlane vac, which used cockpit parts from a spare PM kit donor. Internal doorways were opened and doors made to be added later. Far from exquisite, but fair enough for the glimpse that will be allowed once enclosed in the fiselage:
Next stage is some interior detail on the fuselage walls.
Here you can see the resin engines provided with the Encore kit and the ones that came with the RarePlane vac. The latter will be substituted with the Engines & Things shown somewhere above.
The cabin doors are on, and the most important part of the plane is there too:
More painting ensues. The Engines & Things parts are given their base color, other parts get their second colors or touch-ups as well:
The new props for one of the models are ready, and so are the E & T replacements engines, plus the second toilet and both sets of LG legs:
The RarePlane vac wings are given a resemblance of structure at the wheel wells, to avoid...well, the void:
The wing halves are united. I think I may discard the kit cowls in favor of ones I found in the spares bin that are just right, so I prepared them for use just in case:
The reason for the substitution of the cowls is that the ones in the kit have minor differences, and one is slightly longer than the other. But for the benefit of those having this kit, and without access to alternate cowls, here is a solution.
You apply masking tape as a guide for a cut (to add a "ring" section) then separate the aft section:
The extension ring is glued to the cowl. Once set the trailing edge section is going to be added:
The modeling elves taking a break after dealing with the cowls:
Underneath the cowls of the vac kit there are some depressed areas. In some 18s this a void area, in others there is a carburetor, and in others it is filled.
If you need to cover it, as I do, you may put some putty or Milliput in there, masking the surroundings, or excise the not so neat bit and add a piece of styrene there:
The restroom extensions are added, whilst the clear parts of the Encore kit are bathed in acrylic floor polish. The clear parts as you would expect are thick and produce a lot of distortion, but the alternative of preparing CD clear case windows as I often do, for such small windows, was deemed not worth it.
The open cabin door will have to suffice for the peeping toms:
Fuselage halves are being readied for interior painting. The ones for the vac kit are given the customary aligning tabs, which also add support and some rigidity. The area where the tailwheel will anchor is given some structural support too:
Almost forgot. The Encore kit is missing small windows immediately above the side windshield panes, so those are carved:
The interiors are given a coat of paint:
I wrote above:
"The clear parts as you would expect are thick and produce a lot of
distortion, but the alternative of preparing CD clear case windows as I
often do, for such small windows, was deemed not worth it.
The open cabin door will have to suffice for the peeping toms"
But as soon as I did, this happened:
So in fear, and under threat, I decided to discard the kits' windows and cut, shape and adjust individual clear parts made of acrylic sheet:
Windows in place. I usually deal with this cutting the whole window section area off, and replacing it with the clear strip with window masks.
I definitely should have done that, instead of going for the individual panes. I thought there were just a few, but better go the wholesale way:
The home-made windows are added now to the Encore kit:
The interior goes in:
The interior of the vac kit also goes in:
And here are the twin twins' fuselage halves united:
Carefully trying prepare the transparency for a good fit now:
The transparency on the Encore kit isn't brilliant (you can see the gaps), but the alternate provided with the "enhance" set was basically useless, so I will use this one (the original) and dutifully Milliput the gaps:
Engines and props ready:
A strip is added to the windshield to close the gap a bit:
A coaming and instrument pedestal will be provided before adding the transparency:
A bit better now:
The marriage of the Encore fuselage halves did not go well, so here is some brute "counseling":
Putty sanded and wings added. The wings of course have an indifferent fit, and although one (right) more or less coincides with its root molded in the fuselage, the other (left) does not, being the wing noticeably thicker. If I knew this (should have suspected it, given the general unquality of the kit) I could have sanded a bit the contact surfaces of the halves of the wing at the root, -without affecting the engine nacelles. So you may do a dry fit on your kit, and proceed to any corrections before having the problem dumped on your lap later in construction:
Very thin and narrow strips are glued inside the transparency area of the RarePlanes model, to form a lip to hold it aligned and firmly glued (some sanding is going to be needed later on, on the top, to blend it in):
The exhaust pipes are made of lightly heated and bent styrene tube of adequate diameter, then the aft end walls thinned from inside with a carving bit:
Dry run:
The contact area of the transparency is painted matte grey, and the clear part glued. The tail is also secured in place:
A coat of primer for the vac, and another for the injected.
More work ahead, as usual....
You have seen that the model to the right above (the future American Airlines model) has a football antenna. The one to the left (aerobatic show plane) will have a Jetsons TV antenna, so I made two, to chose the best:
What I hope will be the last light coat of primer before painting commences. You may notice that I have removed the cover-all protective masks on the windshield -that I use while I work on its seams- and not new masks are on for a more delicate work and painting:
And the other model gets some putty limited by masking on panel lines.
Have to be more careful doing sanding later on a vac like this one, since there is a little flimsiness to it and it's easy to overdo it and get haircracks in the seams (that's why the wings are not yet on, to make handling the fuselage easier):
Last mist on the injected kit before painting:
Sanding of the vac proceeds, tomorrow another coat of primer.:
The Encore model is given a black base for the aluminium that will follow:
The thrill, excitment, adeventure of the modelers' life:
"Dear diary: today, one more coat of primer on the vac!":
The plane I would like to represent with the vac model has six lights, provisions for which have to be made:
The usual touch ups aspiring for a better surface, trying not to obliterate the kit's detail:
Because of the nature of vacuum-formed molding, some edges are a bit round. In this case both, wing root and fuselage wing position are so. This is remedied by sanding just a bit of both ends, and then adding a thin styrene sheet to the wing, later to be contoured, and the small gap puttied. This also helps with fit, otherwise a bit indifferent, and rigidity.
I opted in this build not to use added spars, that are advisable in other cases, though. :
The cabin roof vents that were absent from the Encore kit and sanded off during tidying of the RarePlanes vac, are replaced with shaped bits of styrene:
The vac kit gets another coat of primer:
Every few years I need to replenish my stock of lights (remember the vac uses 6, and the injected kit at least 2):
Wings on on the vac:
The plane I am representing with the vac kit had two carb intakes under the cowls.
These are made from heated and bent strip stock, later carved a bit in the mouth:
The model that will be for American Airlines is given an aluminium base color:
More airbrushing on the other model and misc. parts:
The plane I am modeling with the vac was partially red, therefore white paint is airbrushed as a base coat:
Red follows:
Decals for both models, American Airlines and the air show plane have arrived:
Masks on the Younkin model, ready for the black:
Black is airbrushed on the Younkin model and the AA one is given a protective varnish:
Masks off. Only a couple minor spots to touch-up. Phew!:
Windows and windshield masks off on both models:
And now the delicate task of adding details without making any boo-boos:
The home-made lights and Pitot are added:
Same goes for the American Airlines model. Details and decals are added one by one, trying (not always successfully I am afraid) not to mess up:
Works continues on both frames:
The Younkin air show plane is now ready. Tomorrow, if all goes well, perhaps I will do the photography for the completed model post:
Close now with the other model, but still work to do:
I painted the front of the cowls and decided to shave the provided decals a bit, in order not to have to do too much prodding and setting solution. With a shorter width, the decal should stress less following that curvature. We'll see if my ebil plan works:
To be continued.....


Very nice progress, I look forward to more.
ReplyDeleteI am into this build, but also doing five more in parallel, so it's on and off. But we'll get there in time, I hope.
DeleteCheers