
I bought the Amodel and Avis releases believing they were different molds, but no luck.
A very old Amodel mold was released long ago, and that was different (and not in a good way).
Therefore, here are two Moths, one for me and other for dear friend David the Tall of Chicago.
As much I may know about really arcane subjects, I am a total illiterate on these widespread types, and had to start to educate myself.
In any case, here are the boxings and contents.
There are many versions out there in different releases, but apparently the sprues are more or less the same. Save that the seaplane has floats, of course, and the Amodel has an extra wing with slats.


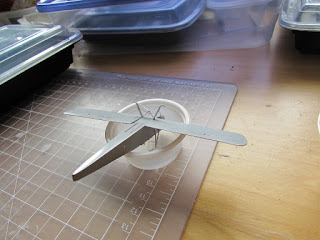
I started with the cockpits, but noticed the strange absence of the front joystick.


Heresy! Sabotage!


The impression of vagueness comes actually form the molding process, not the parts themselves.


They will have you glue the other half of the engine with that flat ridge upwards:


Preparing the floats for the Moth (just in case I want to use them) and a pair of repurposed Norseman floats for a floaty Dragon Rapide. I corrected the shape and am adding the right detail to make them more like the EDO floats they are supposed to represent.
The diorama props are further assembled and enhanced.
Some detail painting on the fuselages of the Moths and an unrelated prop:


I deem these builds 99% complete, the worst is surely over...or is it?


DANGER, WILL ROBINSON!!!!
Well, I was almost leaning toward the Arctic explorer original boxing for my Moth, but fate intervened...again.
Unfortunately it seems that G-AAUR's registrations were not white, nor was the expedition title on the fuselage.
For you amazement, amusement and perusing, here is a PDF with photos that shows that.
http://www.dhmcc.com/November 2016 Newsletter.pdf
O also got more photos showing a color on those regs and lettering (compared to white or metal objects) further proving my doubts.
So all things being equal, if I can't use the kit's decals, then I rather do whatever other subject, related (G-AAZR, the other Moth in the expedition, of different colors) or not.
There are a couple of images that are "burnt" and seem to show white regs, but better (and more) photos show it may have been not so.
In fact, in some photos the lettering has the same hue of the wings, not looking like aluminium -as the kit would have it, compared with the aluminium or aluminium-painted (white?) floats.
Therefore: Beware, you proud owners of this boxing, things may not be as viewed by Avis in this regard.
I just went back to the photos but the Moth logo (that was silver) on the tail has a higher reflective rate than the surroundings (supposedly also silver).
Here is page 5 of the photo catalog at the Scott Polar Research Institute, where the first photos of the planes appear.
You may follow on to page 6, etc, for more photos.
https://www.spri.cam.ac.uk/picturelibrary/catalogue/baare/gallery/page5.html
https://www.freezeframe.ac.uk/?s=moth&images=1
and following pages.
Nah, John, those wings I believe unlikely that they were silver dope...
Again, look at the logo on the fin and the general hue of the flying surfaces:
 Has been suggested by John Adams that these colors were black and orange, with white floats. I tend to agree.
Well, I was almost leaning toward the Arctic explorer original boxing for my Moth, but fate intervened...again.
Unfortunately it seems that G-AAUR's registrations were not white, nor was the expedition title on the fuselage.
For you amazement, amusement and perusing, here is a PDF with photos that shows that.
http://www.dhmcc.com/November 2016 Newsletter.pdf
O also got more photos showing a color on those regs and lettering (compared to white or metal objects) further proving my doubts.
So all things being equal, if I can't use the kit's decals, then I rather do whatever other subject, related (G-AAZR, the other Moth in the expedition, of different colors) or not.
There are a couple of images that are "burnt" and seem to show white regs, but better (and more) photos show it may have been not so.
In fact, in some photos the lettering has the same hue of the wings, not looking like aluminium -as the kit would have it, compared with the aluminium or aluminium-painted (white?) floats.
Therefore: Beware, you proud owners of this boxing, things may not be as viewed by Avis in this regard.
I just went back to the photos but the Moth logo (that was silver) on the tail has a higher reflective rate than the surroundings (supposedly also silver).
Here is page 5 of the photo catalog at the Scott Polar Research Institute, where the first photos of the planes appear.
You may follow on to page 6, etc, for more photos.
https://www.spri.cam.ac.uk/picturelibrary/catalogue/baare/gallery/page5.html
https://www.freezeframe.ac.uk/?s=moth&images=1
and following pages.
Nah, John, those wings I believe unlikely that they were silver dope...
Again, look at the logo on the fin and the general hue of the flying surfaces:

Nice detail as mentioned before:

NOTICE : the different upper wings (with and without slats), the differently bent exhausts, different rudders, different fuel tank on top.


The mechanical resistance of those tiny and weak components is close to nil (that's no fault of the manufacturer, they are closer to scale).
Since assembling the upper wing and undercarriage unavoidably involve stresses, this will be interesting.
What have I gotten myself into, and doubly so!:

NOTES: parts 15 and 18 are mixed (reversed) in the instructions. One is a tailskid and the other a joystick.
This is the second mishap (the first being the engine the instructions will have you glue downside-up) -that I could tell.
Another issue with the kit you should correct: The section of the floor that comes separate has a crossbar as part of it. The thickness of the part is insufficient to be flush with the rest of the floor (as I found out it should be), and the crossbar will impede the part to be located lower to match the rest the floor:
 Correction is needed:
 Bottoms leveled:
 And structure in place:
 The redoing of the problematic area is done:
 The floats are ready too for the white coat:
 The floats are united via brass Strutz, as I did not trust the kit's exiguous injected plastic braces.
The beaching trolley was used to some extent to get things aligned, but -given the imprecise nature of the parts in this kit- good ole eyeball is necessary:
 Painting of a few parts for both models begins:
 The landing gear and a pair of cabane struts are in.
All locations are marked, but need further drilling or fiddling to accept the parts.
The cabane struts attach sideways, a not very elegant solution.
To say that the landing gear is a fiddly assembly is an understating.

 Somebody was watching the soccer match when they should have been paying more attention:
 More shenanigans: The engine fairing should stop before the canopy, and not run all the way to the opening, otherwise it prevents the canopy from seating properly. Hey, a DIY kit!.
The small section will have to be removed (This also valid for the "normal" configuration, the fairing should stop before the windshield):

 The aft portion of canopy fairing is glued in place.
The aft portion of the engine fairing (too long in the model) is nicked back as described above to allow the canopy to be set in place:
The kit does have some small pips in the guise of control horns, but they are replaced for more visually effective photo-etched ones:

 The canopy for the Arctic version is masked. Not easy, really, in such small size and without clear indications (there are some . I looked at photos:
 I think it's ready for the paint. Once more, the way Avis solved the cabane struts is not completely satisfactory, as it's a bit heavy for the scale in regards as how the struts comes from the side and stand a bit too much that way. Vertical/Diagonal slots would have been preferable for me, so the struts can be more "flat" against the fuselage:
 A miscellaneous collection of parts for both models is airbrushed in several colors:
 The canopy for the float version and the struts for the land version are painted:
 Wheels and prop also ready:


 Masks are made for the orange areas in G-AANL. For that I had to scan,
resize and print the side view, since it is not to scale in the
instructions:
Masks are made for the orange areas in G-AANL. For that I had to scan,
resize and print the side view, since it is not to scale in the
instructions:
 Masks applied, sorting the struts and relief detail:
 Aluminium is airbrushed on the lower wing, whilst a gloss white base is needed on the other surfaces before the aluminium is applied:
 The flying surfaces of G-AAUR are also sprayed white in preparation for the light orange:
 The time has arrived for the convoluted masking of G-AANL, the model for my friend.
He hasn't the remotest idea of how time-consuming this task resulted to be.
I would use the trope "I became very familiar with the curves of this little Moth" to describe the process of producing and adjusting the masks*, but I can only imagine the barrage of unsavory comments that this declaration would entice.
*By hand, no software, not plotter, no nothing.

 Gloss black is airbrushed:
 And now the masks are off:
 The masks of the second model are lifted:
 The canopy is on. The fit needed a bit of adjusting:
 The small gap between the fin and stab, as per the original:
 The exhaust has to be "threaded" through the first inverted V pair of struts:
 Two very fine wire holders were inserted in drilled holes in the fuselage to support the pipe, as per the original. I had removed the kit's oversized ones that were located on the pipe:
 Wheels and stab in place on the other model:

This is the second mishap (the first being the engine the instructions will have you glue downside-up) -that I could tell.
Another issue with the kit you should correct: The section of the floor that comes separate has a crossbar as part of it. The thickness of the part is insufficient to be flush with the rest of the floor (as I found out it should be), and the crossbar will impede the part to be located lower to match the rest the floor:


The beaching trolley was used to some extent to get things aligned, but -given the imprecise nature of the parts in this kit- good ole eyeball is necessary:


All locations are marked, but need further drilling or fiddling to accept the parts.
The cabane struts attach sideways, a not very elegant solution.
To say that the landing gear is a fiddly assembly is an understating.


The small section will have to be removed (This also valid for the "normal" configuration, the fairing should stop before the windshield):


The aft portion of the engine fairing (too long in the model) is nicked back as described above to allow the canopy to be set in place:
The kit does have some small pips in the guise of control horns, but they are replaced for more visually effective photo-etched ones:


For the nitpickers among you:
The Arctic plane seems in photos to have a pressed metal Fairey-Reed prop, with the same spinner of one of the provided props, but it's actually not covered by any of the kit's variants.
I will leave mine in peace, since it's hard to tell the difference in 1/72 unless you look for it.
Nevertheless I made Fairey-Reed prop from scratch, to show that is possible:The Arctic plane seems in photos to have a pressed metal Fairey-Reed prop, with the same spinner of one of the provided props, but it's actually not covered by any of the kit's variants.
I will leave mine in peace, since it's hard to tell the difference in 1/72 unless you look for it.


He hasn't the remotest idea of how time-consuming this task resulted to be.
I would use the trope "I became very familiar with the curves of this little Moth" to describe the process of producing and adjusting the masks*, but I can only imagine the barrage of unsavory comments that this declaration would entice.
*By hand, no software, not plotter, no nothing.


The vague nature of the moldings that particularly impacts small parts like the struts regarding length, affects alignment and positioning.
This is aggravated by the flimsy nature of the parts involved (they are closer to scale, which on the other hand is good).
After many trials, I could not commit to glue the upper wing on either of the models. I have built many, many, many biplanes before, but these little fellas are giving me grief.
The cabane struts in my samples are a tad too long, so the external wing struts "float" and can't reach their locations. Trimming back the cabane struts equally and to the proper length is tricky business.
I will give it a rest until tomorrow, but I just wanted to make a note of the things encountered at this stage for those who have the kits.
These kits are in some regards very similar to the New Airfix's DH82, and I know the former are short run while the latter isn't, but the Airfix kit is a much more precise (and therefore more pleasant) affair.
Nothing terrible, mind you, but I take note of these things.
Abler hands may not encounter issues at all, though.
Finally the upper wings went on:


In the original plane the decalage (angular difference) between thrust line and floats is quite noticeable (this normally facilitates take-off and alighting), but I think the kit got that angle higher than it should be.
In any case, I don't want to risk another nightmarish session of relocating everything, so that's how it's going to be. There are minute misalignments too, that nag me greatly, but I had it with this one.


After decaling is done, it will be then possible to add the many control cables, stab struts and other details. So this one goes into hibernation, and we will continue with the other model:


The decals for moth models have arrived from Arctic Decals in Finland. The usual high quality product:

Decal application started, and after an afternoon of work all went well. The sets even included the DH decals that go in the struts and the multicolored Moth logo:

Control cables and props added. An advance of the post with the completed models:


To be continued...
Great pair, "Gabriel"!
ReplyDeleteA short note about "origins". There was a Frog DH60 kit, of which I have one bagged example, & it compares just a bit too closely with the much later AModel release to avoid the conclusion AM's is a knock-off job, albeit with slight improvements. But the old Frog kit was much better than the older of 2 very different Airfix kits, so that's not a horrible thing...
Thanks, Lars!
DeleteVery interesting info, appreciate you posting it!