This cute little plane was an adaptation of the Camel used as a personal transport that later got civilized and eventually sired the Swallow.
KP must be congratulated on the release of yet another civil beauty of interesting lines and good detail.
But this will require some work as the Scooter differed from the KP kit (common sprues with the Swallow) in some regards.
The completed model is here:
https://wingsofintent.blogspot.com/2020/05/sopwith-scooter-modified-kovozavody.html
Comparing the kit with references (by the way, freely and easily
accessible on the Net) the differences are frankly quite obvious, even
at a first glance.
I really like this little kit, and will build it without hesitation,
but I am a bit ticked that a new kit would miss the obvious differences
when photos are just a click away.
The reinforcements of the central ribs have to go, and the rib tape
detail is a a bit out of scale. The instrument panel should not have the
cut-outs for the guns, needless to say.The wing needs a shorter span and a new cockpit cut-out, plus a slight change in the angle of the wing tips.
The cowl needs the vent hollowed. More as the build develops.
I strongly support KP in their efforts to provided very attractive
civil alternatives of such interesting planes. Fortunately for them this
time the corrections needed are easy, but it would be great if more
research was carried out before committing to the production of masters.
I am buying another because I deem this an uncomplicated build (my
subjective impression, please note), and I can't decide between the two
colorful schemes!
The parts that belong to the Swallow are marked in the instructions for dismissal:
The discarded parts go the spares bin:
The cockpit deck that belongs to the Scooter, the aft struts are marked as pips, but I couldn't find the parts in the kit:
The cowl vent is hollowed. To me it looks smaller in the later (civil registered) version of the Scooter than on the earlier:
The wing cut-out is lined, since it was rounder in the Scooter than in the Swallow:
This much needs to be removed, but that's my take, so do not follow and then blame me!
The shortened and re-contoured wing and ailerons. Prominent ejector pin marks were removed from one fuselage side (that has some structure depicted), and will have to filled in the other, but ultimately nothing will really be seen:
Not much left on the sprue, this is a simple kit and I think it will build well:
All parts separated from the sprues and cleaned. The cockpit assembly already started:
A little Milliput to fill the gaps. Once set the whole wing will be given a sand to eliminate the reinforcements and some of the rib tape. The inst. pan. is filled with some styrene bits. Most likely it differed a bit from the Swallow's, but it'll do for this simple build:
The kit's engine is ok, but if you are looking for something really impressive there is the Small Stuff Clerget resin one, which is an incredible product.
I have a number of their engines, but have only used them occasionally, due to my eyesight issues that make assembly a bit challenging. They are mini-kits of outstanding precision and detail:
Working on the wing now, things going well:
The cabane has a teardrop-shaped rigging fairing at its apex -visible in photos-.
To make one drill a thin rod:
Shape one end:
Cut and round the other other end. The rigging should pass trough or rest on the hole, if you use rigid rigging material:
The altered wing is given a primer coat, all looks good. Some base colors are applied to other parts:
Even knowing that because of the loss of central vision in my right eye I can't really to this anymore, I just wanted to do as much as I could. The completely diminutive spark plugs (two per cylinder) completely defeated me, in spite of a "tool" that comes with the engine to grab and position them. I got tired of losing them. But I managed to start to glue the intakes and rockers (not that I think that I can complete this, each part is a phenomenal guessing game, since I can't judge depth adequately):
If not exactly in the areas that I would have liked it, all these years of modelling provided a great expertise on certain disciplines, like missing parts.
I have refined this technique to a degree that I know has filled even beings from other planets with uncontrollable envy (you can tell because their digestive gasses take all the colors of the rainbow).
Without going even farther, in this very build I managed to carefully alter the instrument panel -that wasn't suitable for this version-, refine it, put it on a clothespin for airbrushing, and then presto! I could never find it again, no matter what.
Now, I call
that talent.
In any case, some little progress was made:
Another instrument panel to replace the one I lost:
As noted by fellow modelers in the Rumormonger section, the Scooter wheel axles go a bit upwards as it stand on the ground. The kit's part also is lacking just a bit in width, so the part is replaced:
That little "dihedral" will give the wheels the inclination you may seen in photos:
Ready now to go:
All rigging and control cable locations are drilled at this time. Many are not described in the kit. The box presents a notion of it, if not completely reliable. Look at photos and draw your own conclusions. The aileron control horns positions are sawed as well to later insert metal horns. :
The fuselage halves are glued together.
If you do not sand the sides of the seat, they will interfere with the structure molded on the fuselage sides, confirming the dictum that states "99.9999999% percent of kit interiors are bigger than the space that has been allotted to them":
Ready to glue:
And glued on.
The concave part that fits in the cutout of the belly immediately after the engine is also glued.
The fit of these parts, as with most short-run kits, is indifferent, and requires minor adjustments:
The locations of the control horns on ailerons and rudder are thinly sawed, and metal horns added:
Tail feathers, tailskid, and ailerons are glued:
Landing gear on. Not much else, otherwise.
A bit of primer, touch-ups, and to the painting booth:
A mist of primer:
And now a base of gloss white, to later apply the other colors to better effect:
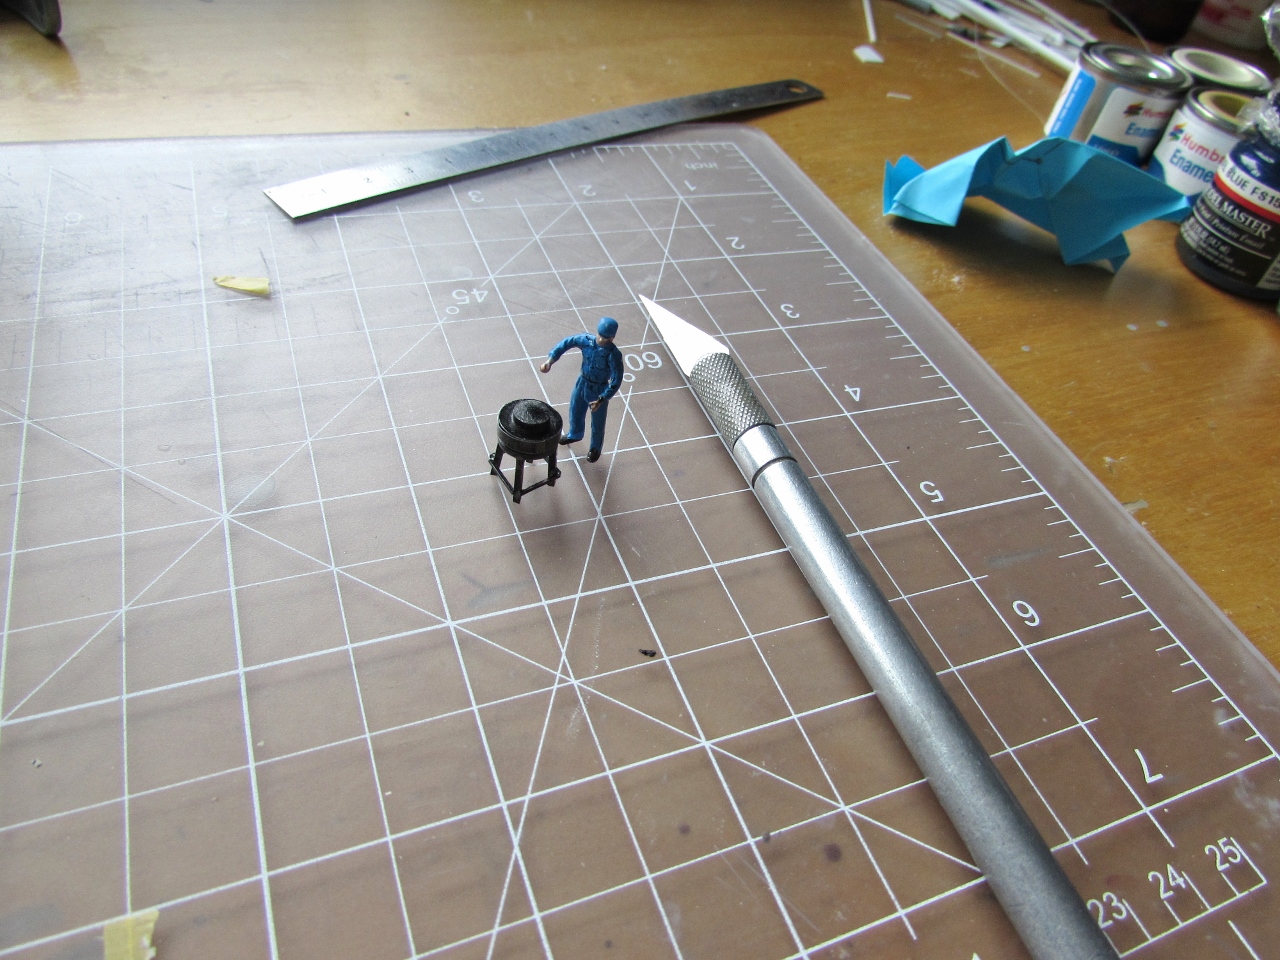
"It all seems quiet on the building board... but a crime is about to be committed! A worker is practicing his yoga asanas when suddenly...":
"Oh, the horror, the horror!!!. The murder weapon is still lying close to the body":
"Dr. Kildare and Dr. Ben Casey are immediately called in, and they
concur after some close ups on their faces that express worry, concern,
lust, hunger, desperation, exhaustion, elation, hope, voracious
appetite, deep existential introspection and the silent efforts to
suppress the gaseous product of their digestions. Using the latest
technology in the field of glues, they reattach the severed members and
instill new life in the body by the expedient of whispering in the ear
of the deceased: -Look! Mila Jovovich is here to see you!":
The worker (that still has to face some rehab in the form of putty and
sanding stick abrasion) is ready now to face the daunting task of
repairing the Small Stuff resin Clerget engine that I left mid-way:
Attaboy!
After painting, the scene can be part of the display of the completed model:
More airbrushing:
Prof. Chimichurri Gumby, Harry Hawker's mechanic, is ready to reassume his duties repairing rotary engines and doing some diorama posing again:
Red ensues. This in turn will be masked for the black, that in turn will be masked for the aluminium paint. The engine is the aftermarket one, half-built, that will be on the repair bench:

I started to apply the decals under the wing. The decals are very good,
in the sense that they are super-thin, but, for the same token, they
require extreme care in handling.
Since the wing decals come in two large sections, left and right, I
decided to cut the individual letters to eliminate as much carrier as
possible, and also to facilitate getting around the control horns I
already installed.
Once laid down, they don't like to be moved around, even with plenty of
water. This is what modelers usually refer to as "limpet" decals. I
broke two, but managed to join the pieces seamlessly. Their adhesive is
good, but seems to lack that "soapy" feeling that allows for movement to
precisely lock the subjects in position.
Once set, they look painted. But be very careful applying them.
As per their opacity, I will know when I apply the fuselage sides regs, that have a white background.
Next step the aluminium color:
Registration letters applied on top now. Also a bit stressful due to the decals not wanting to move around, even in pool of water. One folded, but they clicked in place at the end. VERY thin decals (which is very good, as long as you don't have issues).
Many manufacturers already provide a spare vac canopy. Why not a spare decal sheet?:
Masks off. Now getting ready for some rigging and final assembly:
Believe or not, you have to measure and cut 41 lengths of your preferred material to rig this little fella.
Four more if you do the double flying wires present in this plane.
Here is again Prof. Empanada Gumby, the mechanic, with the spare Clerget:
Getting close. Hold on with the rigging that may interfere with the decals. Apply the decals first, then the rigging:
And unwelcome surprise with the smaller decals: the carrier as said is VERY thin, so thin that you can hardly see it. I separated the small small subjects and started application, only to find out that the carrier exceeds about 2mm all edges of the subject. This will produce, in such small model and confined spaces, a lot of issues.
TRIM THE DECAL SUBJECTS CLOSELY:
To be continued...


Nice one, Claudio. I must have missed KP's release of that one, and confess I'm tempted to get it. Cheers, Mark
ReplyDeleteI think you should get it, it's fun!
Delete...y lo terminaste en 11 días. Admiro siempre tu forma de trabajo.
ReplyDeleteYo admiro 10 veces más la tuya!
Deletenice
ReplyDeleteThanks
Delete