

(The completed model is here:
https://wingsofintent.blogspot.com/2021/09/gal-st-25-monospar-azur-172nd-injected.html
There are certain plane designs that for some reason have an immense aesthetic appeal, even if their lines are somewhat unorthodox.
I have had for the longest time folders on the ST-25 and ST-18. The clunkier ST-18 is my favorite, but when I saw the Azur ST-25 in kit form I bought it anyway, as I never came across the much earlier Aeroclub vacuform in the same scale.
Adding to the potential confusion of several Monospar types that look somewhat alike, the 25 had two main versions, one with single vertical tail ("Jubilee" and "De Luxe") and the one that the kit provides the decals for, called Universal. If you, like me, would rather stray from the path and model another version than the one provided in the decal sheet, look closely at your references to avoid type mistakes, and notice that the kit provides extra parts for some of these versions (single vertical tail and associated different horizontal tail).
Long the kit slept in the stash, until today, when I had the chance of a more in-depth examination. The not unusual Eastern European mixed media of injected, resin and vac parts, a solution that most of the times works quite well. To my joy, TWO perfectly molded canopies of great clarity and perfect thickness were included. The resin parts are good and will serve the purpose, with some minute pores only in the interior pan. The injected parts have nice surface detail, but alas, they are sorely lacking in the locating device department, as again seems the case with many similar kits of the same origin. Well, some engineering and prodding and fiddling are no doubt in store. All in all, it seems to be a nice kit, though. We'll see.
The only solution that to me seems really strange is the complicated cut out of the clear part to fit the fuselage. I don't understand the advantage of such arrangement that surely makes matters very difficult, compared to the potential simpler solution that just requires using the full span of the transparency and removal of the area above the side windows. I will try to clarify with photos as I build.
Cheers to Azur for releasing this charming civil plane, an elegant twin-engine with twin or single tail.
Now, to the build.
Contents:


Parts separated and cleaned-up. Once more, no locating devices and plenty of butt-joints. Some of the struts look a bit clunky and may be replaced:


The long parts on the sides are the exhaust pipes, they are not particularly round, so we'll see:


An assortment of pinholes dots the floor, but once all is primed and painted they won't be noticed:

The wings and wheels halves have been glued together. The resin parts were separated from their pouring blocks, cleaned and made ready to prime and paint. The control yoke and wheel are already in place. I sanded the inner faces of the wing halves to reduce the trailing edges thickness, always a bit clunky in this type of short run kit. But beware that the engine mounts that protrude from the leading edges are angled downwards, and you should not touch those areas at all:

The "butt-joint technology" goes as far as not even providing a locating hole on the engine fronts or an axle for the props:


Time to solve the canopy engineering. As said somewhere above, I do not grasp the rationale about doing such convoluted cut-out as required by the kit, and opted for a much simple approach. I may still discover a fault on my thinking, but I believe it will be ok. The back of the transparency is cut off, as far as possible from the back window:


The kit is missing some small bumpies that will be eventually added:

Instead of using the kits struts which are a overscaled and not easy to clean properly, I will be utilizing extruded airfoiled stock or metal Strutz:

Primer and some colors are applied:

Even reducing the thickness of the wings from the inner faces of the parts -as explained- to get a somewhat sharper trailing edge, the airfoil silhouette on the fuselage sides is much thinner than the wing airfoil at the root. This will be an unpleasant marriage that will require filler and sanding in a not very reachable area, compromising surface detail. As explained above, the "butt-joint technology" employed by this manufacturer requires that you either do nothing and end up with a weak joint, or forces you to metal-pin the main parts. To add to this, nowhere in the instructions is a front view that will clue you to the dihedral, so better get a plan from the Net if you want the correct amount of it:

A bit more of paint:

The interior is assembled, and its fit checked. As it happens 99.99999% of times with resin interiors, you have to shave here and there for it to fit. Once satisfied with the dry-run, I thought the interior may slide into the assembled fuselage. And it did! So I glued the fuselage halves together. Another benefit of cutting the transparency and fuselage as I did. The inst. pan. would require some maneuvering, but it also can be added later. Cheers for that!:

And here we go. The seats and interior in general have quite a bit of details, even the "magazine" pouches on their backs of crumpled leather:

The fit of the transparency required very careful work. This one is up there among the most challenging vac transparencies I had to tackle. Still, I did not have to touch the spare, and I am convinced that if done the way the kit wants it, it wouldn't have been in the least easier. I am now trembling considering the upcoming masking of the individual panels, without kit's masks, aftermarket masks, or a printed mask guide by the manufacturer:

A "how does it look" dry run:

The not very enviable task ahead: masking 18 window panes, 8 of them of irregular shape:

Making and applying the masks:


First coat of primer. The task now will be to work on the seam at the back of the transparency:

We'll see how it goes once the putty is sanded from the seam:

It worked quite well, but I can still feel a smidgen of a step in a couple spots:

Therefore, to preserve the "faceted" shape of the fuselage, I proceeded to mask the central facet...

Some base color is applied to a few parts:

After some minor touches, the metal-pinned wings are added. The lack of locating devices makes this build really difficult, and have still to deal with the multipart landing gear! I don't think I am foreign to resourcefulness and some skill, but this one surely would deserve, being such a beautiful plane, some re-tooling to make it a friendlier kit. As it is, it's a case of mixed feelings, glad I can have a Monospar, and not happy at all about the kit's engineering. This one, with locating devices, an injected canopy, and masks, would be a winner, As it is, I wouldn't recommend it but to the most experienced builders willing to spend time and plenty of harsh language:

I use sometimes a water-soluble product called "perfect plastic putty". It´s many times very practical, and helps with a fast build if used correctly, but not "perfect", as it tends to quickly dry in the tube, no matter what measures you take to prevent that. The first tube I bought was dry already on arrival (hinting at a not very long shelf life) and since then I have to buy another tube every now and again, as I can only use half the tube and the rest is too hard and has to be discarded. Just the heads up on this one, good, but tricky.
Some more airbrushing. The engine cowls appear in one photo I have as having the front rim metal color (it's painted the same color red of the nacelle in other images). I liked that effect, and proceeded to use, as I many times do, Alclad polished aluminium.Well, for some reason, Alclad appears to have changed their formula or solvent, that now smells strongly of something like xylol. At the result, one of the main qualities of Alclad, that is to resist masking without lifting or adhering to the tape, is totally gone. Absolute crap. This has now happened to me many times, so something is definitely wrong with the product. It's also becoming common to experience a total inconsistency in the dilution of the pigment, for the same color, from one purchase to the next. One little flask will have a thin layer of pigment at the bottom, the same color next time will be so thick with pigment that it will clog the airbrush. I hope Alclad, a product that I have used uncounted times with total satisfaction, gets their act together, as there are now in the market similar products that behave quite well. I had to clean the nacelles, re-prime them and will be using other brand for the metal front area:


All is ready now for the final coat, but I will wait until the Arctic decals set is here to better match colors:


Using a different metallic paint than Alclad did the trick, and now the nacelles are ready too. Pity Alclad seemed to have messed up the formula in the last bottles I bought:

The aluminium color is airbrushed:

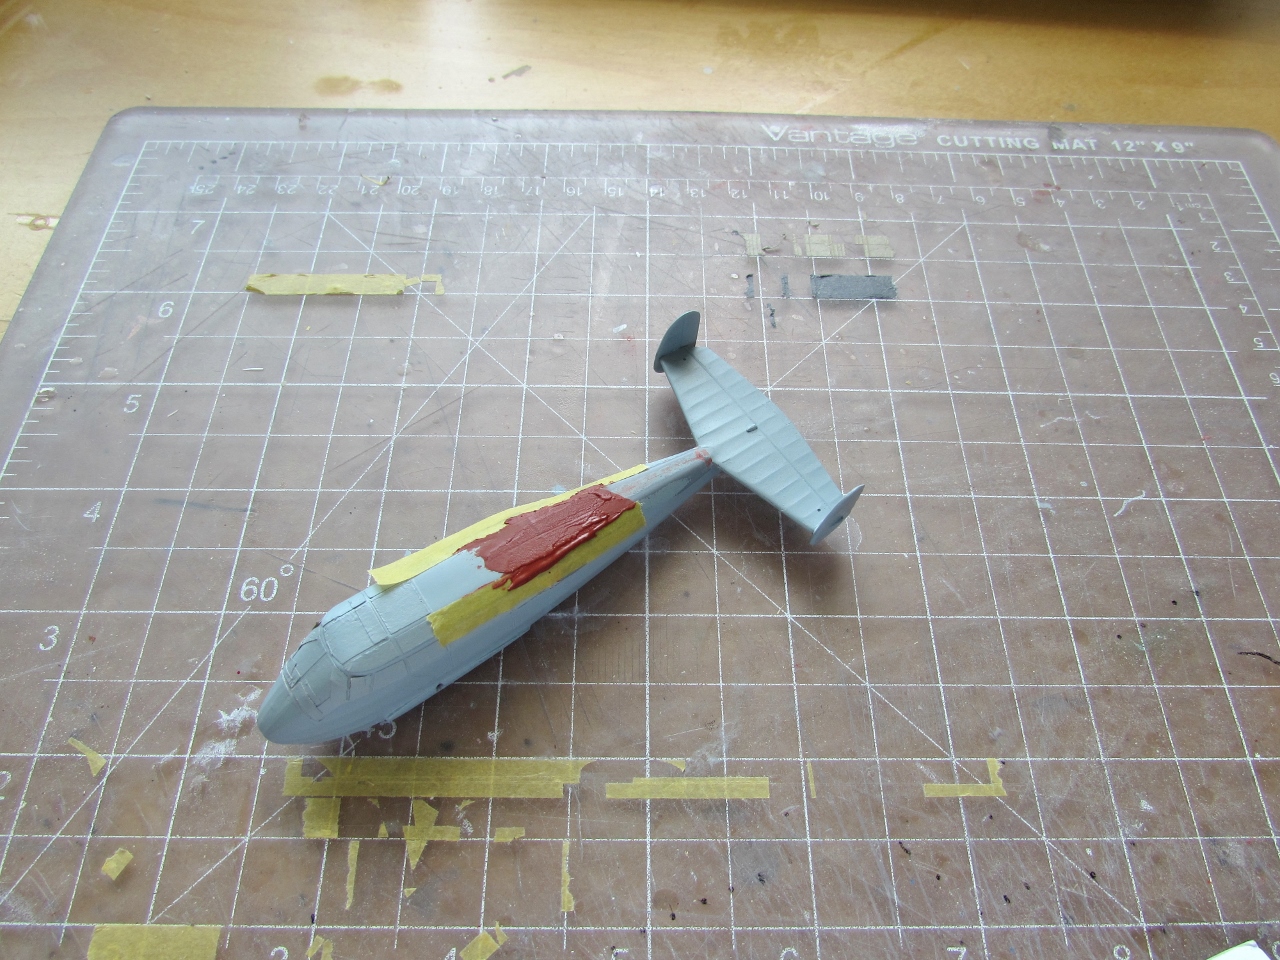
After a long session of laborious masking, the red color is airbrushed:

Masks off. A clear coat will follow previous to decal application:

Masks off:

Landing gear, horizontal tail struts and stirrup are added:


The four aileron horns and linkages, light on top of fuselage, small struts that brace the fins, four exhaust pipes under the nacelles, elevator linkage, and carry-over airfoiled wing spar are now in place. This is to remind yourself that things are not done until they are done, no matter how close you think you are to completion. Still to do: fabricate again the aileron counterweight balances, glue the props, and apply decals.

Everything has been added now, even the antenna that I had forgotten. Just decaling to be completed:

To be continued...
No comments:
Post a Comment