

(For the completed model please go here:
https://wingsofintent.blogspot.com/2021/12/inter-island-airways-kauai-sikorsky-s38.html
The Sikorsky S.38 of 1928 was the big brother of the S.39 of 1930, being of greater size, having two engines instead of one, and capable of carrying 8-12 people instead of the 4-5 of the smaller brother. The S.38 is also a sesquiplane, that is it has a bottom wing of about half the span of the top wing, unlike the S.39 that was a parasol monoplane.
Extremely popular and used by several airlines and private owners, 120 were produced in several versions.
The one presented by the kit is a later version, with the windshield inclined, instead of the older vertical one.
The S.38 CMR kit is in line with all the observations made for the two S.39s:
https://wingsofintent.blogspot.com/2021/09/sikorsky-s39-cmr-172nd-resin.html
the good and the not so good, but in general I would say it is a desirable kit if you have the necessary modeling experience (and not just "some" experience). I refer you to the S.39 builds for all the general observations, and will deal here with some particularities.
The bagged contents:


Second set of struts cleaned up:


What could one do with a spare hull? You never know, so taking advantage of the still not installed interior, a basic one is reproduced, just in case:


My friend David, the Ineffably Logarithmic, was reluctant to make a choice regarding the color scheme of the model, the task being passed to his dog, Toby the Relapsing Rascal. If Toby made a choice, we may never know which one, as it's hard to tell "woof" from "woof". To be honest, I liked the NYRBA option provided with the decals, and also Osa's Ark, for which very unfortunately the "zebra" motif -that is drawn in the instructions- is not provided on the decal sheet. I also acquired, just in case, the aftermarket Draw Decals sheet for "Inter Island", as I am very fond of Hawaii, a place we visit as much as we can. The Inter Island planes had Townend rings on the engines almost always (but not on their christening day), and those will have to be scrounged from somewhere or made. So a decision needs to be made, as it impacts minor aspects of the build. Meanwhile, here is an interesting finding for the Hawaiian Inter Island planes (there were four: Maui, Kauai, Hawaii and Molokai). The sliding hatch for the entrance seems to be a clear panel! I love it when a bit of research can throw some light (pun intended) into the build:


Comparison between the two Sikorsky, S.38 to the left:

The kit's wheels with their solid spokes are replaced with O-rings and photo-etched spokes:

A coat of primer:

The kit as you can see above provides only six passenger seats, but the instructions only show four passenger seats, (the other different two are for the cockpit). This is not according to references, which clearly show eight pax seats, although other special arrangements can be seen in privately-owned planes. The kit provides a drawing of Osa's Ark, as mentioned before, but does not provide the interior, which was completely custom. The back cabin bulkhead was also neglected, and some planes were equipped with a very small toilet after it.
The landing gear tall legs (they insert in the engine nacelles) were already a bit bent:


The notches on the wing for the booms were too big as they came, so they had to be shimmed:


Booms and stab are aligned and then glued. As I mentioned, the fit is not precise, so you can't trust the parts, but rig them carefully::


Part of the tailbooms structure is on to help with stability:

The float short struts (some of which arrived already broken) are replaced by much stronger metal ones:

The tailskid/suspension unit is also replaced by metal components:

Base color is airbrushed to many internal and external parts:

A coat of primer on the wing/booms/tail sub-assembly. It revealed many blemishes on the leading edge and a couple air bubbles:

The little rail that goes over one of the removed tabs is given that tab back (it will be cut to size later) and primed:


But a closer look at references revealed that the toilet did not have the conventional shape, but was actually just a hole in a plank with a can below, so an accurate one is fabricated, together with the other needed parts:

The wood effect is created with oils:


The transparencies are cut. The fit seems good:


I can't see any marks or reference points for the many struts that go here, which will make things very difficult. The only notches are for the LG at the bottom and the central "+" strut to the side of the nacelles. Bummer.
I am replacing the access sliding hatch as photos show a clear panel (at least in the Inter Island ads). I am making two, just in case:

The metal colors applied (exhaust, aluminium, polished aluminium, etc):


The interior is ready:


Dry-run checking that everything fits after the modifications:

Blemishes were dealt with, and a last coat of primer is applied to the wing sub-assembly. Both sets of engines are not ready, whichever is finally chosen, the other pair will be ready as spares for other projects:

A set from Draw Decals arrived today, in case we go for the Inter-Island livery. Depending on the choice, you may have to add some missing thin line "boxing" clearly seen on the booms in photos surrounding the text:


Acrylic bath for the vacuum-formed transparencies of the two S.39 and the3 S.38:

Size comparison with the in-progress S.39s:

The vacuum-formed transparencies are glued from inside. One of the aft portholes wouldn't conform properly, so it was cut off. The space will be later filled with "window maker":

The fuselage halves are glued together:

The seam line all around is masked on both sides, leaving a 2mm gap. This is filled with putty. Once the putty has set, the masks are removed and the seam carefully sanded avoiding marring detail:


Plugged and ready to be primed:

A friend got into a program that certifies you as a pilot:


The hull has been primed, sanded, and primed, and sanded, etc. Still the not so good hull moldings are giving me fuss at the upper seam. If I would build this kit again (which I very much doubt), I would have sanded the seam smooth obliterating all the detail, as it is far easier to reproduce the surface detail than maneuver around it and try to make for the not so symmetrical halves and the really uneven seam they create:

More corrective sanding ensues. The cockpit transparency (dry-run) was about 1mm wider than the fuselage, one more problem to solve. Sigh...:

After much pondering, photos showed the side windows open, so I did, fixing the issue:


So, what was I saying about fixing kit's problems? Oh, yes, the lower wings form an inaccurate angle when joining the fuselage, as their roots are not angled as they should to accompany its shape. This is a really silly oversight:


Compressed air is used to blow any possible debris and dust from the interior, before masking the side windows and add the cockpit transparency:

A bit more more masking and we should be on our way to start airbrushing the base color:


The white color on the vertical tails is masked, and red and blue applied:

Hull and floats airbrushed with French grey. Lower wings with aluminium. The former will be later masked to apply the underneath black (looking gloss in photos) and the top of cabin black (looking satin in photos):

The wing/tail sub-assembly is painted aluminium, and the vertical tail masks removed. The bottoms of the hull and floats are painted black:

Hull bottom and hull top painted now in gloss black and satin black respectively, masks removed:

Most components are ready, now I have to prepare the 23,845 struts for the final assembly:

And what are the chances, at the next table during a lunch out:


The struts are now prepared for painting, together with those of the two S.39:

Meanwhile, friend David the Logarithmically Tall (future living-room and bathtub pilot of the S.38 and one of the S.39) sent an anticipated Holydays present:

I am now giving a closer look to the Draw Decals set. Compared to photos, it seems that one pinstripe is missing (it goes all along the fuselage at a short distance below the windows). This is not included in the nice graphics that accompany the decals:

As these planes went through some changes (the already mentioned presence or not of the Townend rings, among other details), some photos show the plane number (they were number from 1 to 4) prominently on the fuselage nose. Others don't, and the decals do not include these somewhat large numbers:


The mail service related lettering is also either present or not:

None of the photos I have shows the high-vis yellow area on the top wing, but this is depicted in the decals graphics:

Again, there were changes along the service of these planes, so may be they had, or not, at one time or another, the features described as pertinent in this decal sheet. I will try to walk the line based on what photos I have (not many, really).
Here is where the build stands today:


Experienced modelers know that the most difficult parts is still ahead, to get together those parts with a profusion of struts. I think that a key element would be the cruciform part that unites wing, hull and engine pods.

To which extent it could be used as a starting or aligning point, we will see. Where is Yoda when you need him...
The Draw Decal set went on without any issues, but the fuselage black pinstripe (actually molded in the kit, as it is some sort of batten) will have to be added from spares. If any feedback at all, it would be to give more space between the small lettering. There is quite a bit of real estate on the sheet, but all the small lettering is clumped tightly together for no reason (the names of the planes, for example), making cutting the individual subjects a difficult operation. No spares whatsoever are provided, if you mess up a small bit, you are done. The model has now been given the name of Kauai (of the four options available), as I vacation there and have become very fond of the place:

The other side of the struts will now be painted. The area of fuel tanks will be given a different metal hue, as it was not doped fabric:

The pinstripe is added:


The nacelles are glued to the cruciform main struts, my hope is that this will help with alignment and facilitate the addition of the upper wing:


Exhausts are added:


Houston...we have (yet another) problem. The V struts that connect the top of the fuselage with the wing interfere with the engine nacelles. Here I am sort of forcing them to open (with a temporary wood spreader) to the width needed to set on the fuselage, which of course forces them to curve a bit, and pushes down the horizontal bar of the + strut, also slightly curving it. It seems that it's impossibly to completely trust many kits. The easiest solution would have been to add a bit of length to the horizontal component of the + bars, thus separating a bit the nacelles out from the center, clearing the V struts. Not so neat a solution would be to carve the nacelles or the V struts where they make contact until no tension is induced. But, as you know, you have to use either epoxy or superglue to deal with resin, and now all is very firmly glued in place. So here we are, stuck with another kit-induced shenanigan:


The extensions:

The extensions ready to be added at the ends of the horizontal strut:


Two sets of four parts (three of them "V" struts) represent the engine nacelle struts. They are overscale and unrefined, and lack the angles necessary to make appropriate contact with the nacelle surface. The nacelles lack their locating holes or marks, but their anchoring points are marked on the wing. Their fit is vague and imprecise, I think I may replace them with more-to-scale and properly sized metal items. Granted, this is a complex array, and not easy to render in kit form; still, I expected a better, more precise solution. Here are the kit's bits:

As the final stages approach, it's good to have a look at the details that might be missing from the kit. Photos revealed a group of small teardrop fairings. These are made sanding the end of a leftover plastic strut to shape, and then cutting it off. I discarded the ones -to the left- and made smaller ones:


If CMR's S.39 kit has exquisite surface detail, their S.38 is somewhat lacking in that department, and has to be added by the modeler.
At this point it was obvious that the very flimsy and deformed tailbooms "V" strut wouldn't do, thus another one was made from metal. Below is the kit's flawed part. Hot water baths cured the curve for a few days, and then it will return to a banana shape, besides the flimsiness:


Here is the new "V" strut this time with the proper length, measured in position with the model propped:

The two sub-assemblies were connected using the main + strut and the "V" strut behind. Once that was secured the inner wing struts were added. Here I had to replace the kit struts as they were a tad shorter than needed (as was the original V strut). Then the outboard struts were added, trying not to induce tension (and thence warps):


All the struts, small and large, are now in place. The original ones were either short or long, besides being not rigid enough, so most have been replaced. The fun continues.

And guess what... the landing gear legs, of which I had previously replaced the lower part with metal tubes as the kit rendition was poor and flimsy, now show to be short. So new legs were made, something I have should have done at the beginning. You live...and many time don't learn:

While work continues on the mainframe, additional details are dealt with. Photos show a short mast on top of the wing with a light. I have seen this feature once in a while on photos of other planes:


The part is fabricated:

A cleat can also be seen in contemporary photos on top of the hull nose:

And again the part is fabricated:
Rigging mostly done:

Floats are on, a few walkways on lower wing and hull top:
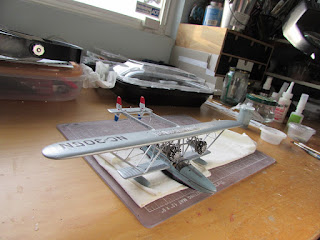
Landing gear, Townend rings, props, nav lights, cleat, and other details are on:

Photos show the props without any logos, with the old HS logos (the stripe with the airfoil), with new HS logos (the oval with the prop in the middle), with red tips, without red tips, with different props on the same plane, etc. So I didn't apply any logos to it yet.

ME ENCANTA ESE APARATO. HACE AÑOS VI UNO EN RECUPERACION EN UN MUSEO DE U.S.A.
ReplyDeleteEs realmente una hermosa máquina.
DeleteClaudio,
ReplyDeleteBeautiful build in all respects! The red/silver scheme is very striking, and it is a type with which I was unfamiliar. I enjoy your builds and the histories that accompany them, as I have learned so much about Golden Age civilian aircraft.
Thanks, Mike!
DeleteThe scheme may be a toss between Inter Island (Hawaiian) and NYRBA.
We'll see. Much to do still before reaching decision time.
What a beauty!
ReplyDeleteIsn't it so? I also love the spidery looks very much.
DeleteCheers