

(For the completed model, please go here:
https://wingsofintent.blogspot.com/2021/12/sikorsky-s39-varney-air-ferries-cmr.html
Igor Sikorsky, one of the most important aviation pioneers, was creating four-engine passenger planes well before anyone else, actually even before WWI, in his native Russia. After migrating to the US, and painfully laboring through trying times, he finally established one of the most relevant aviation industries in the country. He is also well known for his contribution to the development of the helicopter. At some point he realized the importance of the flying boats to span great distances in regions where facilities were not well-developed, and created some of the most beautiful and pioneering planes ever to serve as such, effectively contributing in great measure to the opening of the wide oceans of the word for passenger and mail traffic. The mystic of the great transpacific and South American flights -and of aerial world exploration- was born. Among these machines the best known are the S.38 and S.39 for the shorter hops with few passengers, and the S.40, S.42 and S.43 for the larger flight spans. I have built a model of the latter that you may see here:
https://wingsofintent.blogspot.com/2013/05/execuform-sikorsky-s43-172-vacuform.html
The S.38 and the S.39 bear some resemblance, but beyond some general shape and design commonality, they are very different planes. As objects, they look very busy and complex, which is what I love in a model, and exhibit a great amount of detail from the go.
I had long sought to acquire kits of CMR's Sikorskys S.38 and S39. There was also a vac released by Esoteric Models which unfortunately is not available anymore and I couldn't find any to purchase:

Some time ago, during a trip to Palm Desert, I found in the local hobby store (RarePlane Detective) the CMR S.39 kit. Meanwhile, dear friend David, The Immeasurably Tall, had acquired both kits, so we decided I would build them all.
I have built CMR kits before, and so have many of you: they are well detailed and well-cast, and among the better kits in resin media. Resin is a strange region populated by great renditions (SBS Model, 72Topia, and CMR among others) and the most despicable blobs.
In opening the box, the first thing I decided was to replace some of the resin struts and structural members for metal counterparts, as I have done with many resin kits, considering the feeble mechanical strength of such parts when bearing loads, even the mere weight of the model. The landing gear structure and the booms are questionable too regarding mechanical strength. The vacuformed transparencies had not withstood the passage of time (maybe 12-14 years?) and have utterly yellowed, no remedy would work to restore clarity. As all modelers that have built resin kits know, they require a specific approach, specific glues, specific cautions taken, and sometimes different building strategies than their injected plastic counterparts. I don't consider them more difficult or laborious than many injected kits, though, just different.
CMR's S.39 looks well engineered in general, but also with areas that seem not that well resolved. Very intelligently designed top and bottom fuselage halves, and the wing-booms-stab group is presented as one piece, which would help -in theory- with alignment and the build in general, but introduces more issues than it solves in reality (see below photos). As per usual, there is great detail, in the form of a multi-part engine, full interior, and many smallish parts to add interest.
The contents come bagged separately, but even before opening the pouches I can see a couple of broken parts, which is a frequent bummer with some resin kits. The decal sheet, presenting two options -"Spirit of Africa/Borneo" and Varney Air Ferries- looks very nice and well printed. It seems, though, that the Varney scheme may be partially inaccurate, as the surface under the wing was clearly not blue, but most likely aluminium, and the top, also indicated as blue like part of the hull, may have been a high-vis color, like yellow-orange, invariably used on these seaplanes as it facilitates eventual spotting and rescue, instead of the blue that will effectively act as "camo", and make it much less conspicuous in the water. Photos clearly show the color difference at the leading edge, darker hue on top. The top of the hull does seem white as indicated in the instructions, but the rest of the airframe looks like aluminium, again in accordance with frequent practice. Something to ponder about.
References were gathered and some thinking was done on alternate schemes, as the S.39 had many users.
A model of this complexity requires patience and some skill, and is most definitely not for the less experienced. The build is better approached in thought-out steps, and alignment will be a constant (pre)occupation during it.
The contents, group-bagged. Note very big resin panels holding together the wing/booms/stab, that will create issues down the lane:


In any case, the side windows are very small and can be done with liquid "window maker", the optical quality on par surely with what the not superb vac could attain anyway, but the cockpit glazing is another matter, and maybe I would have to make individual panes from clear sheet. Mille tonnerres!
Very practical and well-realized split of the fuselage. All openings were thinly webbed, but easy to clean up (very very carefully, mind you). These parts are a casting marvel, no defects, and all the thin framing is intact and well-defined:


And material to be removed on top of the boons, which have almost 0 mechanical strength and will not tolerate fussing. Good intentions that did not translate into practical building help, one may say:


At this point I looked at models posted on the web of this kit and saw that other modelers were faced with the same issue, and replaced the booms, which is what I may do.
The bent in transit tail struts are treated with a bit of hot water and the shape restored:


Dry run of the cockpit transparencies. They pop in perfectly. Since that section is the less affected by yellowing, I may use it:


Now to the very fiddly bits, which come webbed together. I excised the easier ones first, the "N" struts. I noticed that two of the "T" wing struts had tiny air bubbles, and I know that this spells disaster, so I filled the air holes with a bit of cyano glue. It didn't work, and the first one broke nevertheless as expected, plus it's extremely difficult to obtain a clean part removing the mold seam due to the extreme fragility of resin. I decided to replace all these with metal airfoiled "Strutz" and keep for the moment the resin "N" ones:

As the manufacturer himself advises:

Just to make things a bit tidy, the mold mismatch spots are filled with putty, after masking the adjacent areas. As mentioned, I may be replacing those booms anyway:

In an extraordinary bout of luck, the S.39 my friend bought has two sets of transparencies, thus providing one to replace the yellowed one I had:


As we all know, no resin kits of the same plane are created equal, as the artisanal nature of resin molding introduces variables. This second kit as mentioned has many parts broken, but again it went through many hands and not in its box.
The cleaning and readying of the second model parts started. The very thin molded flanges to keep the spray away were broken in this second kit.


The missing bit for the control wheel is added:


In a sort of longuish airbrushing session, five basic colors are applied to parts of both models:

The repairs have been completed on the first kit booms. It may be done, but it's not worth it:


More airbrushing ensues. Various colors or metal hues according the parts:


Oil colors are used to create the wood effect. The bulkheads were not installed yet as they have detail (a hook and what looks like a bilge pump) that needs to be hand-painted:

The not so fun bit: extricating from the casting web and cleaning those struts. To the left, what is more or less salvageable. The the right, what won't do. Still on the left there are some questionable ones due to mold mismatch, tiny bubbles, deformation and such. Some came already broken:


Detailing proceeds:


The engines are assembled, and all the interior parts are in place:


The elevators and rudder are provided with new metal control horns, as the molded-in resin ones did not survive the years:


The missing fuel tank battens are pre-curved a bit to follow the airfoil and cut from thin styrene stock:


Acrylic bath for the vacuum-formed transparencies of the two S.39 and the3 S.38:

The horizontal tails are now in place, as well as a Strutz crossbar to substitute the kit's:


Troubling waters: the transparencies are a bad fit, and too thick. If you glue the ones that go on the sides, they will interfere with the interior structure and details. Freaking bummer. The front one, that seems to include the two small windows on top of the cockpit, is again a bad fit. I had to cut the latter and apply them individually, still a not pleasant fit, if you make one side fit, the other is off, and vice-versa. There is so much you can thin the resin frames, and to no avail anyway. You can't "press" the transparencies into place, as those thin resin frames will surely break. There are also differences in thickness between the resin parts in the two kits, product of the "artisanal" molding, unfortunately getting in the way, again, of a good fit. What a disappointment. A complex build to start with, and many problems as you go. Not for the faint of heart, or those looking for a relaxed, pleasurable build.The side windows will have to be made with "window maker" liquid, as making them from clear plastic and pressing them in place would risk breakage again of the thin resin structure. Fortunately I planned to open the access hatch on top, in order not to negate visual of the interior.
There was no way those front clear panels would fit, either the new spare ones or the old ones, so I had to separate the old ones (that had a slightly better fit) into individual panes, trim them as much as possible, and glue them one by one. Not my preferred Sunday modeling activity:

After those front and top transparencies were finally fitted, I joined the upper and lower fuselage halves. As explained, the side windows were not a good fit either, plus they interfered with the internal detail (bulkhead and back seats), so they will be later filled with "window maker", after painting (for which I will have to fill the fuselage with wet tissue, to avoid paint the interior as I airbrush the interior). Oh, the things we are willing to do to have Sikorsky S.39! Yes, I know, in a few months time some blessed manufacturer will release a friendlier kit of it in a more amicable media (clue: top half of the fuselage made entirely of clear injected plastic and with masks provided for the windows). Sigh...

Slowly getting there...

Now the cockpit transparencies on two fuselages are masked, one by one. Very tedious and a fuss, let me tell you. The pax side windows will be done with liquid. The side windows of the cockpit, as they retracted down into the volume seen on the fuselage, will be left open as in the majority of photos:

After masking, the two hulls and the two wing/booms/tail sub-assembly are primed:

If you are doing "Spirit of Africa and Borneo", it is good to know that the yellow area on top of the wing was interrupted by two bands of the general aluminium color -where the external wing panel joint is-, as easily seen in this photo:


The second model will be painted as Varney Air Ferries. Here the instructions are misleading, as the bottom of the wing wasn't blue like the top, but aluminium, as photos at the SDASM photostream show, and the rest of the plane (minus the hull top that was white) was aluminium too, again, as photos show:
https://www.flickr.com/photos/tags/nc55v/

After priming those remaining parts, the basic paint will start:

The hulls are painted white, which will the base for the sandy base color of Spirit of Africa, and the light blue azure color for Varney Air Ferries.:


The base sand color of Spirit of Africa is airbrushed:

The upper surface of both wings, that will have some hig-vis yellow and Varney's blue, are given a coat of gloss white to better enhance the following color:

The hull and floats' bottoms of "Spirit of Africa" are airbrushed satin black:


The painting mask for the yellow on Spirit of Africa wing is prepared. The instructions will have you make it so it has the same heights as the registration decals, which is inaccurate, as photos show some space above and bellow them. I made mine 15mm wide:

The mask will be applied over the yellow, and the rest painted aluminium:

The Varney fuselage and floats are painted in that particular light blue with a pinch of cobalt color:

Aluminium airbrushed and mask removed:

Spirit of Africa main components are ready:


The Varney main sub-assemblies are ready. I reiterate that the surface under the wing isn't blue as stated in the instructions, but aluminium, like the rest of the plane -minus the hull top, that is indeed white:
The thin black decals that divide the hull colors on Varney broke in many pieces after a short time of being submerged in water. The decals do not look old, but they are (about 15 years or so?) and they didn't survive the passing of time with dignity, unfortunately. I managed to handle the many bits and form the required lines, but not without proffering some colorful words. So beware. I scanned the remaining images (those giraffe spots, trouble on the horizon...) just in case I have to print a new set. Decal spray to "fortify" them doesn't really work unless applying several coats, which renders a decal pancake that can be noticed from afar once applied, and I hate that. One more headache with these kits.

After a hiatus due to vacations and:

As it would have been too difficult to apply the myriad of decals for Spirit of Africa once the assembly was complete, I decided to apply them to each sub-assembly and seal them. This is, as we know, a very optimistic project on part of CMR, almost doomed to have downsides. And it certainly does. I have two kits (and therefore two sets of decals), one being newer than the other. None of the sets allow for an uneventful application. The decals -otherwise well printed on super-thin carrier- brake on contact with the water, or during application, or during manipulation, making the decaling process a veritable nightmare. Needless to say, many of the larger subjects go on double-curvature surfaces, and almost all go over surface detail molded on the parts. So not another Sunny Day in California. I already had to use the second set for decals that teared and curled and folded, and I just had began!. Oh, I hear you: "Apply a coat of decal varnish", but nope; that, in order to really strengthen the decals, quickly becomes a decal pancake that refuses to follow the complex surfaces of the kit. So fingers crossed, and we go on:

CMR has made some provisions in a few areas to account for the double curvature of the kit surface, separating large decals into sections, or providing additional sections to fill-in some gaps. Unfortunately, it doesn't always work, and again, moving the decals around over prominent surface detail to adjust them, even with plenty of water and a delicate touch, creates creases, and endangers folding-over and tearing. Some images fall a smidgen short of the area they are supposed to cover, some are a bit larger. Patience (and a spare decal set -get one of scan and print a spare if you can) is the name of the game.
As advised by the modeling monk Jaakuna Ritoru Kitto in his "The Zen Art of Decaling", the modeler should pacify his mind contemplating the soothing sunset:


The work for the day is done. Setting solution was applied to help conform the decals to the surface. They are so fragile, that when brushing the solution -with a soft brush, naturally- the N on the registration lost some bits. And since we are at it, the kit's instructions have the reg under the wing in the wrong place, look at photos of the original plane (not the replica) and move it accordingly a bit towards the righ, as I did:

On the positive side, I once more stand in admiration at the incredible level of surface detail in this little kit. It's extraordinary. Whoever did the masters is a superbly talented craftsman. Pity the bad resin struts, the vac parts, the bad booms and the problematic decals.
A few more "giraffe" decals were applied to the hull and floats, and the reg on top of the wing. Since the carrier shows a bit, I cut the regs in individual letters and trimmed some of it:

All decals applied now:

The struts are now prepared for painting, together with those of the two S.38:

Meanwhile, friend David the Logarithmically Tall (future living-room and bathtub pilot of the S.38 and one of the S.39) sent an anticipated Holydays present:

Now to the Varney's S.39. The big lettering on the fuselage is on. The decal sheet is missing two other inscriptions visible in photos in a much smaller font that go in that area. The one at the nose of tip says "Bay Wind", the other "Speed Lanes Inc.":

The vertical tail decal comes as one large subject. Guess how if fits. You got it, it doesn't, its too large. Guess again when you discover this. Right again: once you have laid it down.


Another missing detail on the decal sheet: the leading edge of the fin is also part of the decoration motif:

Comparison between the two decal sheets in the two kits (compare the hue of the blue):


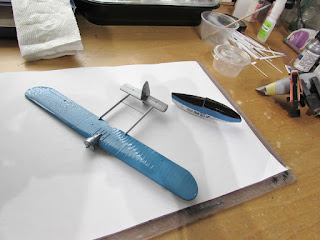
Here is where the two builds stand today:


Savvy modelers know that the challenge is still to come, how to unite all those parts with a forests of struts. Knee-shaking ensues...
As I wait, the smaller parts are removed from their casting blocks and detail-painted:

What I think it's one of the most difficult stages of this build was attempted by gluing some of the connecting bits to the hull (in the photo below the "V" tailboom struts are there, but I removed them before gluing the wing, and added it later):

The gluing was done in this position, laying the wing upside down on the board. The tailwheel was glued to provide a reference for the V strut:

The N struts are next, then the floats and the fin struts:


At all times this remains an extremely fragile model. Being the mechanical strength of those resin struts very low, tings are wobbly and a tad too flexible for comfort. The fit of all those struts is in the general ballpark, but not really precise, and adjustments are needed. So far, all the little pips that help location at the end of the struts had to be removed to get a good fit. An additional issue is that many struts came bent/curved, and not always are easy to straighten, and occasionally will go back to bent after a time.CMR used in other kits a black, more resilient resin, but the one here is not really good:

The floats-to-wing inner struts are not in position, as well as two thin rods that connect engine and wing:

All the external struts, on both models, were defective or broken, all will have to be replaced by the previously prepared metal ones:

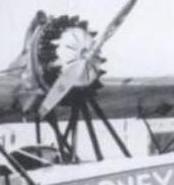
The instructions correctly point out that the Varney plane did not have the oil cooler that Spirit of Africa had, but the kit is missing the "funnel" air intake seen in photos, and that will have to be fabricated:


All the struts are now in position, and the access doors have been added on top of the hull:

Some rigging is being added. The kit is a bit off regarding the position of the elevator control horns/fin struts, the latter interfere with the former, something I didn't realize until now. Once more, kits can't be blindly trusted:

The same assembly sequence is used for "Spirit of Africa", first the "tripod" made by the engine struts and the short fuselage side ones, and then the "V" that supports the tailbooms:


The remaining struts are added following -as mentioned above- the same steps as in Varney's model. Again some resin struts have been replaced by metal Strutz, as the kit resin ones were badly molded, too deformed, or broke during extraction due to air bubbles in the resin. For this particular kit, the resin struts were not a good choice, and they should have been provided as metal airfoiled material, or some sturdy inject lengths of it (as in vac kit sometimes). While inserting these struts, care is needed in order not to induce changes in the geometry or stresses that may lead to deformation or misalignment:

The two models are now at the same stage, using the first as "practice" and carrying the experience and solutions to the second:

Quite a bit yet to the finish line, still having to add the engine sub-assembly, main landing gear, remaining rigging and control cables, and misc. small details like Pitot, aileron hinges, etc.
The Varney Sikorsky is now ready to take off. It's late now, so tomorrow, weather allowing, will do the photo session:

The jig to prepare the somewhat complex double rigging of the booms (I have to do this now on "Spirit of Africa"):

A beautiful rolling fog dusk yesterday:

The pre-rigged rigging is applied, first on top and then bottom:


And when you think you are done, you remember there are still some smallish details that need your attention. The resin Pitot was not well cast, so a metal tube replacement was made and added:


No comments:
Post a Comment