

(The completed model is here):
https://wingsofintent.blogspot.com/2022/04/de-havilland-dh89-dragon-rapide-hercule.html
Hercule Poirot Channel-crossing plane*
*These strange days you never know when you may step on somebody's copyright toes. Poirot is a series that at home we love, followed, and never get tired of watching again. We had gone through it so many times, that we can often anticipate the lines. The production is so well crafted, the actors so wonderful in their roles, and the spirit so charming, in spite of the crime-solving genre, that the whole thing has become for many like us a true classic. Be this a small but heart-felt homage to Agatha Christie, who wrote the original books, and to those who created this iconic TV series.
...Poirot and Hastings are on board of a De Havilland DH89 Dragon Rapide over the Channel, approaching the white cliffs of Dover, while Poirot himself is approaching the point when you start to desperately look for that paper bag...
The Plane registration is G-ACZE, and it's smartly painted in blue, red and silver. A shot of the interior from the famous TV show seems to depict perhaps a variant of the configurations illustrated here, a baggage compartment that opens to the right hand side of the fuselage, and what looks like a door, slightly offset back, to a small restroom, although it's not really clear from the images I could find.

It's uncommon that we modelers would chose build the same subject -and kit- over and over, but I have done so on occasion, as the charm that two particular planes exert over me is seemingly inextinguishable. Both are De Havilland designs. Now, if you would forgive me, I don't think British planes in general are particular beautiful, or graceful, (I could give plenty of examples if you ask me) but the De Havilland firm is an exception. So I have built many models of their DH88 Comet, and an growing amount of their DH89 Dragon Rapide, using the venerable Heller rendition of it:
MacRobertson DH89:
https://wingsofintent.blogspot.com/2018/06/de-havilland-dh89-tainui-macrobertson.html
Argentinean TAASA airliner DH89:
https://wingsofintent.blogspot.com/2018/06/normal-0-false-false-false.html
Uruguayan "Expreso del Plata" seaplane airliner DH89:
https://wingsofintent.blogspot.com/2020/08/dh89-dragon-rapide-seaplane-uruguay.html
Canadian seaplane DH89:
https://wingsofintent.blogspot.com/2020/08/canadian-dragon-hic-sunt-dracones-part.html
(plus one or two old builds from many, many moons ago, at a time when Internet was for me a sci-fi term).
This very old Heller kit is the gift that keeps on giving, and once more when completed it will be plying the skies of imagination in a colorful livery, British this time, to honor its place of birth.
There are some aftermarket accessories for this kit (unfortunately originally presented by Heller in inexplicably unappetizing, utterly boring schemes, over and over, in a marketing miss of proportions) in the form of a very good mask/window frames set from Arctic Decals, and a photo-etched set by Kuivalainen (produced by Eduard, but now apparently OOP, which is regrettable), some interesting "upgraded" versions released by Tasman Models (that include the Heller kit) and yet another, more succinct, aftermarket photo-etched set by SBS Model. There are kits of this plane in other heretic, ungodly scales that we will not mention in this 1/72nd scale noble sanctuary).


Old style instructions, more "instructive" than many nowadays. Just a caveat: I don't know who had the brilliant idea of threading everything before -or as- you build, it's the perfect recipe for complicating your -already complicated- modeling life. Better to do it after the model is built, using the aftermarket photo-etched rigging set, or ceramic wire, or elastic thread (which I dread), or steel wire, or the old method of stretched sprue (a blast from the past), using the holes already in place on the wing as help. The too big holes on the tail surfaces are better plugged, they are ridiculously childish:


A Preiser figure that I would like to adapt to represent Poirot, deleting the tie and painting a bow-tie (if my sight and hands allow it):


Ideally new ones should be made:

You could use discarded ordinance tips, or simply shape the ends of a suitably-sized styrene rod or thick sprue leftover, as in this case:


Better to do a few, to chose the best among them:

If you drill the rod (before shaping and cutting), you can insert the blades instead of butt-glue them, if that´s your approach:


The SBS set. It covers rigging, the aileron actuators, and a few other small details:

It's wise to have in mind that one of Heller's "aileron actuators" is one rib bay out of place, and should be removed and relocated. Here is the good one (about 25mm from the tip):

And here is the one (about 30mm from the tip) that should be moved outwards:


The horizontal stabilizers have been modified. Besides the angle of the ribs, the angle of the root has to slightly modified, otherwise the hinges have a little arrow. To correct this, the front pins are erased in the process of sanding the root, and a new one is installed:


The added home-made aft bulkhead is mounted on the cabin floor, and the aft windows puttied over:

The aft windows are now blocked and flush with the rest of the fuselage:
The prop blades are carefully separated form the kit's spinners and added to the home-made ones:

The air scoops present in the gondolas are opened up, and small additional air vents are drilled, while the seams are tidied:

Poirot and Hastings, I repainted the figures to make them more similar to the characters:

The engine gondolas are glued to the wing. The struts are separated, cleaned up. The two that have ejector pin marks (the only ones present on a visible surface of the kit) are puttied:

The wind-driven generator is fabricated and added:


Just to be clear on how the aileron actuators work (in a sort of rocker arm-way), they are connected through the strut (a rod inside the hollowed strut, actually), so that's where they should be positioned, aligned with the strut:


The props, wheel hubs and exhausts are painted with three different hues of metal. The cabin floor is masked and the inner sides of the cabin bulkheads are painted a light ocher, as a base for the oil colors that will create a wood panel effect:

For a model that will have no open hatches or doors, and with the relative clarity of the kit's transparencies, I think this is enough detail:

The interior is glued on, as well as a few curtains:

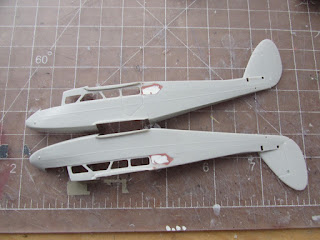
And the fuselage halves are united:

The top wing goes on:

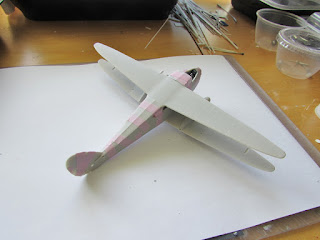


There are a couple of things that need to be dealt with in this Heller kit, and they are known to most builders. One is the step that remain after you glue the wings in the right position (that is, aligning them with the wing root profile sections present on the fuselage). In other builds I used an engraved veneer for top and bottom, but in this one I will first sand those steps, and then create the relief for the stringers as I did on other models, masking and adding putty in the gaps. But first it's better to close the openings and mask the windows, as quite a bit of dust will be generated, and also to protect the transparencies from slips with the tools:


More puttying and sanding until a good even surface is obtained:


Each stringer relief is done by masking, leaving a narrow gap, and then applying putty. This can also be done drawing the sections between the stringers on masking paper and applying them all at once -again leaving the narrow gaps between sections of paper-, or simply by gluing very fine stretched sprue or styrene sticks, later brushed with some filler and sanded:


Once the tape is removed, a relief remains. This is repeated following the path of the other stringers, which were curved, not parallel to the central one:


I am using the very nice masks and "metal" frames from Arctic Decals, a great complement to this kit:


The nose light lens is drilled. The cavity will be filled with chrome paint to simulate the lamp:

Details are added to the vertical stabilizer. For the rudder weight balance, a small hole is drilled, a metal pin inserted, and white glue added to the tip, to simulate once painted the lead weight. A small notch is cut on the rudder to add the base of the tail nav. light. The fin big rigging hole was plugged and now drilled again to a much smaller diameter:

A coat of primer:


Red and blue benefit from a white base coat to better show a true hue, thus gloss white is applied, without forgetting the struts:

Wings and horizontal tail are painted in an aluminium hue. These will be masked, the red applied, in turn masked, and then the blue applied:


Red masked and blue airbrushed:

Quite a bit of masking tape removed:


The beautiful set of "metal" window frames from Arctic Decals is applied:


The set from Arctic Decals arrived, as usual beautiful, sharp and exquisitely printed:
.jpg)
.jpg)
.jpg)
.jpg)
Starting to apply the decals. As usual Arctic Decals delivers an excellent product, with accurate fit, thin carrier, great color and sharpness. The decals can be moved around -carefully- until positioned, without tearing or lost bits. A pleasure to work with:
.jpg)
.jpg)
Aftermarket photo-etched control horns and leads are added to the rudder:
.jpg)
.jpg)
More rigging in progress. Prop for the home-made wind-driven generator in place:
.jpg)
The new set from Arctic Decals that includes the door and luggage hatch frames has arrived:
.jpg)
.jpg)
Props go in:

To be continued....
One of Heller's best kits and a beautiful airplane, as well. Can't wait to see how the Poirot figure conversion comes out- can you do a 1/72 bow tie? How many scratch built aircraft toilets will this one make? You are indeed the Prince of Plastic Plane Potties! Following the build with great interest, as I think I have two Heller kits.
ReplyDeletePrince of Plastic Plane Potties!?
ReplyDeleteSo you mean I am some kind of royalty? ;-)
Man, those are BIG spectacles!
ReplyDelete;-) ;-) ;-)
Delete