
From the Net, don't remember from where exactly, an archived old magazine it seems:

Every scratch-builder knows that his/her creation would be released by some manufacturer some time after the model is completed. In fact, if you want a kit of your preferred plane, scratch-build it, and down the lane, sooner or later, you will have a commercial rendition of it.
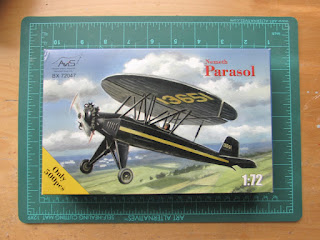
True, the rarer types may take some time to pop... but they eventually do! As the Lee-Richards annular wing released some time ago by Avis proves, and now with the Nemeth Parasol "Umbrellaplane":
My scratchbuild of the Nemeth of 2007:
https://wingsofintent.blogspot.com/2015/03/172nd-scratchbuilt-nemeth-umbrellaplane.html
My scratchbuild of the Lee-Richards of 2006:
https://wingsofintent.blogspot.com/2014/07/scratchbuilt-172-lee-richards-annular.html
Once more, Avis is to be applauded for their bold and
refreshing choices, that I keep buying, building, and collecting. So glad
to see these very attractive, unusual, experimental types made available
to modelers tired of the
same-old, same-old:


I know that the Nemeth is a strange plane, but it couldn't morph into a General Aviation GA-43:


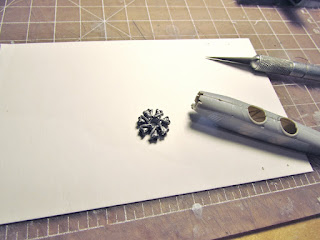
The detail is fair. Being this a short-run kit, there is plenty of cleanup to do, and some of the sprue gates are not in the best places, plus they require careful cleaning after the parts' removal:


Parts removed and cleaned-up:


I have no concept of kit manufacturer, and are completely unfamiliar regarding how Avis conducts their business, but either Avis uses different pattern-makers, or they are perhaps rushing a bit too much to produce the next kit, as some of their releases are really fine, and some are a bit blunt. This one leans a tad towards the latter.
Avis chose not to do two discs to represent the wing, effectively precluding the modeler the option of representing the large SPLIT flap down, clearly seen here in this movie:
https://www.youtube.com/watch?v=ieAIPIsRnCk
More footage:
https://www.youtube.com/watch?v=0lMik-MkUlE

Besides, the flap had its edges were the red arrows are, not where the part ends, and the bits at the ends should be blended with the rest of the wing, as marked by the blue lines:

The instructions' historical blurb holds that the plane flew with a Lambert engine. It did seemingly at the beginning, but was found not powerful enough:

This is how a Lambert looks, it has five cylinders:

And this is how a Warner looks, seven cylinders:


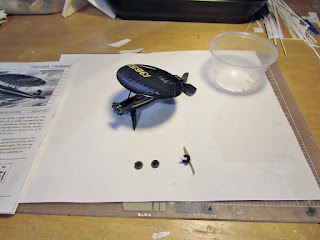
The kit's engine (to the right) looks a bit over-scale, but I have to corroborate this:

I would really like to have that flap semi-deployed as I had it in my scratch, so I proceeded to sand Avis' rendition down:


The bulk of the small sections that are not part of the flap are restored using sanded-down styrene sticks:

The flap is made:

Using the rib detail on the kit as guides, pencil lines are traced on the inside of the top wing:

And then rib detail engraved using a double-bladed Olfa cutter:

And ready:

The instructions are useless regarding the finer points, as explained. These engine parts seem to be intakes, although the real engine had prominent exhausts coming out from each cylinder, absent in the kit. If these indeed are intakes, where exactly the heck do they go?. Furthermore: the most prominent features on the back of the cylinders in photos of the real plane and engines are the pushrods, not the intakes. Could it be that there something was lost in translation at Avis and the parts needed to be reproduced were those exhausts on each cylinder, clearly visible in photos? I guess we will never know...:
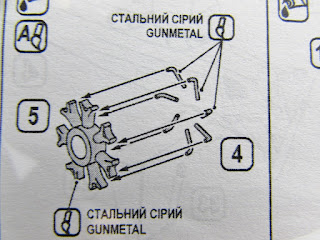
The engine has some little protuberances molded on the back, whilst the fuselage front has recesses (not for those protuberances, but apparently for the "intakes"). Do the intakes go on top on them? between them? from which side of the cylinder? I can only imagine a not very experienced modeler trying to figure this out:

Same for the parts under the engine: do they go on the sides of the cylinders? in front of them? You will need to have a good look at a real plane and the Warner engine to figure this out:

Some interior parts were assembled. The front bulkhead is a bad fit and has to be reduced from the sides, and the bottom corners rounded to follow the real -thick- contour of the inner fuselage walls, not some ideal drawing. These parts are ready for some basic airbrushing now. The instructions do not specify the colors of the inner fuselage walls or bulkhead. Almost nothing of this will be seen anyway once the fuselage is closed and with that umbrella wing on top:


This is (perhaps) how this may be done. The very small J-shaped intakes have no spares (why? would have broken Avis' piggy-bank to add one or two more?) attach to the side of the cylinders, and insert on the grooves molded in the part. This is not really accurate, as those intakes should not just "rest" on the cylinders, but come at a right angle from the side (not the side Avis describes in the confusing and bad instructions, by the way). The parts are a bit over-scale, and may be better to use fine solder and replace them altogether, as it's very difficult to clean the sprue gates and mold seams from them. Set the way are below they "almost" fit into the grooves in the fuselage nose. Those most likely will need a big deal of enlargement for the engine to be glued properly:
This link will take you to a back view of the Warner engine, so you will see what I mean:
The interior is set in place. The tail was rigged, so the locations of the wires are drilled. At this point is useful to bear in mind that the horizontal tail airfoil was "reversed", that is, the curved side was down, whilst the flatter side was up. The kits parts are nice and thin. Locate which side is what, and glue the part accordingly:

The build as it stands this morning. Then fuselage will need plenty of putty and sanding, as the seam is uneven, a common occurrence in short-run kits:


The bottom of the fuselage had an uneven seam, that necessitated quite a bit of filler and then sanding. There is some detail especially at the front end: a panel with louvers, and a little rectangular bit at the center where part of the LG structure attaches. Needless to say it's almost impossible to retain that detail (mostly on the louvers) while puttying and sanding in the amount needed to have a good finish, therefore I decided to obliterate the detail and then re-create it. It would have been ideal if Avis would have provided that fore section as a separate part, and not transected by an uneven seam:


Tail feathers added, and a small styrene disc is punched to represent the fuel cap:

The landing gear assembly is a fiddly thing composed of six parts (not counting the wheels). Be sure to further carve the main legs tips to comfortably accept the wheel axles that come from the shock absorbers, I didn't, and the fit was not good:

And now for the most controversial part of these endeavors: determining the colors from B&W photos and films, when there aren't completely reliable references. For my scratch-built umbrellaplane I followed the plan and colors given by Bill Hannan. Since then I gathered more material, and I think that determination was not completely accurate, and I tend not to believe that Avis suggestion of a silver color for the wing is accurate either. More and more it seems to me that the wing was also black. The photos showing a lighter hue underneath it are perhaps the product of light reflected from the ground, as other parts of the plane (fuselage belly, underneath stab) show the same light hue. Several photos taken from above also point to black, and a narrow band of a lighter tone running longitudinally through the middle. Some types of photos and film could also render red and/or blue as a dark hue, so there is a room for guessing (and getting it wrong), but I deem all the marks to be of the same color (given as yellow). As the painting stage approaches, a decision will have to be made. One of the films and one photo show that the edges of the top wing were repainted in a not very neat manner (more up to where the arm would reach while on top of a ladder). When a I first saw this I thought they were reflections, or even dew, but the movie shows that feature while the plane moves around and the "reflections" don't change a bit, so it's fresh paint or fresh varnish on top of a seemingly faded paint. Copyright potential issues advice not to post here unfortunately the material I got (all from the Net anyway) that illustrates this disquisition, but you could look it up if curiosity takes you there. Decisions, decisions...
A coat of primer, The unusual but beautiful lines of the Nemeth plane are becoming more evident:

The struts are separated form the tree and cleaned up. To avoid confusion, they are laid out numbered:

Meanwhile, looking at photos of the original, it seems that Avis depicted those "exhausts" inaccurately. Instead of a volume akin to a silencer, it looks like the exhaust passed through the carburetor intake, a very common practice to heat up incoming air, thus a small mod will be needed:

Black is airbrushed:

The tail rigging is on, and some detail painting:

The other side of wing and struts are painted:

Now for the big moment, the union of fuselage and wing via 14 struts and one flap actuator. To say that here Avis instructions are too small and vague would be a compliment. The locations of the struts are not all marked on the fuselage, juts six of them, the rest go "more or less there". They are, though, correctly marked on the underside of the wing. I am glad I scratched this plane long ago, as it gave me a clear idea of what goes where. But I used metal airfoiled material then, and not flimsy and relatively fragile plastic, thus had quite a good support to play with. I remember I first used four struts as one would mount a wing on a cabana, and then sliding the rest in position. Not sure here the same can be done. We will soon find out. Or may be I could substitute a few of the struts for metal, and use them to rig the wing and then, as I did before, add the others in place. Hum...
All strut locations are drilled to accept the strut pips (their locations are only marked as shallow dimples in the kit). Four struts are first glued, keeping their upper ends to the correct distances amongst them according to what is given on the underside of the wing (about 16.5mm width and 21.5mm fore-and-aft):

Neither the kit nor me in my previous scratch got this perfect. The kit does not provide a side view to show the incline of the struts, but the fore pair above should lean forward a bit. The two aileron control struts go almost perpendicular to the flight line. I will correct this as much as I can, but not to the extent of having to redo all the kit's struts. Here are two side views (the second spot on) that show the slight disparity between the kit, my previous scratch, and the real thing:


The approach seems to work, here is the wing on.

Cheeking that the wing is aligned properly:


Once the cement is set, the plan is to start adding the remaining struts in pairs, first the ones that go between those already in place, creating the "Ws", then the two actuators, and then the diagonal (looking form the side) ones, avoiding creating stresses. This stretch of the build requires patience and a careful hand. I guess that if all goes well, a reassuring very little drop of superglue at every anchoring point could be a bonus, adding to rigidity. We'll see.
Most of the struts fit ok, just a slight touch here and there, but parts 8, the aileron controls, fall quite short of the mark, and lack the locating pips. The need to be replaced:

All the struts are on, and the decals went like a dream, easy to move around, very solid color, and with thin carrier. Avis even includes one spare for the small fin registration:

In the process I knocked off the front windscreen, which is ok, as its curvature didn't match well the fuselage. Will make another one form the leftovers of the clear sheet.
One thing I am considering doing is adding the curved exhaust stacks, as they can be easily seen in photos. Fine solder and a steady hand shall do.
I fabricated another prop retainer, as the kit one wasn't very good:
Wheels, engine front and prop are added:

Exhausts were fabricated and added, also the ones that replace the kit's parts seen loose above. There is a provision (slot in the wing) for the Pitot, but none comes with the kit, thus one is fabricated:

The model is now ready, and hopefully soon I will be able to photograph it and upload the images in the corresponding separate post.
Imagine all the time you'd have saved if you knew back then these planes will be kitted!
ReplyDelete;-)
Delete