
While doing some research for the previously posted Caudron
C.600 Aiglon
which flew with Mme. Finat, I noticed some photos of the
record variant, the C.610. Basically the same plane, with increased fuel
capacity, the deletion of the fore seat and a revised canopy, plus other
details.
Two apparently were built/converted: the registration that
interested me was F-ANSK, flown by French Elisabeth Lion to some remarkable
achievements. The plane's appearance changed quite a bit during its life, so
check your references.
I am basing my work on some images found on the Net after much researching, and "L'aviation Légère en France", by Roger Gaborieau, a book I purchased and is due to arrive soon.
In this era where we have to endure vulgar, ignorant, twisted disgusting misogynists as presidents, I thought it was only fair to build a second plane flown by a successful women.
I had first to establish a chronology to sort out the many different schemes the plane wore during it's life:
Chronology F-ANSK (const. # 7035)
Beginning at the presumed end of its life, the only certain
deductive starting point possible:
-The plane is appropriated by the invading
forces.
As such it still wore most of its registration, and had a
very light finish, possibly cream, not likely white, or a really whitish aluminium color, and marks in what seems red (which renders a very dark hue in B&W photos). It still has
the spinner and the Ratier prop, as well as the three stripes on the external side of the wheel
pants, and the last known closed cockpit configuration (that looks like a
racer, a bit like a C.430 Rafale's) with "half-moons" extending
the view that coincide with the cockpit opening to the sides). The fore
position is seamlessly erased, not just lidded over.
-Therefore the photos of the plane with Elisabeth Lion
posing with the exact scheme (minus nazi marks) are the last wore by the plane
before the war.
In that configuration a not too prominent "bulge"
can be seen bellow the fuselage due to the tank that provided extended fuel
capacity. In one photo Mlle. Lion is wearing a white mechanics garment, and the
color of the plane seems close to that, possibly a very light cream.
-The configuration that preceded that one, inverts the tones
of the decoration. The plane is painted in a dark hue (perhaps blue), and the marks in a
lighter hue (perhaps silver, although definitely not white), besides changes in the details of
the decoration (different wheel pants motifs, a small French flag, etc). In
this scheme extensive windows are seen in what used to be the front seat area.
Still the closed canopy is there with it's half-moons to the sides. The inversion of the decoration colors is not the product, as some times happens, of ortho and panchro films, to which many other details in the photos attest.
-The configuration that preceded those above had a
different, sort of "fighter" canopy, the fore position closed with a
visible lid, no Ratier prop nor spinner. A tailwheel is present instead of a tailskid.
-In an earlier configuration (July 1936) at the
"12 heures d'Angers" (which were reduced to 6 hours due to weather), the two positions on the plane are open and
have their windshields. The airscoop at the left cheek of the cowl is still there. A number "83" (the age she will pass away,
strangely enough) is visible on wing and fuselage. Mlle. Lion will come 2nd at the 8 liters category.
-I discarded the prop since the variant I want to model had
a Ratier prop with a prominent spinner.
-Necessary additions will be a slim "belly" seen
in photos (extended tankage), a new decal set and a home-made vacuum-formed
canopy.
-Deletions will include the fore position and the intake
normally seen at the left cheek of the engine cowl.
As you can see this an adaptation that doesn't require
special things, and just involves normal skills and renders a model with an interesting
"racy" appearance and remarkable historical significance.
The review and build of this really nice kit was posted here before, so I will refer you to the link at the beginning for details regarding that.
The parts are again easily separated from their casting blocks and cleaned up. To the right the group of parts that won't be used for this modification:


The belly tanks is made from styrene:
 A copy is vacuum-formed:
 And trimmed to the fuselage:
 The interior is given a generic color:
 Details are painted by hand:
 Seat belts (I did not use the ones provided with the kit, although I used them in the first kit. They are not that flexible):
 Ready to add the other half (always check the fit before gluing, I had to shave the inst. panel a bit):
 Nose and tailcone are added in a snap. I have to decide now if I go for the version with windows on top of the fore fuselage (earlier) or the one that as that area smooth (later). For the latter the lid provided with the kit can be used (and then sanded flush), but for the former a section of the top front fuselage could to be removed and replaced with a simple curved clear part that is masked for the windows. Therefore I'll wait a bit until I can review my references:
 A Ratier prop with its spinner is scratchbuilt. The prop turns clockwise looking at the plane from the front:
 Assuming that I am correct in my choice of colors for Mlle. Lion plane -in the later version I am building- (cream and red), The kit's decals are easily adapted shuffling around just a letter.
(I realized later that the "K" from the other reg. is slightly smaller and the hue is a perhaps a smidgen darker, but no worries, the "N" is easily converted in a "K" by just cutting it in segments and rearranging the components of the character):
 Headrest and front cockpit lid are added. The latter to be sanded flush, and used here only as a gap-closing device:
 Front cockpit lid sanded down:
 The vacuum-formed canopy in place and trimmed:
 The recess for the airscoop needs to be filled, it's absent in this version:
 The footrest relief has to be erased for this version:
 Tail feathers in place. If your clean-up is good, the fit is perfect:
 Wings are added. I have only two suggestions for this kit: the flap line should be engraved on the fuselage bottom, since it goes all the way (no two separated flaps, just one piece flap), and better locking devices for the landing gear legs, which do not positively lock in place:
 Ready for the primer. Sliding rails for the new canopy still to be added, as well as two minute details over the nose:
 The tailskid locks in place in its recess impeccably. The same solution could have been utilized for the landing gear legs.
With everything in position, it's time to apply primer:
 Primer on:
 The cream base color is airbrushed, so is the red on the spinner and the black on the prop blades (these will later be masked and given aluminium color on the front):

 All the parts are ready now:
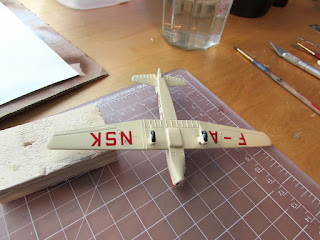
 Decaling begins. As I commented on the first build of this same kit, decals are extremely thin, and require the most careful handling. Thin decals are very good, since they really stuck to the model, and for the same reason they have to be very carefully applied. A couple folded on me, but somehow, don't really know how, managed to make them good. In one photo on the Net I found out that this plane had that diagonal flag strip at the wing tips, so I used the kit ones from another option, and they fitted just right, in spite the images went on the fuselage for the other version. Extra fuselage red stripes came from the spares bin.
 The wheels and Pitot tube are added. The extra fuel tank is visible too:
 The new prop is assembled and home-made Ratier logo decals are added:
 The leading edge decals are again taken from the kit's set for another version.
Let the decals' adhesive soften completely, that will help you with a "soapy" layer to move it around a bit. Wet the surface where you are applying them. Long decals like these ones are especially tricky.
Very thin, "professional" decals are truly desirable, but require utmost care during application:


(I realized later that the "K" from the other reg. is slightly smaller and the hue is a perhaps a smidgen darker, but no worries, the "N" is easily converted in a "K" by just cutting it in segments and rearranging the components of the character):


With everything in position, it's time to apply primer:


Let the decals' adhesive soften completely, that will help you with a "soapy" layer to move it around a bit. Wet the surface where you are applying them. Long decals like these ones are especially tricky.
Very thin, "professional" decals are truly desirable, but require utmost care during application:

To be continued.....
great article, thank you
ReplyDeleteA pleasure, glad it may be useful.
DeleteCheers