
http://wingsofintent.blogspot.com/2017/08/the-british-heinkel-g-adzf-icm.html
Three things differentiated the "British" Heinkel
He-70 from the original one:
1) A different nose with a different engine
2) The covers of the retractable landing gear are partially
different
3) It didn't belong to the freaking dumbhead nazis

Different accounts exist on the details and development of
the acquisition by England
in 1936 of a He-70 passenger plane, before all hell broke loose a few years
later.
You can find the stories with the browser of your
preference. The fact is that England acquired a He-70 but had to send a
Rolls-Royce Kestrel to be installed on it in origin as the builders
-predictably- refused to send their plane as it was to England (with its BMW
engine) to be motorized there (they all felt the dark clouds already looming).
This was no doubt a sort of intrigue gimmick, but the plane
finally arrived to Croydon with a Kestrel -in route to Hucknall- with its
British registrations.
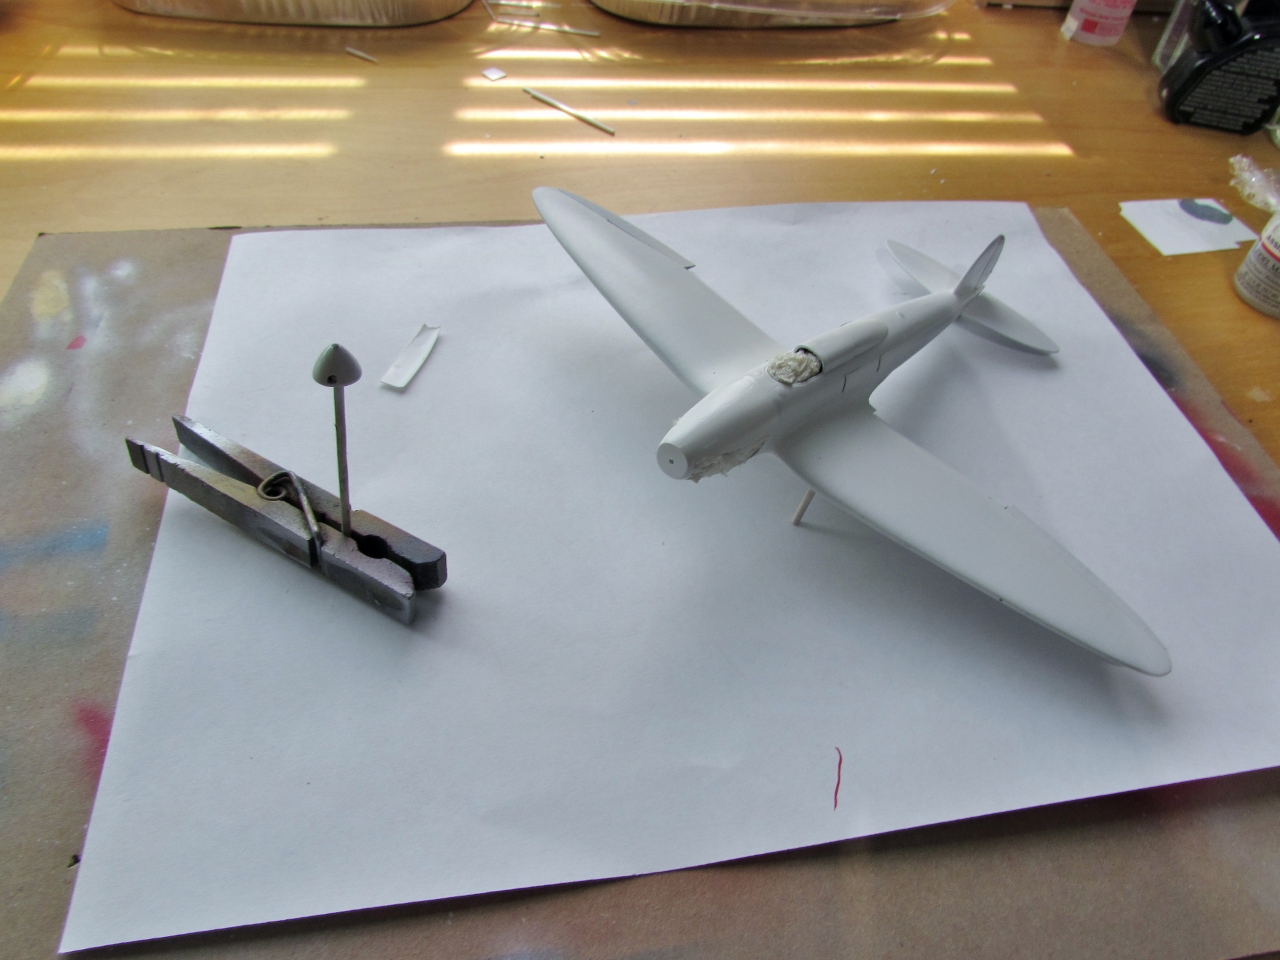
Long ago I used the old Matchbox/Revell kit to build the civil
passenger version, but the sight of an ICM kit enticed me to build this unique
machine, G-ADZF, also spurred by the recent conversion of the old Williams
Bros. Northrop Gamma kit into two differently-shaped planes, by changing their
noses and other details:
All this lends the expression "Plastic Nose Surgery"
a whole new meaning.
Nice of ICM to release once in a while a civil plane.
The kit, well-known by now, is a newer -and therefore better-
kit than the venerable Matchbox/Revell rendition, but, as always, there is a little room
for improvement.
As said above, the lowest part of the wheels' retractable covers should be
appended to the outer side of the wheel bay, instead of folding at 90 degrees
of the leg cover as in the other machines.
The new nose was obtained via a carved basswood master used
to plunge vac shells on the Mattel Psychedelic machine. I got a resin Engines
& Things Kestrel to see if I can get to show some of it by removing a nose
panel, as I did with the Hawker Hart racer.
I also plan to pose both doors open. We'll see how all this
goes.
The very good news:
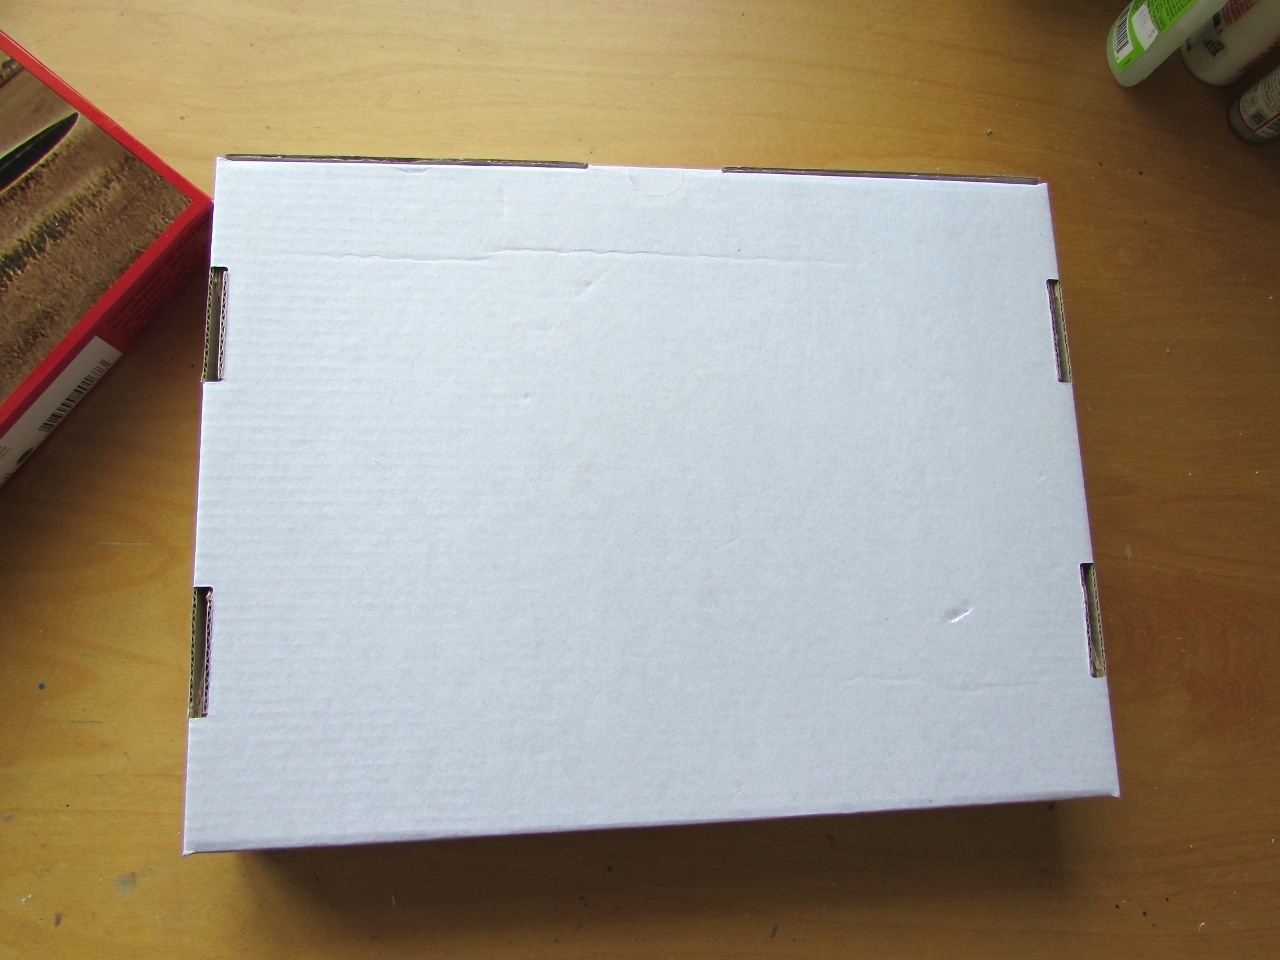
The ICM kit comes in very sturdy box with the addition of a
lid cover. I do appreciate this kind of box since as we all know it protects
the contents much better than the pre-crushed flimsy thin packaging used by
some manufacturers.
The molds as said are much better than the Matchbox/Revell old
release, and include wonderful surface treatment as well as many detail parts.
The engineering is innovative and we'll see how it plays in
the actual build.
The parts come separately bagged and the transparencies are
clear and clean. The injected plastic is free of fuzz and flash and the sprue
gates are reasonable small.
Now the not-so-good news:
The decals (that have small lettering rendered blotchy), for some
reason I can't fathom, are absolutely dead matt in finish, whilst the real
planes had a subtle shine clearly appreciated in photos. Not only that, but
instead of printing the "thunderbolts" in their appropriate color,
they are rendered as clear spaces amidst the black decals, that you somehow will have to
match or mask in order to paint the surrounding nose black too.
The instructions unfortunately committed the silliness of using a faint and fuzzy gray scale for the drawings, that fuses the
detail in an undifferentiated gray mass, and makes everything confusing,
rendering most of the diagrams useless. Really, guys, don't you check your
galley proofs?
Summarizing:
A welcome civil release, fairly priced, and exceptional kit, of innovative
engineering, well packaged, with superb detail and moldings, BUT where all graphic
components (instructions and decals) are barely useful.
A welcome sturdy box:


Look carefully at the wheel well frame, and you will see that unlike the lower wing, it ends flat to the exterior. That is exactly right for this British version. The lower wing round cutout will have to be trimmed to follow the frame, and the wedged wheel cover used instead of the half-round one:


The level of surface detail is very high:


 The nose is cleanly and carefully chopped off:
 Interesting interior detail:
 Both doors outlines are marked internally:
 But only one is marked externally, since this mold serves other variants:
 Let's have a good look at the pilot's door, since it will be obliterated and then re-created:
 Two doors cleared for the fuselage side:
 The Kestrel engine, just in case I feel like:
 The multi-part center wing section assembly goes well.
You could now (or later as I did) remove the plastic area on the lower wing to follow the contour of the frame to the exterior):
 The seating area is a bit simplified, and an ejector mark needs to be erased:
 The nose outline is sketched:
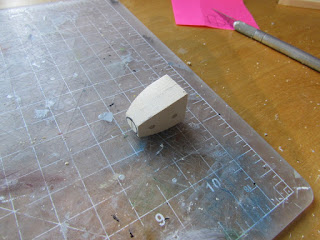
 The basswood blank is marked for cutting:
 The plane being depicted here had two seats in the cockpit, staggered. The pilot's seat is there, the kit's provided second seat (marked as unused in the instructions) shall go about where that "little box" is, behind and to the right of the pilot. You can see in many photos a "guy in back" peeking to say hi behind the pilot:
 The wing tip halves are glued, notice that there is small "spar" that has to be glued before joining the two halves:
 That's the short spar peeking:
 Smaller parts are cleaned up. The Engine & Things resin engine can be seen there too:
 Work on the wooden nose plug continues:


 Be aware that this plane was used as an engine test-bed, and the shape of the exhausts and minor details varied (as with the Merlin engine, for example). I am representing it as it arrive to England, with the Kestrel:
 As I started to try the fit of the sub-assemblies, I found it to be reasonably good, but some areas required adjustments (some sanding and/or elimination of the pips) especially in all the bulkheads, some of the highest points on the wing structural frame that get in touch with the fuselage sides, sides of the cockpit pan, etc). Just check before gluing, as usual. The engineering is good, and only needs some sanding to improve the fit, otherwise you will end up with gaps.
Here some details are being added:
 A bit of the ceiling too so I can later add the lights:
 Parts are readied for airbrushing, the wheel well interiors, seating area, cockpit, and cabin, with different colors:
 The parts from the clear sprue pertinent to this version are excised and washed. You can see the passengers' door provided as clear part whose window you have to mask. I will have to scratch a cockpit's door, since I removed it from the fuselage side:
 The lost door is reproduced with styrene sheet and strips:
 The small circular porthole is drilled:
 Some color is applied. The cabin color will follow:
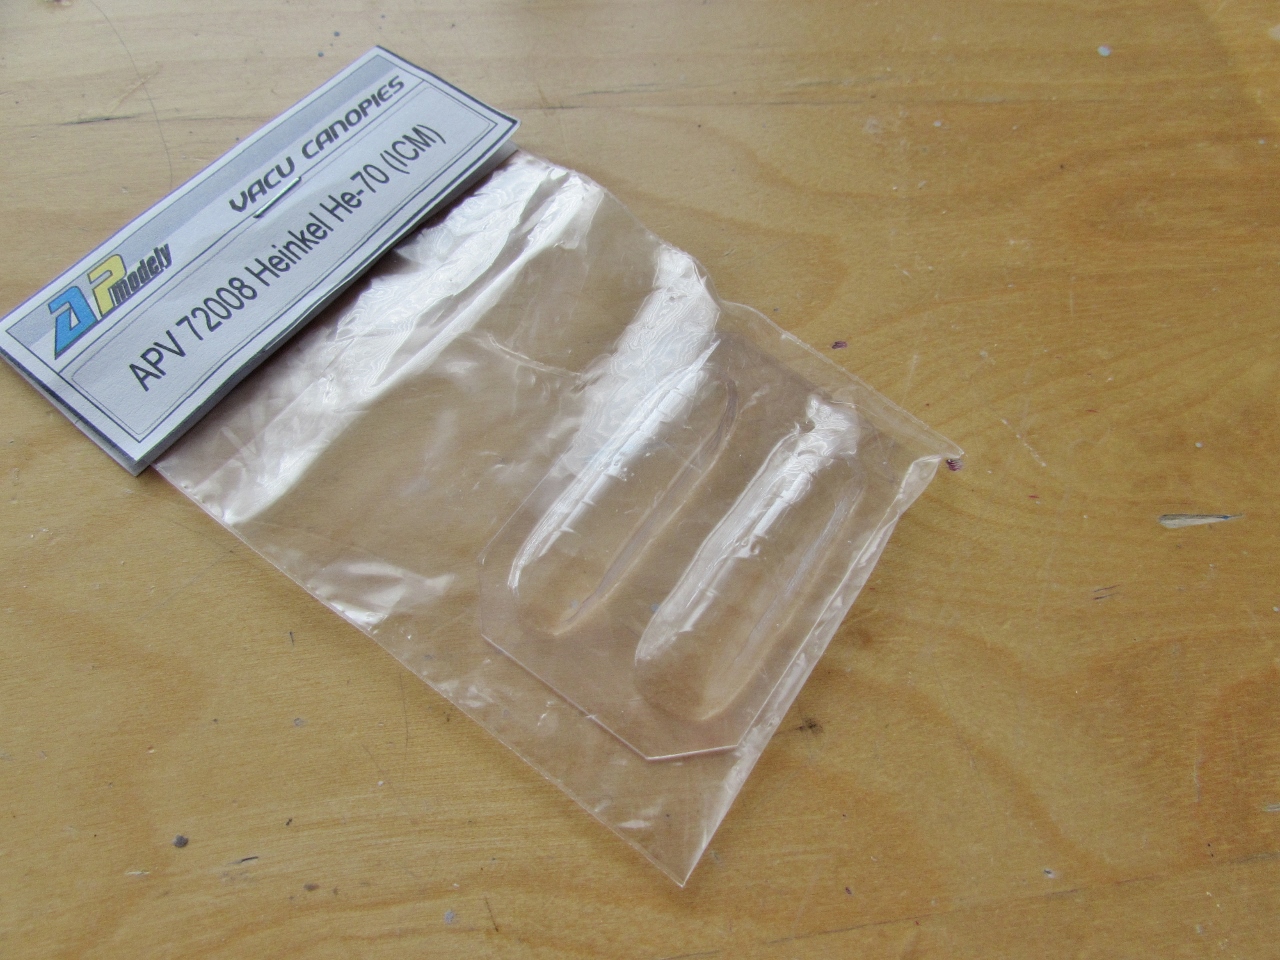
 Just in case, I purchased a vacuformed after-market canopy, although the kit's transparency is very good:
 The back side of the clear inst. panel is painted black:
 On the other side, the instrument recesses are given a dot of white glue, as a mask:

 The wing panels are joined to the interior of the fuselage. This left a seam not easy to deal with on the underside, where external and internal wing surfaces meet. I think the lower half of the wing should have been a whole piece. This seam is bad engineering, not sure if dictated by mold size:
 The new door can be seen:
 Other colors are airbrushed, and also painted is the cabin clear door (whose window has been masked) and the instrument panel face (which was the light color, not black):
 As said about, not the cleverest of engineerings. Here is the seam I mentioned before:
 Not easy to fill undetected. Perhaps the panels should have reached to where the arrows are bellow? Or may be there was a technical imperative we are not aware of:
 The interior with the added details (structural detail, lights, belts, added cushions on bulkheads as per photos) is ready. The passengers' cabin door was mistakenly painted the cockpit color, but has been corrected since:
 The seating area and the inst. panel are glued to one side:
 The fuselage halves are joined and the fit was great:
 The wing panels' seams have been dealt with; primer will show any needed touch-ups:
 A dry run shows a good fuselage/wing fit:
 Part B-15 is not necessary for this version, if you were wondered for hours like me what the heck was that. They forgot to blank it out in the instructions.
The tailcone/stab/rudder device works very well, aligning all the parts, this was an intelligent engineering solution:
 The fit of the windows was the best I have seen in my decades-long modeling life. They are just pressed in place, with no stress, just the right amount of pressure and they lock in. Thanks, ICM!:
 Same for the other side, perfect fit:
 The nose is ready to do some vacuformed trials:

 Wing and tail now glued in place, putty is needed for some areas:
 Shape of wheel well corrected for this version:

 The nose cone vac copies are pulled:


 Some clean-up:
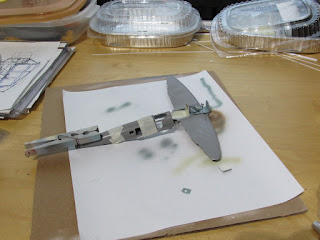
 And now working on the structure. An aft bulkhead, a front bulkhead, engine beams. I am not sure at this point if I will include the Kestrel engine or not, but I make preparations just in case:

 A first coat of primer is applied:
 The new nose with the engine inside is completed, save a few details. As said above, a panel was left open:

 So with some moderate effort the new nose is ready to go in:
 The nose in place:
 Photos show a very visible separation on the nose/fuselage seam, almost as if the purpose was to provide some additional venting to the nose, so it shouldn't be hid too much:
 The beautifully done control surfaces are added:
 A new spinner and prop are fabricated:

 The kit provides as said the two styles of wheel covers. For the British version you have to curt off the external rounded part of the covers, and use the wedged ones on the modified well:
 The level of detail on the surface of this kit is frankly amazing:

 Tailskid, radiator, antenna, Venturi, all in place:
 After some additional priming, the model is ready for its coat of paint now:

 The grey-silver color is applied. This was a custom mix:
 After masking the black color will be applied:
 Using the Arctic Decals assorted masks sheet the wheels were masked and painted:
 The front side of the prop blades are painted polished aluminium:
 Masks for the canopy were purchased:
 Masks applied:
 Masks removed after airbrushing:
 Some details that go underneath are added, like trailing antenna exit, airscoops under the cowl, a small reinforcement for the tailskid, and antenna, etc.:
 Model masked and black applied:
 Masks removed. Bottom view:
 Top view. The part of the thunderbolt that goes on the nose will be made with decal stock painted in the fuselage color. I did not mask the bolt because the chances of it coinciding with home-made decals for the rest of the fuselage were minimal:
 Readying the parts and doing some detail painting. The landing gear is complicated and extraordinarily fiddly, a fact that becomes apparent only when its assembly is attempted. It will not "lock in place" but will keep trying to glue and align several parts at the same time, that do not show any inclination for making your life easy :
 Some metal panel seen in photos is represent by a decal:
 Again, this landing gear, which is well-detailed and well-molded, is nevertheless quite a nightmare to put together and align. Something could have been done to better secure the pin-and-hole locking devices:

 Four more parts that represent the wheel covers are glued:
 The canopy and the Pitot tube are glued in place:
 The partially-visible engine is given a wash, in preparation for some dry-brushing:
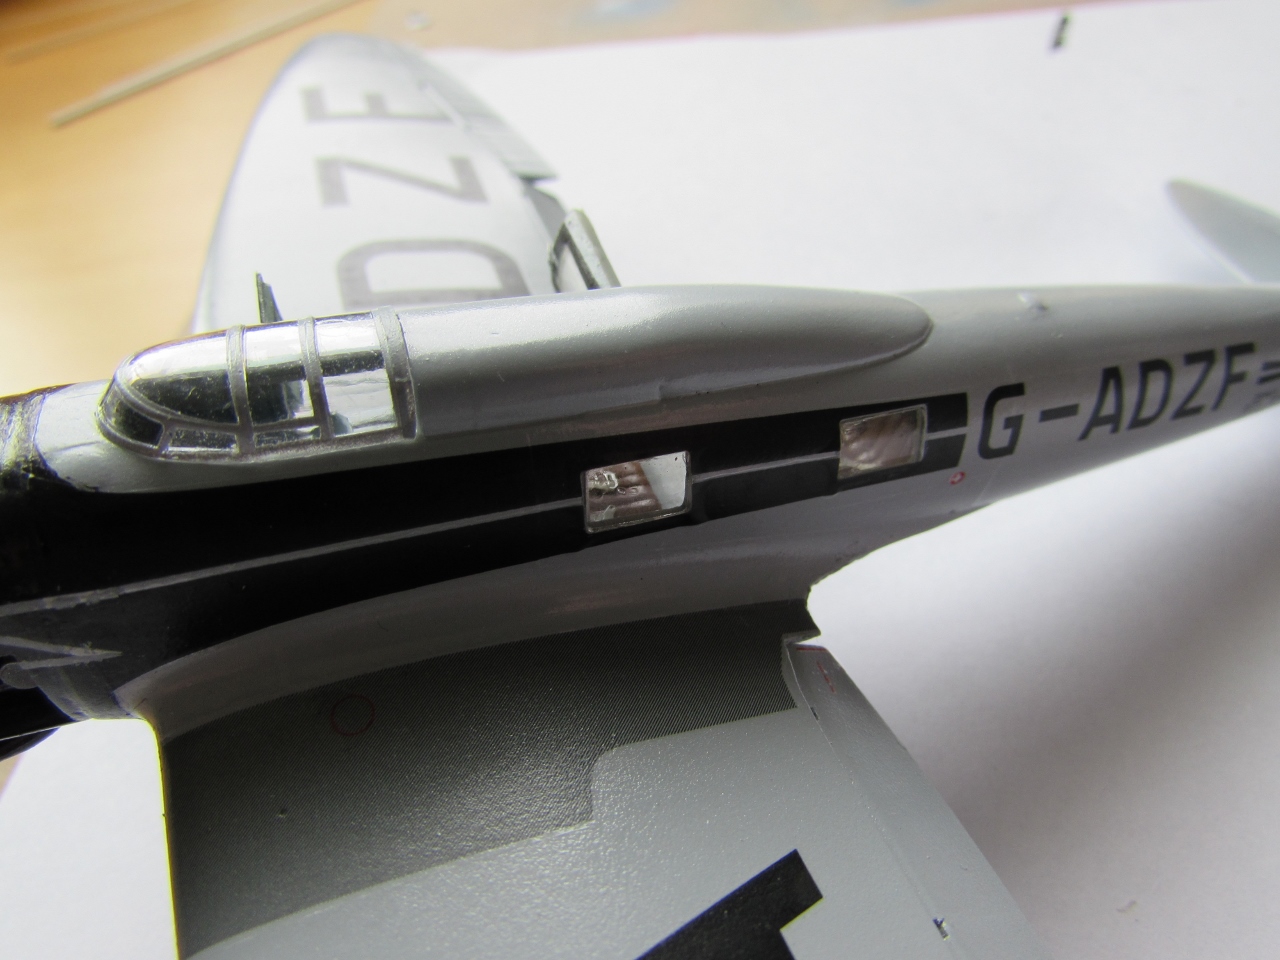
 Decal application on the way. I am using a set from Arctic Decals which includes the British registrations, the walkways, and corrections for the rest of the images:
 '
'


The level of surface detail is delicate and extensive:


You could now (or later as I did) remove the plastic area on the lower wing to follow the contour of the frame to the exterior):


Here some details are being added:


Once the face is painted the interior color and the white glue removed, you can see the black background through the clear part. This is not really my preferred take on instrument panels, and I rather have a photoetched and film solution, but it works:


The tailcone/stab/rudder device works very well, aligning all the parts, this was an intelligent engineering solution:


The shells are cut using the wood masters as a guide:


Nice choice , sir- I believe this was always thought to be the inspiration for the Spitfires wing planform
ReplyDeletebut very cool choice.
Great so far!
Dear Keith, thanks.
DeleteAlthough the known "rumor" that the Heinkel was the inspiration for the Sptifire's wings has been long debunked. There were a plethora of other elliptical wing planes all over the world well before either. You can easily corroborate that. Woody Allen famously said: "diplomacy and reason always fails with nazis, but baseball bats are doubtlessly effective."
Very interesting....., Armando Gil.
ReplyDeleteA ver si lo podemos terminar, estoy esperando las calcas ;-)
DeleteSuperb finish of a really obscure but very interesting model.
ReplyDeleteYou are very kind, Herman, thanks.
Delete