
https://wingsofintent.blogspot.com/2019/03/lvg-cvi-kabine-passenger-conversion-172.html
Kabine conversion, anyone?

The combination of historical significance and aesthetics
provides already a field: the post WWI conversions of machines by demilitarization
and some simple adjustments or addenda for the new role, sometimes in the guise
of "put on" passenger cabins.


Those who visit these pages know that I have done a number
of those, many of which work on the more or less simple expedient of scratchbuilding
the needed cabin parts and create or commission new decals, that is: doable for
many modelers.
Most recently I have finished a Rumpler:
But also a very long time ago there were other projects like
the Hawa F.3 (scroll down once there to get to subject):
and the Hansa:
It is not a matter of slapping a cabin on, you have to do
your homework to pick up other details that usually change, and then work on
the alternate decoration.
To me, there is a lot of satisfaction involved in changing the intent
of a machine from killing to more civilized roles, like passenger transport and
such.
The new KP kit looks certainly good, like the recently built
Avia B.H.11.
The detail is good, the instructions are good, the molding
is clean and the subject has potential for many civil post-war conversions. The
price is fair. No photo-etched pars are included but some alternate parts
are included (for the spares bin ;-)
Dear friend, modeler and patterner extraordinaire Matías Hagen (the link to his site is in the side bar of the blog) from Argentina, made this resin Benz IV, which is a beautiful, accurate and clean cast. The kit's engine is quite OK, but this is certainly better in my eyes, and what I will be using:


A note: in fact the drawing at the beginning with that "faceted" cabin is a Raab Katzenstein RK.8-built C.VI (D-1216) described almost invariably as an LVG.
It is the one of three cabin civil conversions -that I am aware of.
The civil LVG C.VI, also called P.I and P.II came in one instance with two windows and in another with three windows (the one I intend to build).
"-What do think, doctor, I believe the incision on the patient should be on the natural panel lines."
"-I concur, doctor"


"-Yes, with a diet of more styerene and liquid cement all shall go well."


The passenger version had a different, larger, lobular rudder, so the kit's one is separated:
 New rudder:
 Engine, tank and exhausts painted:


The fuselage halves are glued together:
 The decals, frames and masks arrived from Arctic Decals of Finland. The basswood block that is the base to carve the plug to vac-form the cabin is seen:
 The block is gradually shaped:
 The vacuformed part is produced:


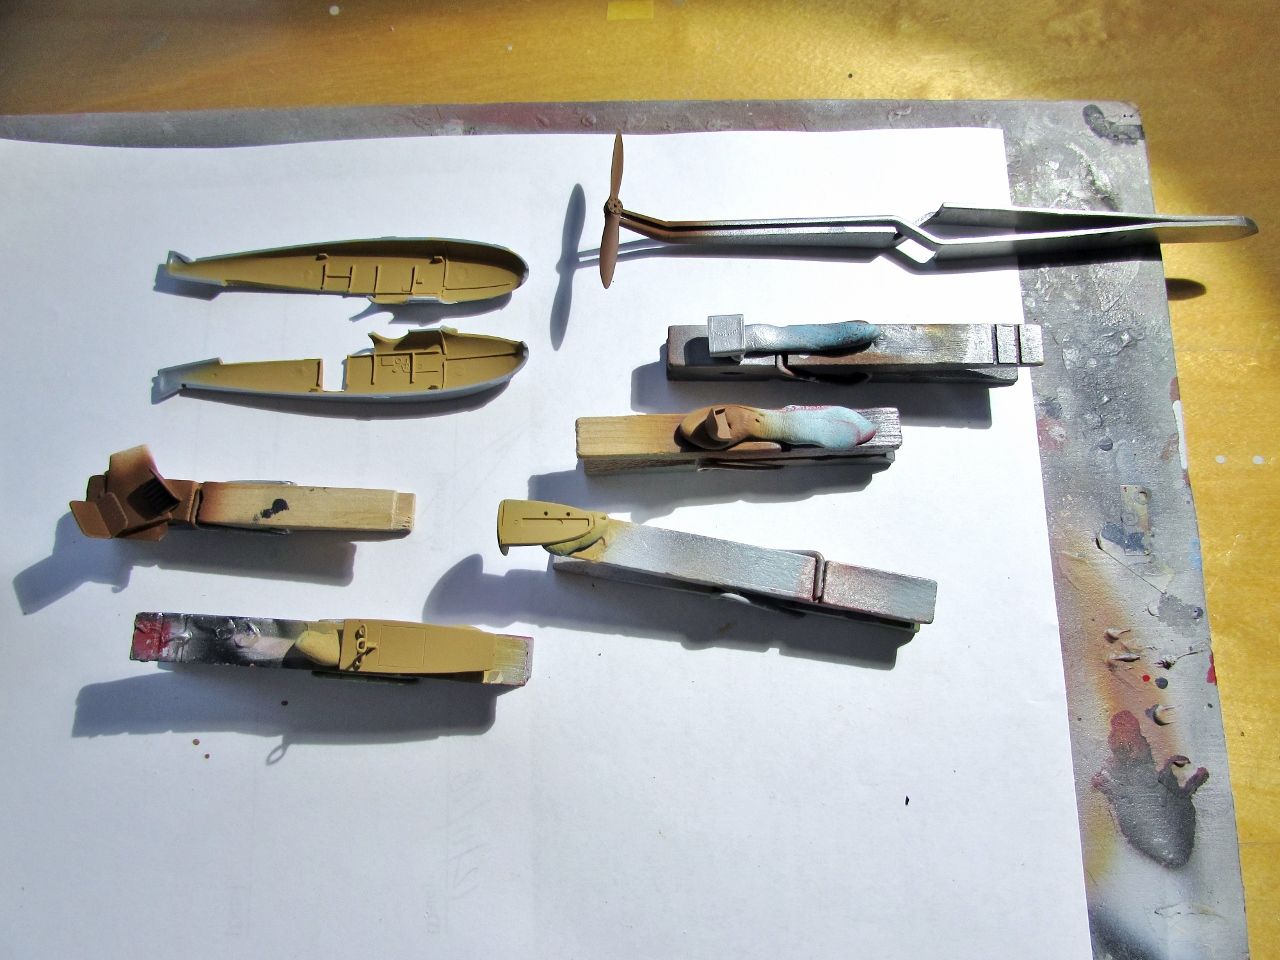
 Meanwhile metal control horns are inserted in rudder and elevator, and parts are prepared for an airbrushing session:
 Canopy is dry-fitted to be able to measure and cut the door out.
A clear door is made from thick plastic. Windows will be masked using the Arctic Decals mask set and then all painted:
 The kit correctly portrays a cut in front of the aileron, where a lever/actuator has to go, though, that will need addition. The LVG had a different than normal way of actuating the ailerons:
 The cord wrapping around all wing struts is exaggerated in the kit, and completely absent off all photographs I have of the civil machines. So it is almost completely removed, in case it was ther but painted over (rendering a much subtler and realistic effect.
Bear in mind that in the plane I am modeling all struts were the fuselage color (very light grey) and not wood, so don't autopilot, look at photos, that always somewhat, for some reason, unfathomable no doubt, relate better to reality than drawings or written accounts:
 The cabin area is given some off-set flanges to give some support to the transparency:
 The landing gear legs are butt-joined, but I decided to insert anchoring metal pins in the back legs, just a a precaution:
 A few parts are given a base coat of paint:
 The vertical tail is glued on and the canopy is masked to deal with its seam. Fortune favored us this time, and the seam was quite good naturally, plus it is the color division line, being the upper part black:
 The landing gear is installed at this time:
 The Arctic Decals masks are applied to the canopy:

 A coat of primer to spot potential blemishes. The interior of the masked door is painted at this point:
 What a pleasure it is to work with a good kit, and how different to the struggle a bad one is.
This is a jewel, one of the best kits I have built lately.
A good kit, however, does not per se solve all the problems and sometimes we need to remind ourselves of the basic principles, and this case is no exception: I had forgotten to wash the parts and therefore the paint on the wheels was lifted by the masks I used to paint the tire, so I had to strip the paint (in no time, easily with an immersion in Simple Green for a couple hours). So I washed all remaining components in anticipation for the paint stage. You may notice that the cabane struts are glued to the upper wing, as well as the water intake for the wing radiator:
 Painting proceeds:
 Painting of the other side of the flying surfaces follows, as well as the black paint on the upper fuselage and cabin access door:
 For some complex curves, wheels, and difficult to mask places (like the chin under the nose of the fuselage in this case) I resort to commercial masks, here are some from Arctic Decals and a "canopy survival kit" that have proved quite useful:
 The masks are off. The small windows facing the pilot are a tad speculative: they can barely be seen only in photo I have, and there is no doubt that windows are there, but the shape is imprecise, and I made my best guess:
 The door is prepared, as well as the tailskid:
 The door is further detailed and the cabin curtains are prepared.
The locations for the aileron control cables are drilled on the wing:
 The only real criticism I have for this kit, and it is well-deserved, is that the location of the upper wing cabane struts is not defined or guided anywhere on the fuselage surface. This is a mistake that could have been easily avoided by making small dimples or depressed areas where the struts would rest. The cabane struts are beveled where they join the fuselage, but that's absolutely insufficient to make for positive alignment and locking. Same goes for the landing gear legs/fuselage join, quite vague and insecure. This produces hesitation and uncertainty at the critical moment of gluing the parts, and most likely some glue smears.
I know now that for the next one (I have two more) I will carve on the fuselage the anchoring points of those elements to achieve positive location and alignment, and a better, firmer, glue joint:
 Stab goes on, the absolutely beautiful lines of this design -enhanced rather than encumbered by the passenger's canopy and increased area rudder- start to appear:

 The lower wings and struts are glued in place, a task that requires attention.
As said above, the fact that the upper wing cabane struts do not lock positively on anything, may produce problems: if located low, the struts will be too long and will force the lower wings down, if too high, struts will align only in one pair, either exterior or interior. I was lucky and had almost no issues, but had to very slightly sand one end of the struts to get a good fit. The struts here will be the variable to adjust in any case, so take care not only of how high or low you glue the upper wing, but also which incidence. The lower wings have some play in their sockets, allowing some moderate change in incidence too:
 Rigging commences:


A clear door is made from thick plastic. Windows will be masked using the Arctic Decals mask set and then all painted:


Bear in mind that in the plane I am modeling all struts were the fuselage color (very light grey) and not wood, so don't autopilot, look at photos, that always somewhat, for some reason, unfathomable no doubt, relate better to reality than drawings or written accounts:


This is a jewel, one of the best kits I have built lately.
A good kit, however, does not per se solve all the problems and sometimes we need to remind ourselves of the basic principles, and this case is no exception: I had forgotten to wash the parts and therefore the paint on the wheels was lifted by the masks I used to paint the tire, so I had to strip the paint (in no time, easily with an immersion in Simple Green for a couple hours). So I washed all remaining components in anticipation for the paint stage. You may notice that the cabane struts are glued to the upper wing, as well as the water intake for the wing radiator:


The locations for the aileron control cables are drilled on the wing:

I know now that for the next one (I have two more) I will carve on the fuselage the anchoring points of those elements to achieve positive location and alignment, and a better, firmer, glue joint:


As said above, the fact that the upper wing cabane struts do not lock positively on anything, may produce problems: if located low, the struts will be too long and will force the lower wings down, if too high, struts will align only in one pair, either exterior or interior. I was lucky and had almost no issues, but had to very slightly sand one end of the struts to get a good fit. The struts here will be the variable to adjust in any case, so take care not only of how high or low you glue the upper wing, but also which incidence. The lower wings have some play in their sockets, allowing some moderate change in incidence too:


To be continued.....
No comments:
Post a Comment